
Welcome to another edition of Art of Eorzea. This is the sister column to ‘Echoes of Eorzea’ and is dedicated to the artistic side of Final Fantasy XIV. In this series have already covered ‘Screenshot Basics’ and an ‘In-depth Depth of Field’ guide, however, within the very first article I specified that I’d be exploring many aspects of screenshot photography, expanding on each area, such as DoF, color theory, framing and lighting.
To ascertain what would be the most useful subject to cover next in this series, I asked the FFXIV community on Twitter by use of a poll. The highest percentage fell upon the creation of a ReShade preset guide and, as ReShade very heavily falls into the creative side of gaming, it’s a very worthy subject to be covering in my opinion. I really hope that this article can be of some use to you on some level. If you don’t know what ReShade is, the following articles may be of some use:
ReShade Install Guide
ReShade Settings Guide
ReShade Depth of Field Guide
Before I continue I would like to take a moment to emphasize that I am no expert, and any creative opinions are entirely subjective (my experience can be found here). The following advice and tips are just explanations of the way I do things, they may not be perfect in the slightest!
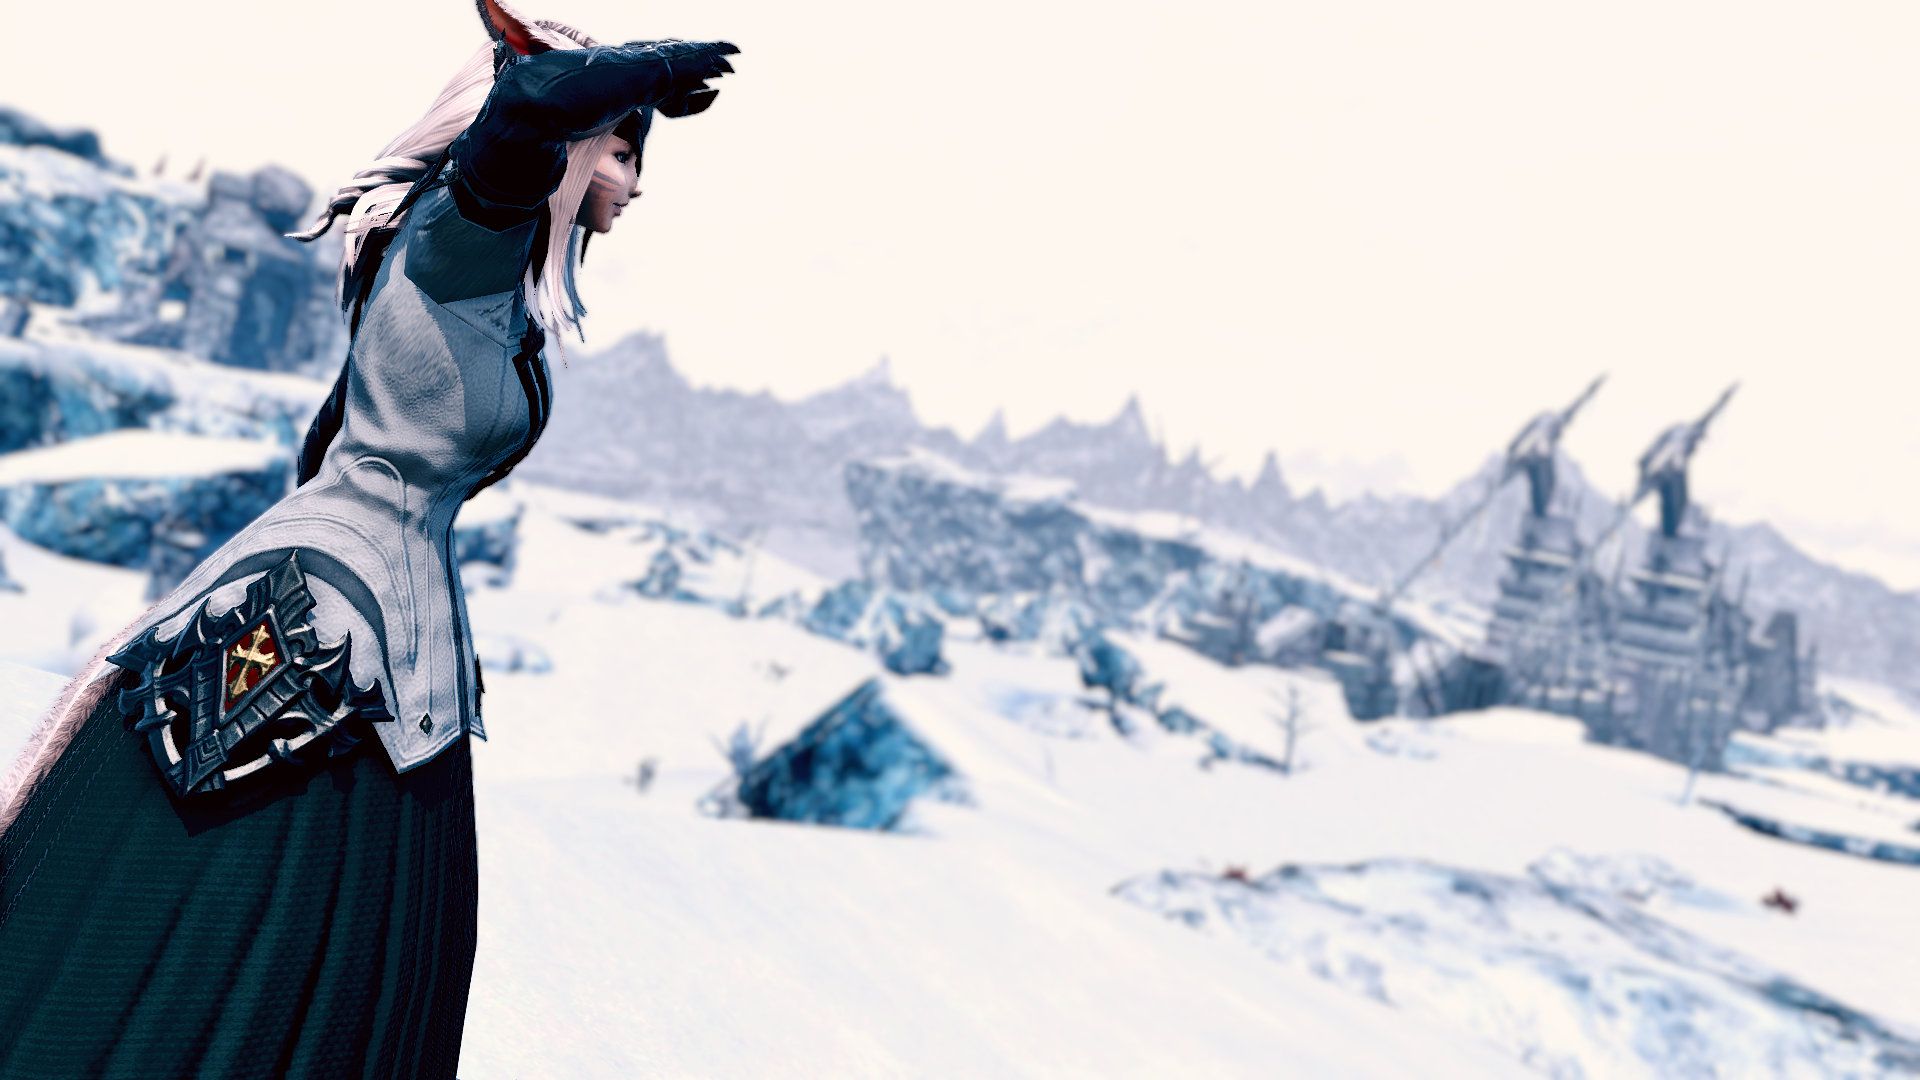
 Late afternoon in La Noscea.
Results will vary based on time of day, character clothing, hair color, skin tone, weather, how vivid the color in the environment is and many other factors. I’ve tested the preset in both day and night conditions and it ‘seems’ to work well (unless the light is too bright). Hopefully by the end of this article you will know enough to be able to adjust your filter to suit your environment.
Where to begin?
The first thing I think of when beginning the creation of a filter is an imagined ideal end result. Do I want it to look autumnal, or stark, or suitable for portraits? With the help of the new Group Pose time-stop feature, creating filters suited to environments has become a lot less stressful as you can now pause the time of day when entering GPose.
Today I will be starting with my usual filter basics and then leave you with some optional extras which will allow you to easily tweak the look of the filter.
Tip: Keep in mind that, even though you create your filter for a certain environment, you can test it out alongside the GPose filters and various lighting environments to see if it becomes more versatile.
Basic 10 Step ReShade Filter
SHADERS
For each shader I mention, I will reference the description from the ReShade Settings Guide (or summarize it) alongside my own comments if applicable. Ideally, this will be a basic environmental filter which will emphasize color, contrast and image depth with slight sharpening.
For the sake of comparison this preset was created at the Last Vigil in Ishgard.
Important: Please remember to disable GPose 'Depth of Field' setting before creating any sort of filter preset (it will throw off your DoF and sharpening).
The video above shows the before and after stages of this ReShade preset as well as some of the variables each shader can achieve. Sadly my screen recorder (Action!) crashed the game six times while trying to film the creation live, so I had to go back to film afterwards with OBS (and pray Ishgard weather conditions didn't change). The best I could do was to deconstruct and reconstruct the filter to show you how the layers build up, I do apologize that there was not more. Should you not be able to discern the settings from the screenshots, they are available within the video. I have tried to not go over the top with the filter and maintain a relatively 'neutral but enhanced' look, though I'm not sure if I succeeded or failed in that regard but I hope you like the results. ### ONE | MXAOMXAO is at the top of my list because it gives me a good idea where character and object shading is going to be, then when it comes to adding in the contrast and brightness in other shaders. This way I’ve got a good idea what I’m working with and I won't go overboard on the shadows, which could create very heavy and jagged lines.

Description: In Final Fantasy XIV ReShade, MXAO creates a very noticeable difference between images, creating depth and shade.
“MXAO can both apply little shading almost for free or heavy shading for screenshots to completely change the look of the scenery.” Source.
Keep in mind that this is an environmentally dependent preset, so one set of values may work for certain hairstyles, yet for others, you might have to pull the slider to the opposite side and lessen the intensity to create a more subtle effect or compensate for certain shapes. The most important slider here is Sample Radius (determines where the shadow will sit), so set that first before altering the others.
TWO | Adaptive Sharpen
Next, let's sharpen the image a little to provide slightly cleaner lines and emphasise features.
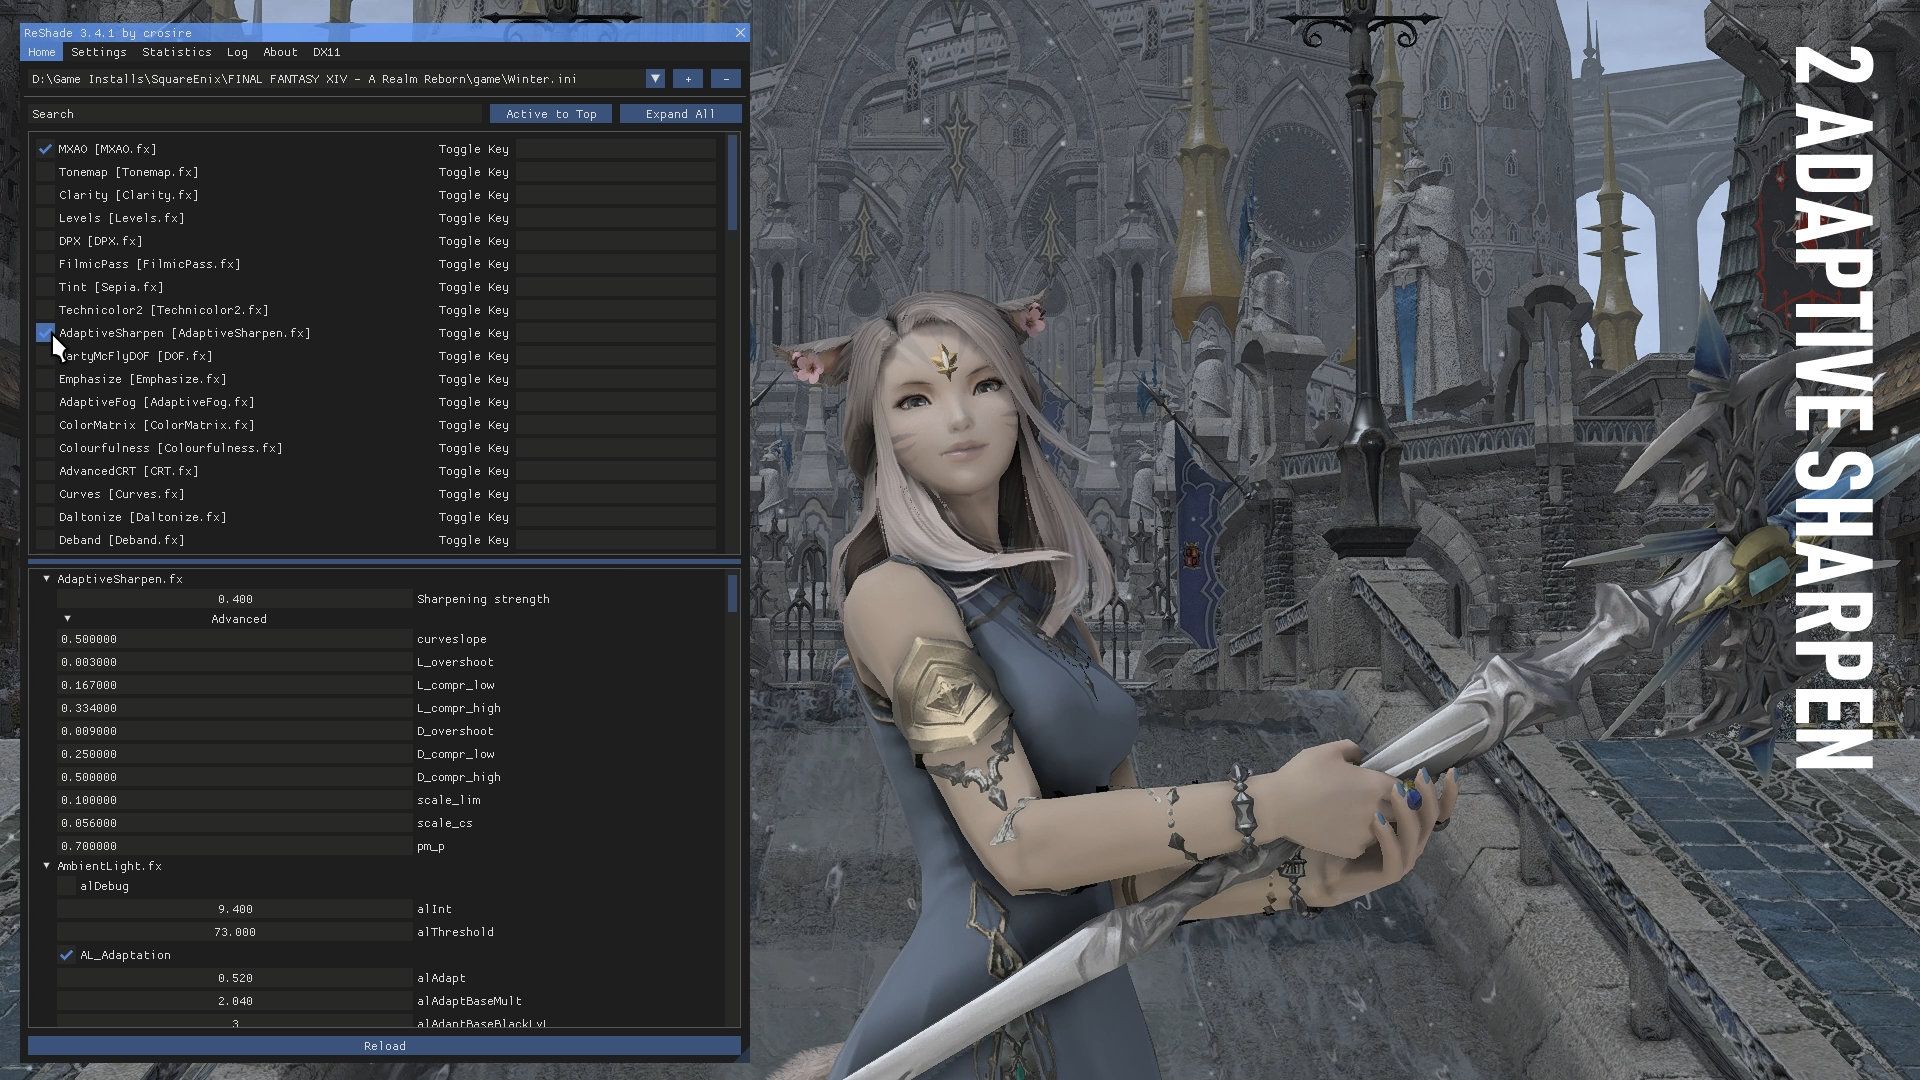
Description: Adaptive Sharpen is versatile and its primary use is to provide definition around objects within an image. I tend to use this option in its default form more than any other sharpening shader. You may increase the sharpening strength to suit your need, although I would recommend having lower values for wider distance shots as it may make the image look very grainy or cartoon-like.
THREE | Tonemap
Tonemap might seem a rather extreme addition to the filter at this point and ‘washes out’ a lot of the color but when I build a filter I think in terms of building blocks. This shader provides the ability to lay down the foundation of the color changes and also provides the ability to make some basic contrast and brightness alterations. Keep in mind you can always come back to this at a later stage and make some careful adjustments.
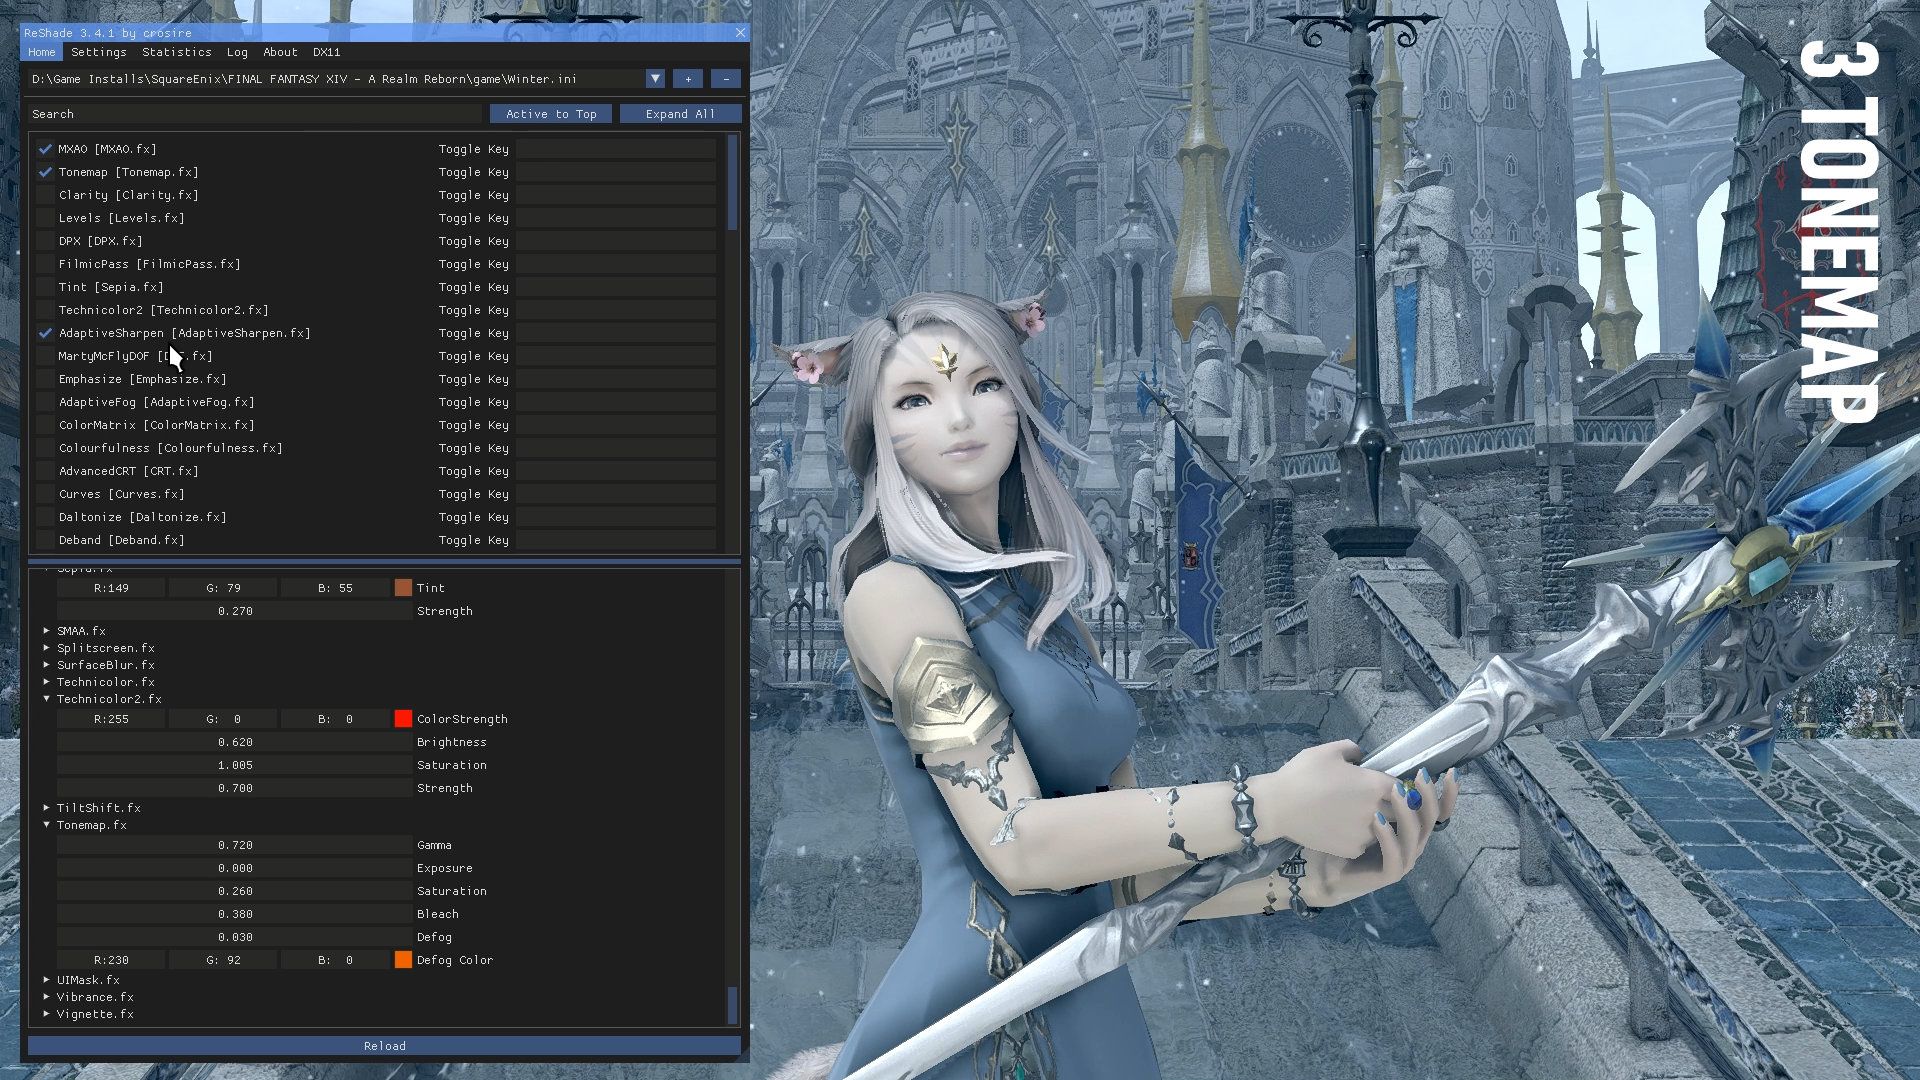
Description: Tonemap is another color manipulation setting incorporating Gamma, Exposure, Saturation, and Bleach. However, the most important feature of Tonemap is the Defog setting. The color you choose in the bottom right is the color it will remove from the image.
FOUR | Clarity
Although subtle, I feel that clarity adds some more image depth that MXAO doesn't quite capture and emphasizes objects in the image a little more with out excessive sharpening.
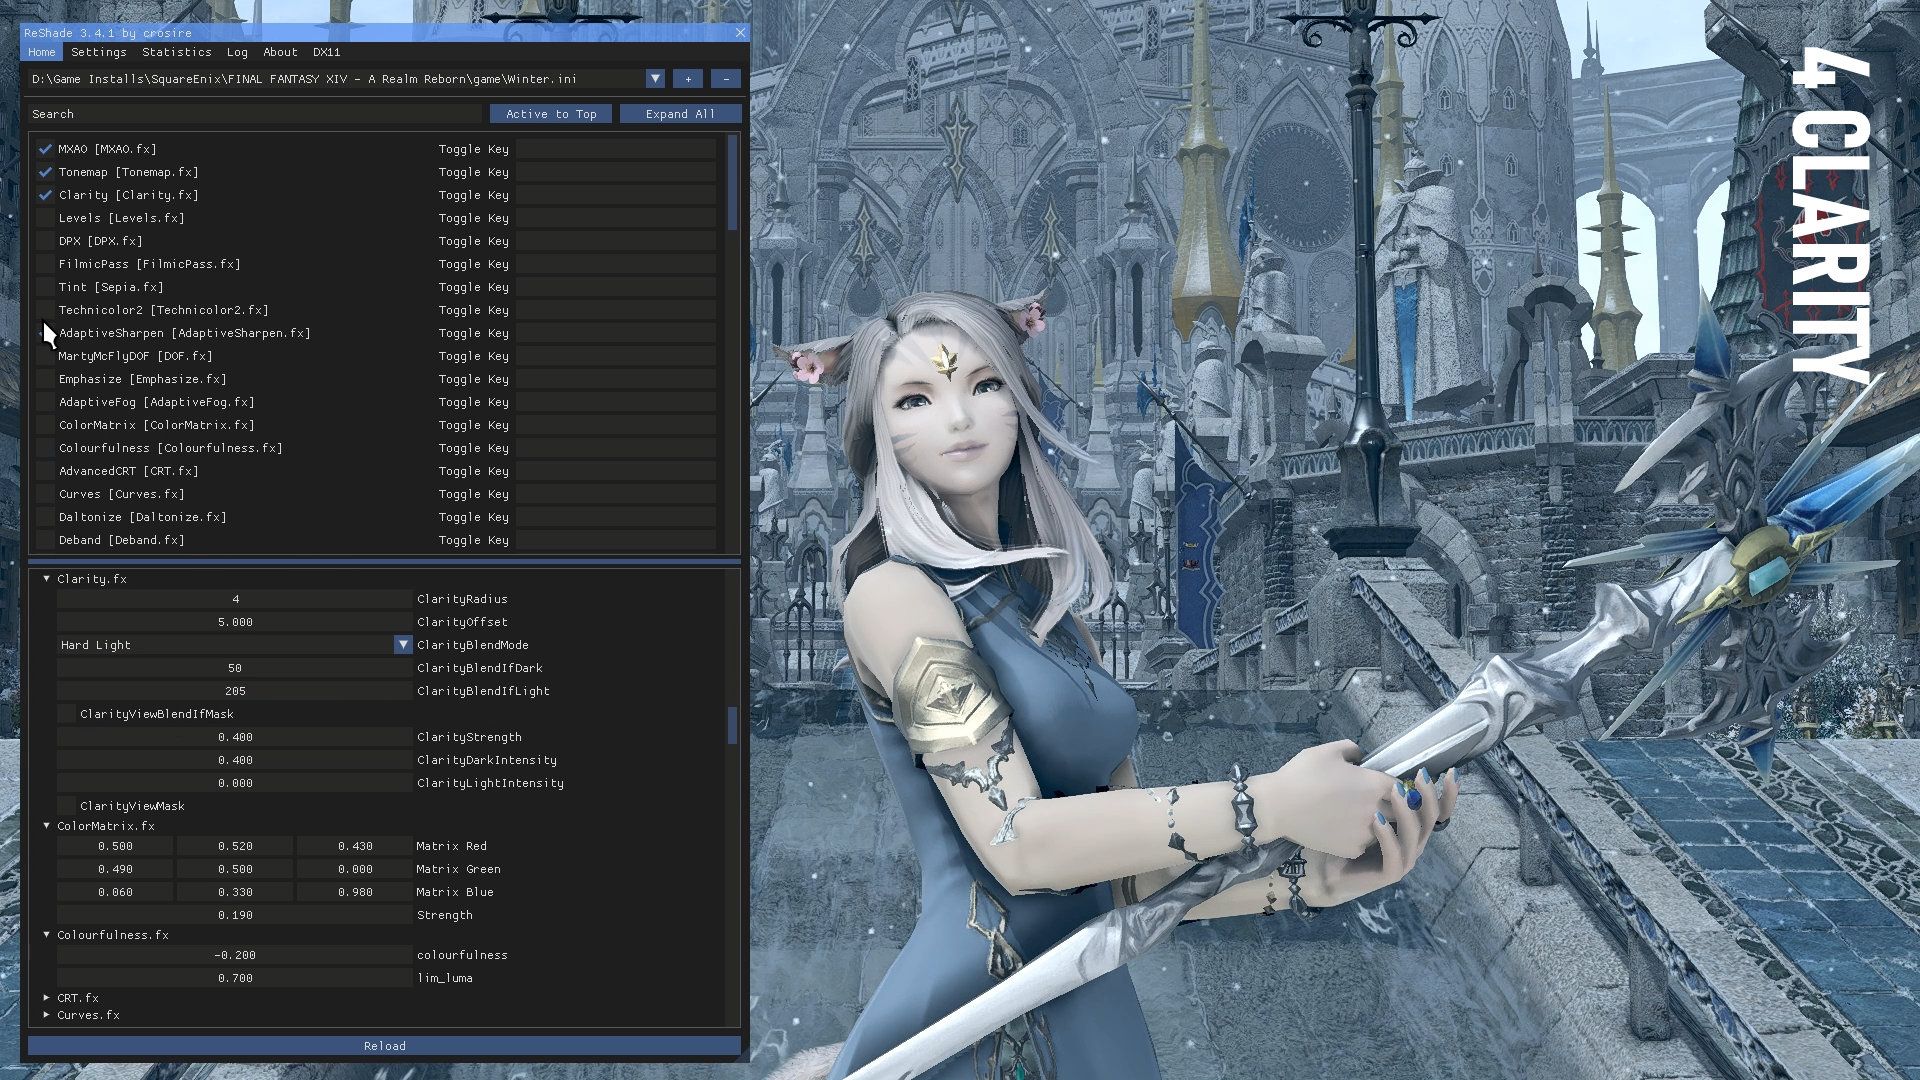
Description: Clarity essentially emphasizes the shadows in the image to provide more contrast. This shader is somewhat similar to the ‘strengthened effects’ GPose filter. There is a lot of flexibility in this preset and it’s well worth spending some time on as your image can get a great boost from it.
FIVE | Levels
Levels will act as the base for the image contrast, as you can see in comparison to image three, it has become significantly more bold and less 'washed out'.
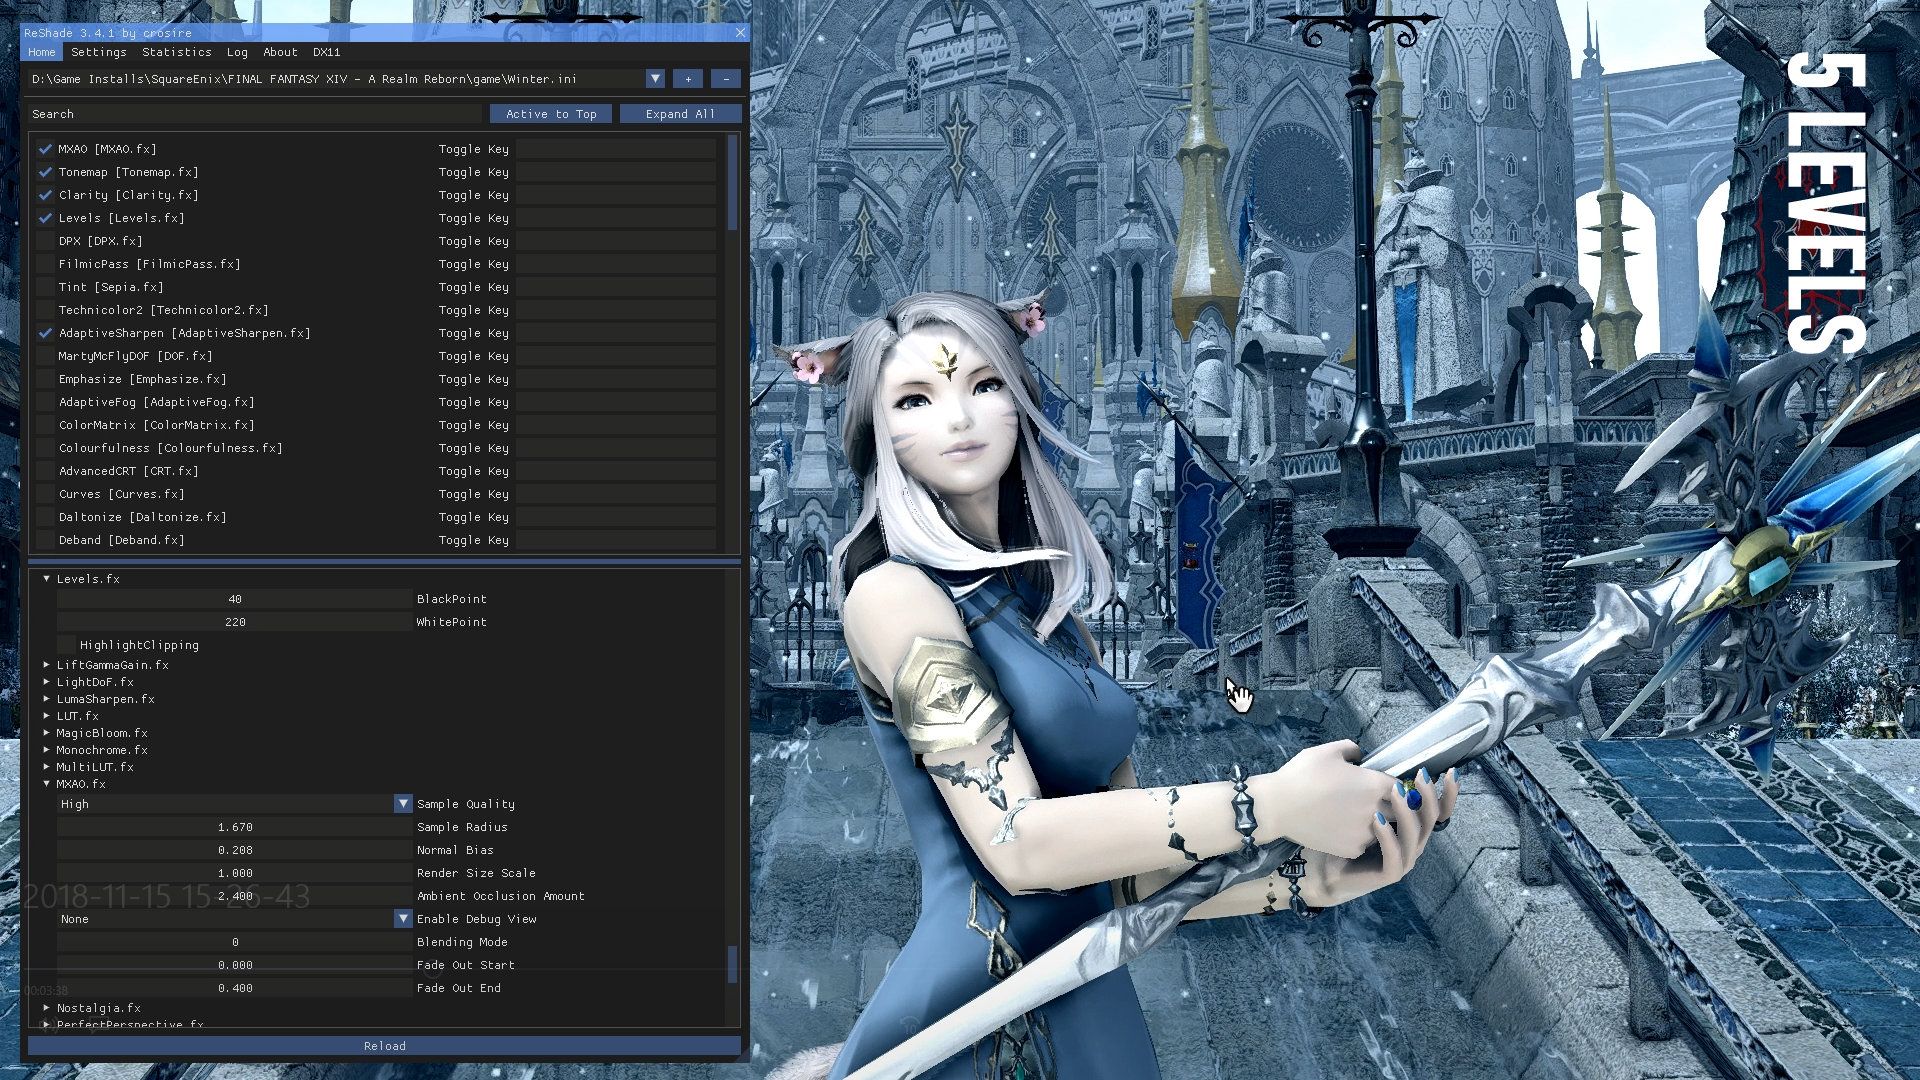
Description: Levels only has two settings to worry about, BlackPoint and WhitePoint. BlackPoint emphasizes the dark areas and WhitePoint, the lighter areas. This is a very simplistic way of adding contrast to the image.
SIX | FilmicPass
This shader is very much personal choice but I absolutely love including it within my presets, it makes the tones quite unique but keep in mind you may have to balance other settings around it. The shader itself also has great control of lighting and saturation so it’s great for multi-purpose use.
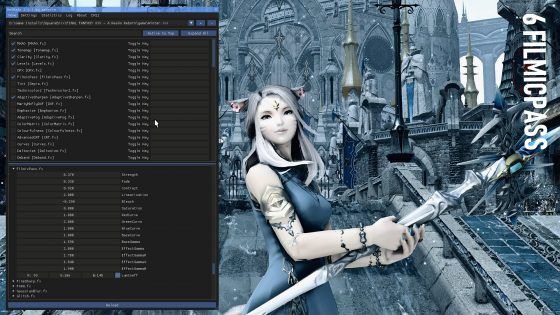
Description: FilmicPass provides both contrast and background darkening. The most important values to keep an eye on are Strength, Fade, Contrast, Linearization, Bleach, EffectGamma and Saturation. The values required for a daytime shot will be quite different as these values will over expose your character quite badly because they are designed to compensate for low light.
SEVEN | DPX
Here I'm using DPX to emphasize the cooler tones without losing saturation, depth or contrast.
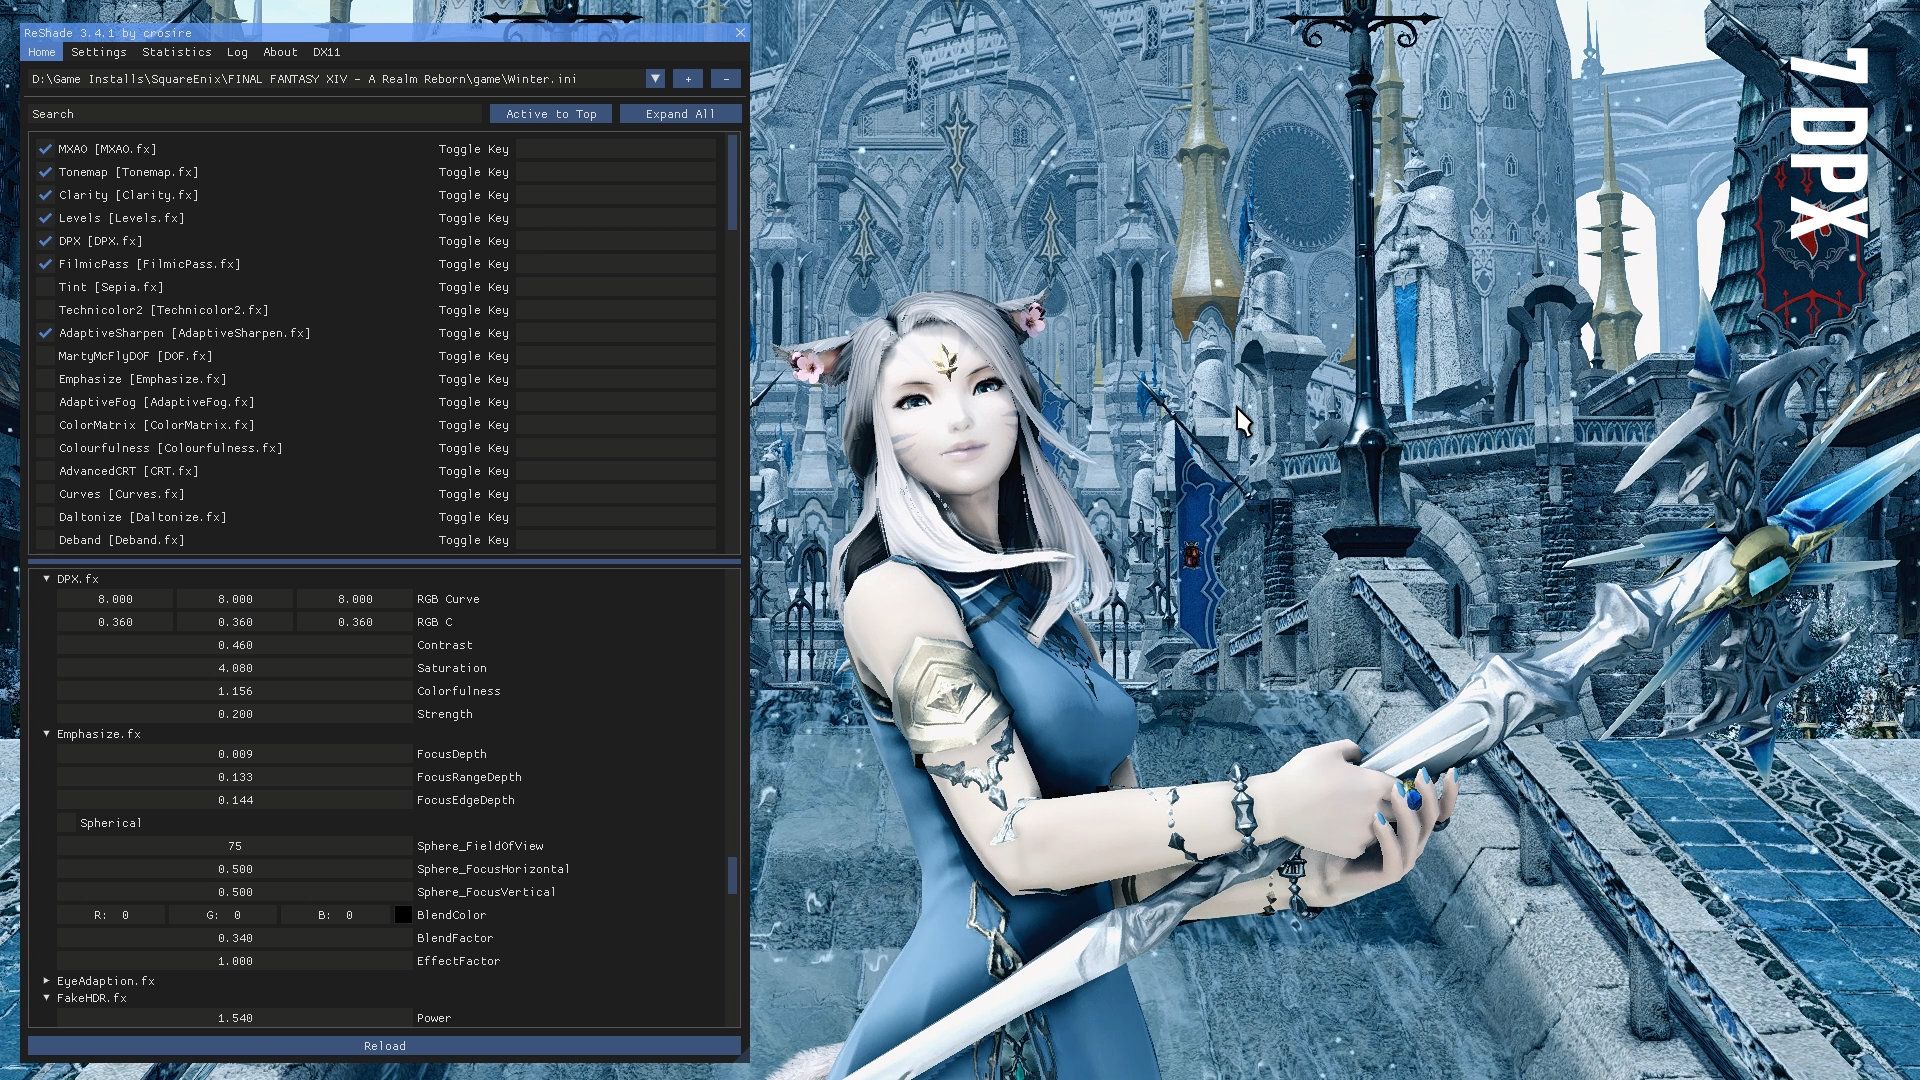
Description: DPX is a powerful preset in terms of the color manipulation of your image. You have control over Contrast, Saturation, Colorfulness, Strength, RBG Curve and RBGc.These settings are relatively safe to play about with to see the color alterations that can be achieved. Having a play works best for a preset such as this.
EIGHT | Tint
Changing the color tone of your image can have a huge impact on your final image and in this instance I'm using the tint to add a slight warmth back into the more pale tones such as Novi's skin and the sky. In effect, I am replacing the warm tones of the were lessened by Tonemap/DPX, but these tones are artificial and of my own choosing.
If I add a tint into images it may be necessary go back and edit the Tonemap again to make sure that the color balance is as desired.
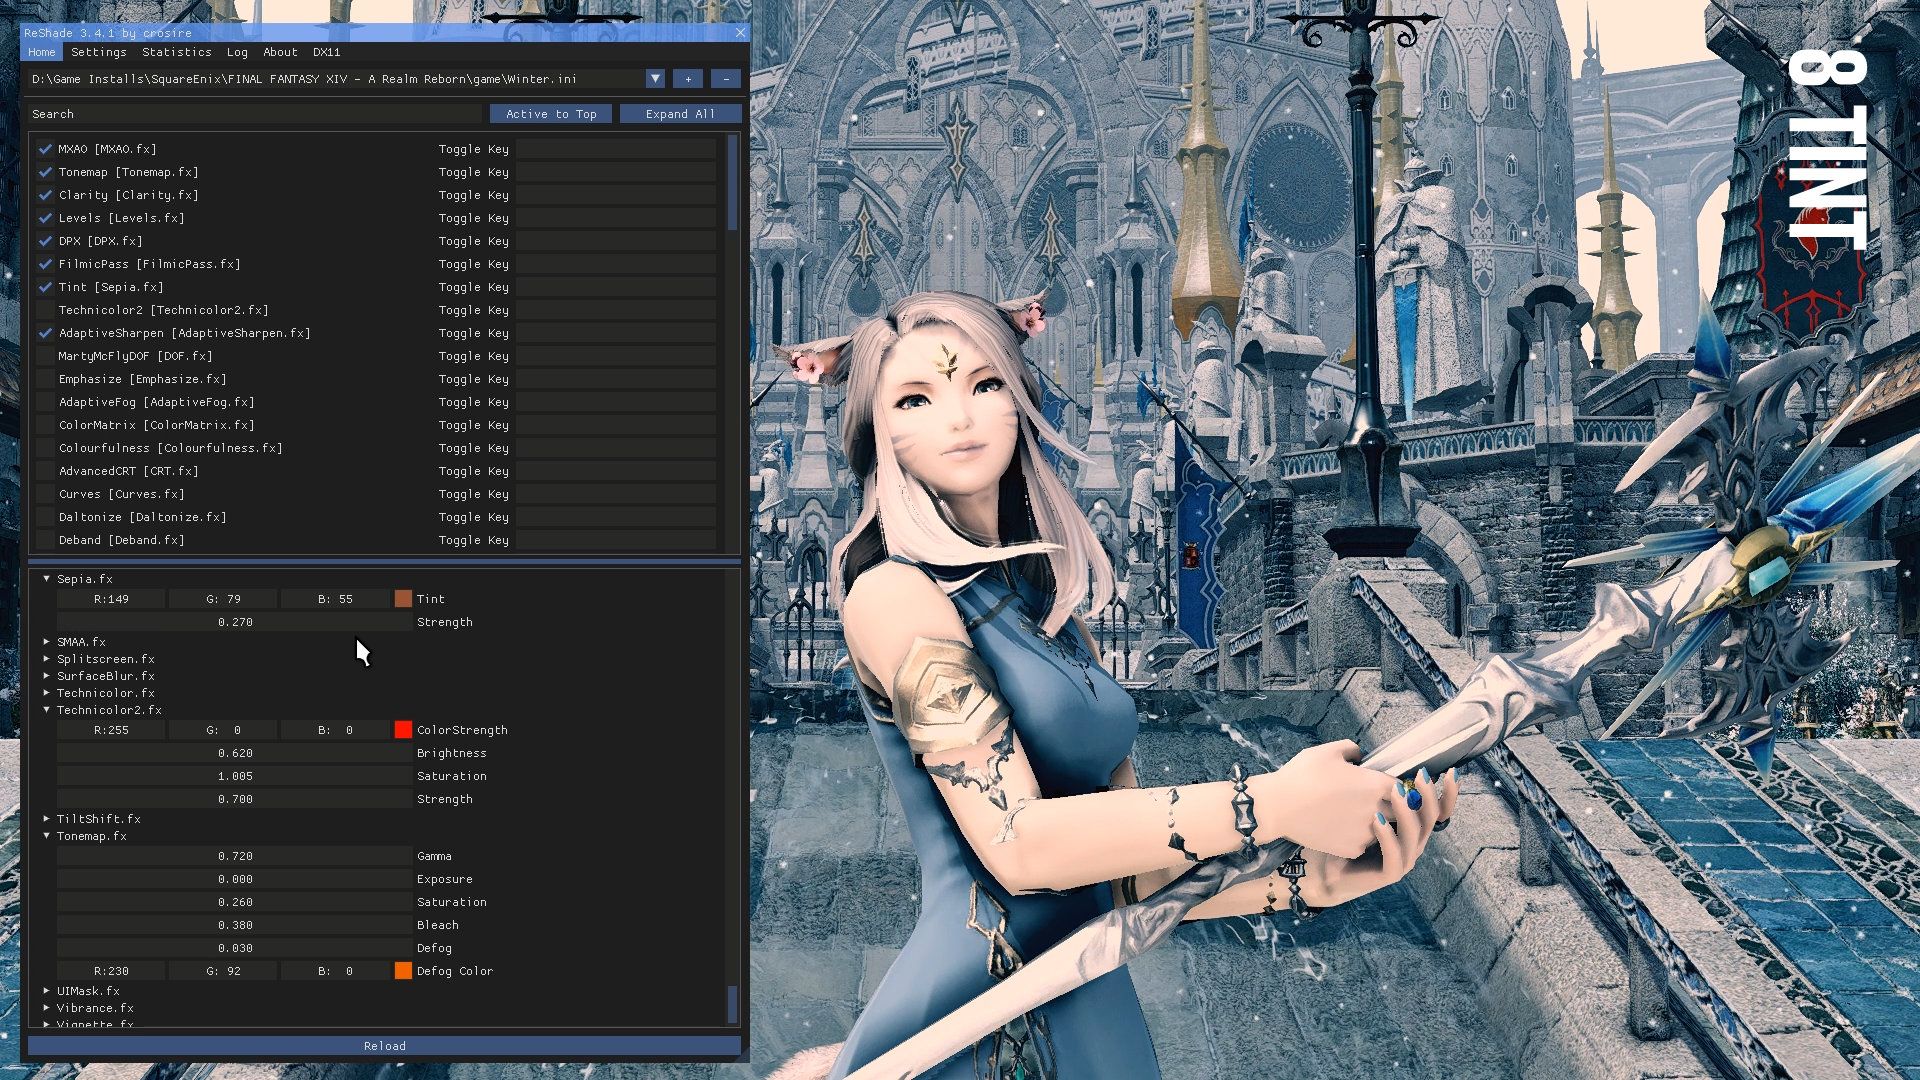
Description: Sepia is a handy setting to use if you wish to subtly tint one of your presets. Just modify the RGB value (or enter your desired hex code) and adjust the strength.
NINE | Technicolor2
In all honesty I don't know how my brain works, but here I can only assume that I'm using Technicolor2 to emphasize both the cold and (artificial) warm tone structure developed using the other color management shaders. In all honesty, I just do what my eyes tell me to!
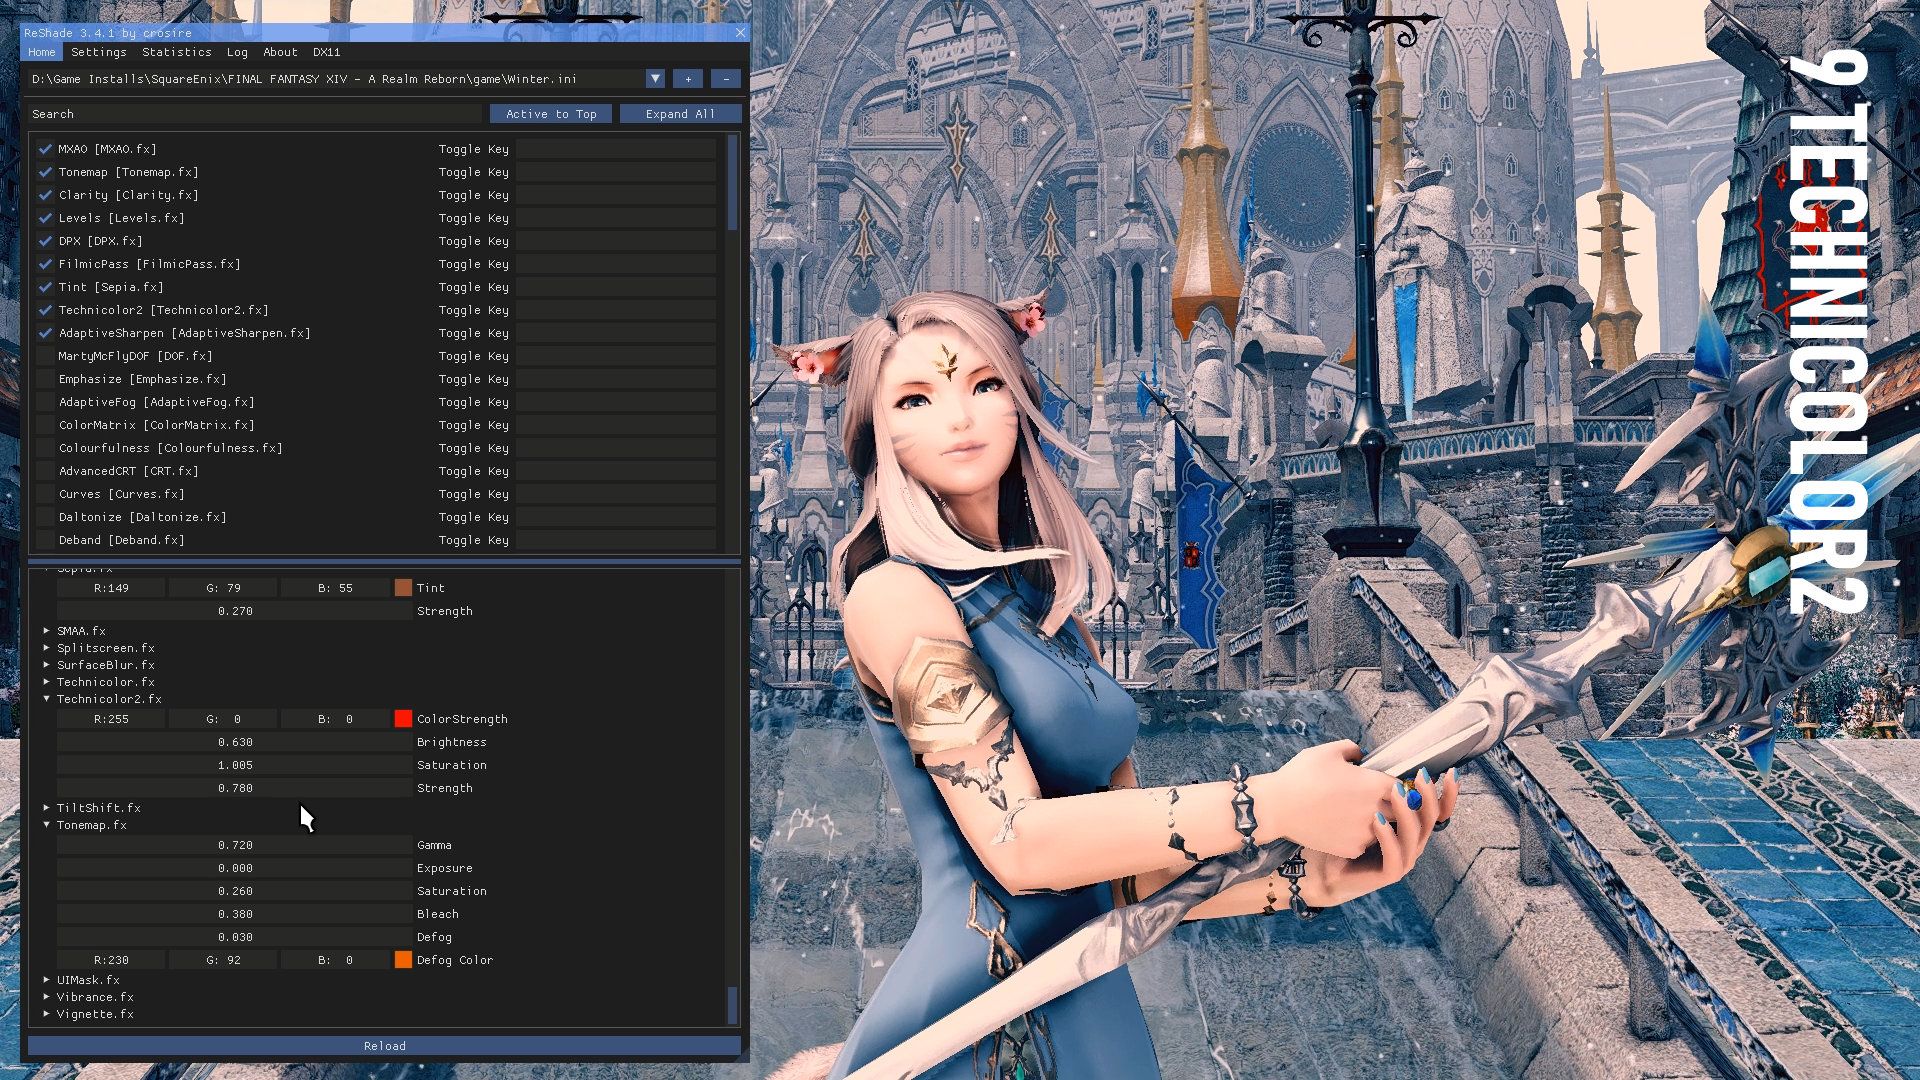
Description: The technicolor setting aims to recreate the Technicolor three-strip process. Technicolor 2 has slightly more versatility and may play a useful part in slight alterations of color in conjunction with other settings.
TEN | Depth of Field
As a photographer I enjoy using depth of field in my images above any other style or technique, the same goes for my Final Fantasy XIV images. I don't seem to be capable of creating a preset without it!
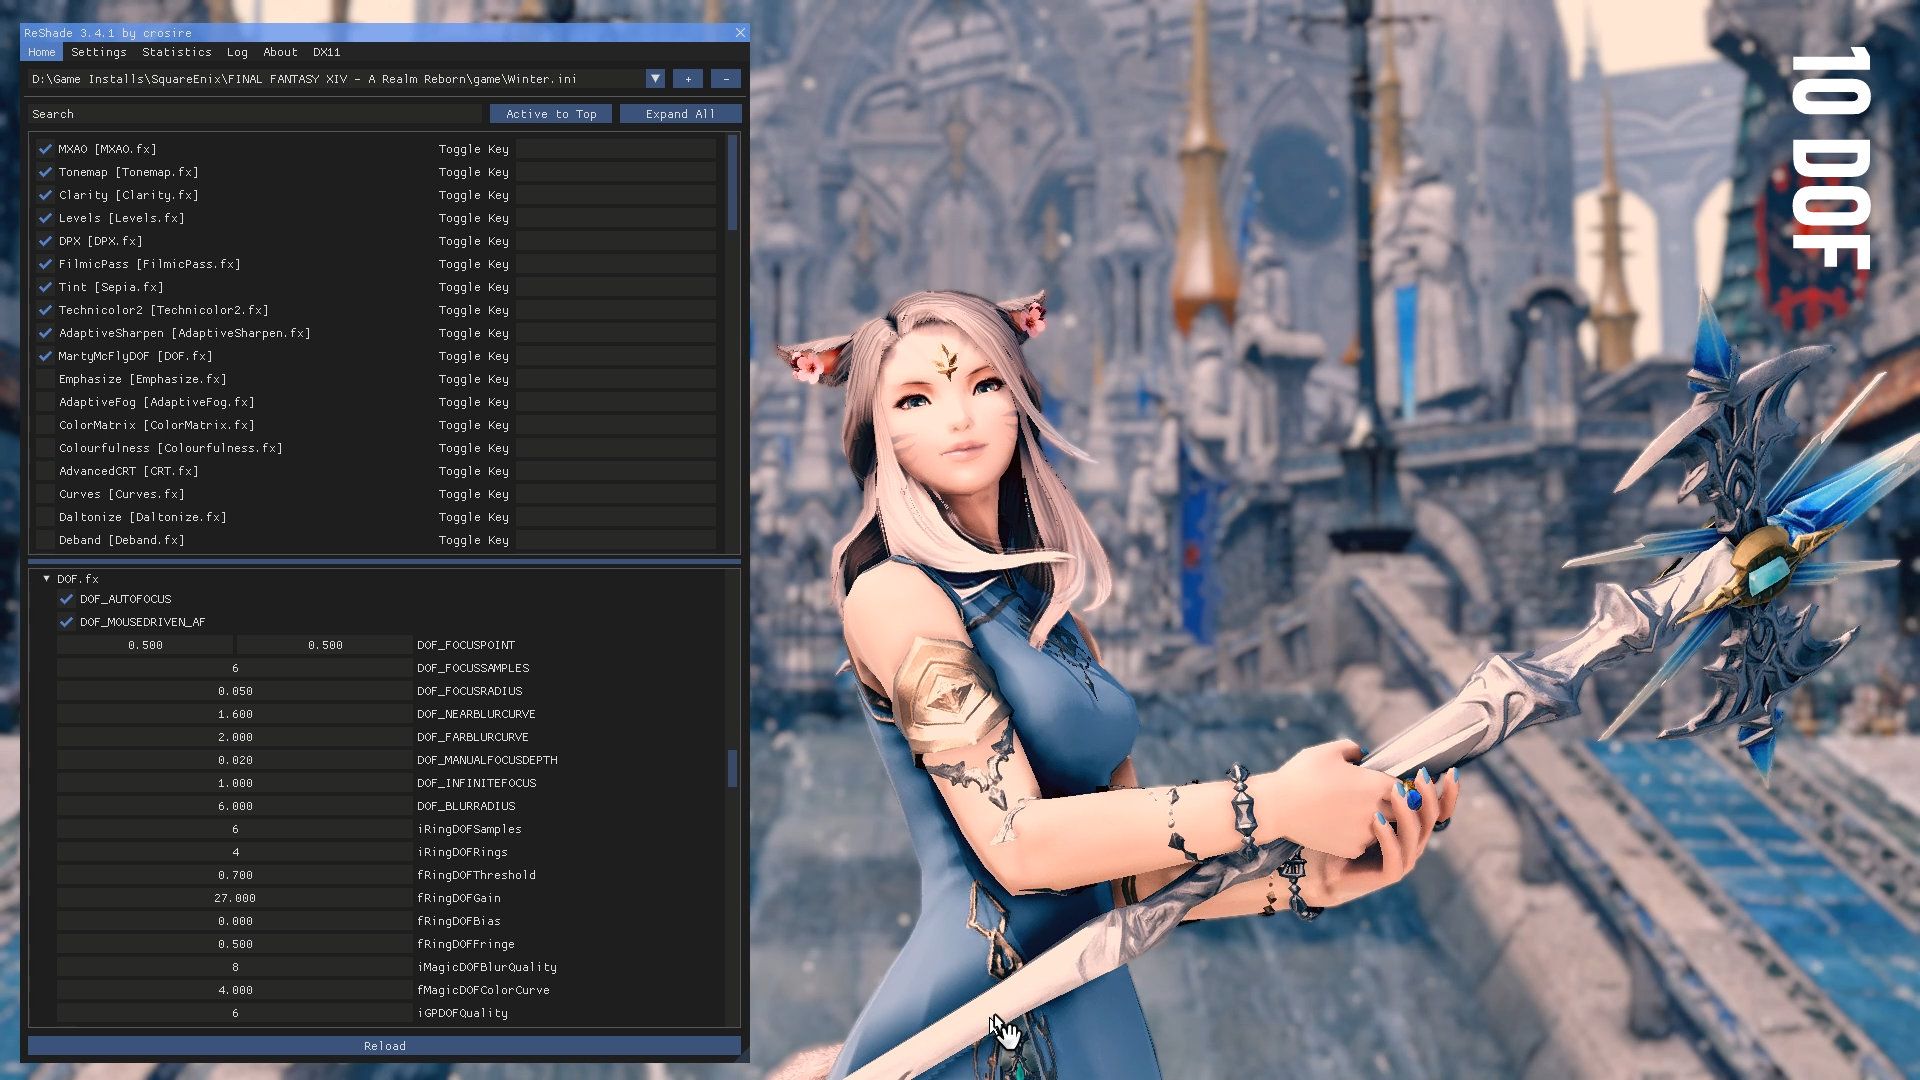
Description: The depth of field variables within the ReShade presets are possibly some of the more complex options in the lineup and can very easily break, so pay attention to what you are changing and note the value before changing it. For a standard preset with simple DoF, I will turn on the DOF_AUTOFOCUS and DOF_MOUSEDRIVEN_AF in the general DoF settings. Mouse driven AF simply means the mouse will determine where the focal level is detected. [Full DoF Guide here.]
Why leave DoF until last? It’s easier to see the whole picture during the color/light editing process, and then add in the DoF. If gamma/exposure alterations need to be made because of DoF bloom then you can go back to Tonemap or FilmicPass and alter those settings retrospectively.
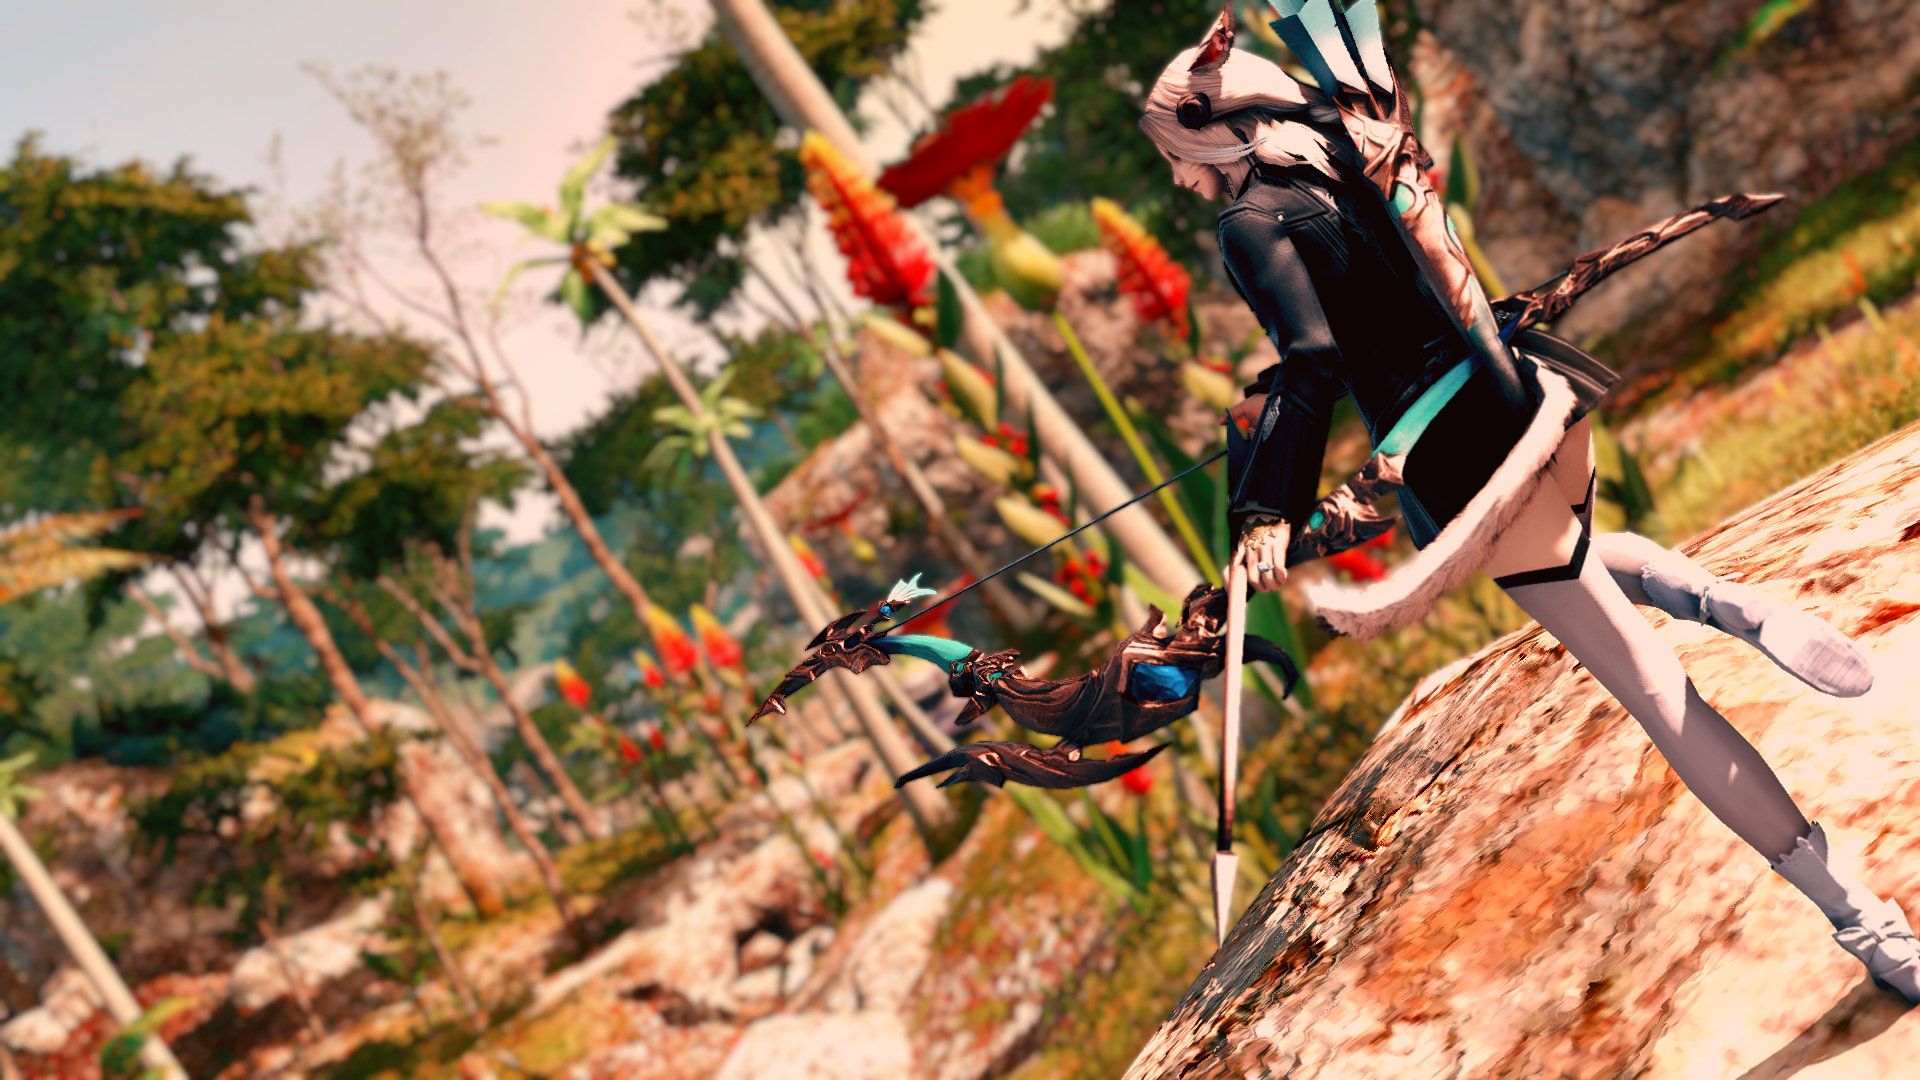
[caption id="attachment_265420" align="aligncenter" width="560"]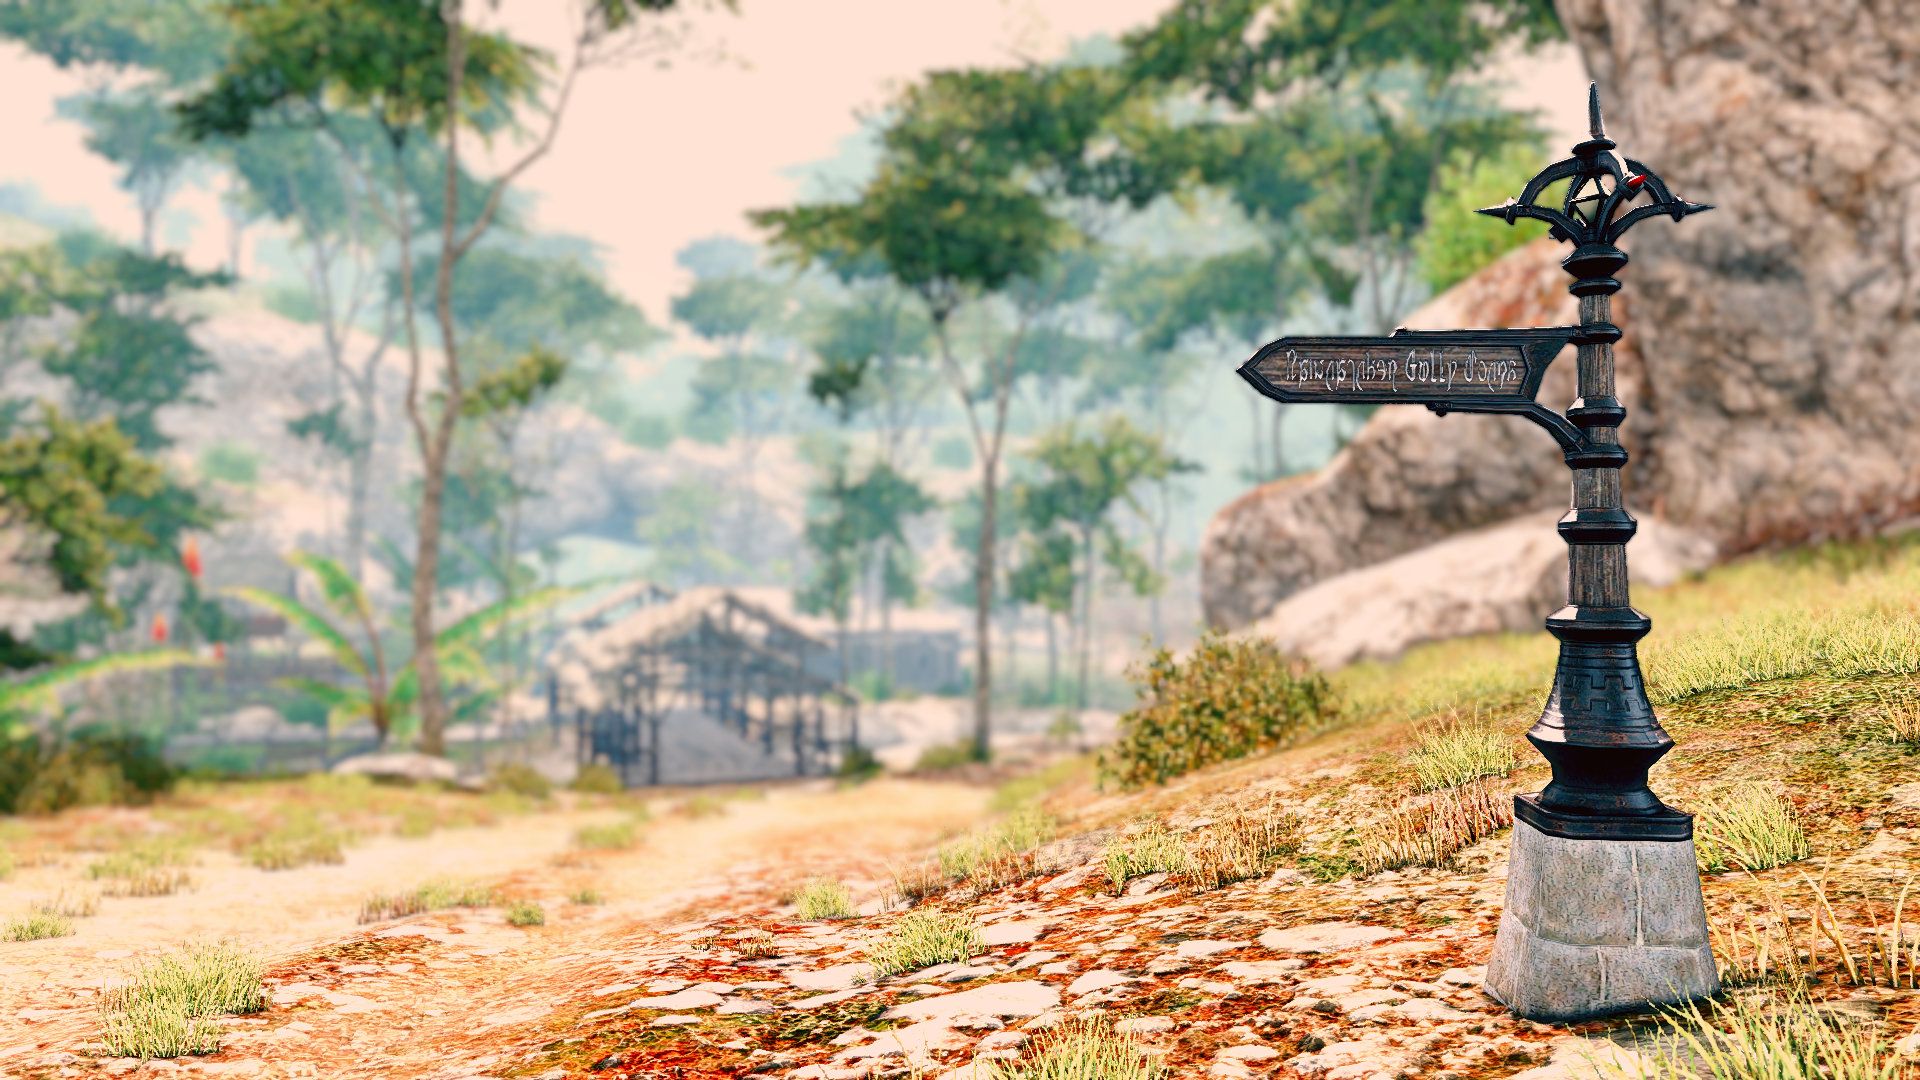 Landscape versatility: Filter used in Eastern La Noscea on a bright, clear day.[/caption]
Note: You are absolutely not obligated to use all of these shaders or even replicate the settings I have used. A similar filter could be achieved in fewer steps but I feel each of the color altering shaders offers something unique and it’s just my preference to use a few of them during the process of creating a filter base such as this one. I also based the main chunk of this shader around color and contrast management because these are the foundations of all my presets. Many other additional shader choices would be down to personal taste such as adding blooms, lens flares or special effects, so working with the basics seemed logical.
Please, please remember to back up your presets and shaders folder!
Optional Extras
The above video displays some of the capabilities and uses of the addition shaders mentioned below. [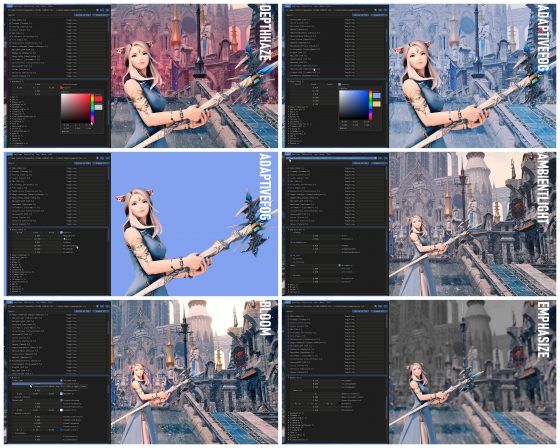](https://www.mmogames.com/wp-content/uploads/2018/11/1-A35.jpg) ### DepthHazeIf you’d like to add a little more depth and interest to your images, depth haze is a great way to do it. From steamy pools to eerie forests, this is a fantastic and versatile shader.
Description: Depth Haze is similar to Adaptive Fog although far more subtle. The shader places a fog effect in the far distance.
Adaptive Fog
Description: Similar to DepthHaze but with greater flexibility and stronger effects. This preset is also wonderful for creating silhouette images for the background with the right configuration. It also makes a great green-screen!
Emphasize
Description: Emphasize gives you color in the foreground of the image, fading out to grayscale in the background. You can manually alter the color focus by using the FocusRangeDepth and the ManualFocusDepth.
Ambient Light
Depending on the look you are going for, this shader gives you the ability to add a soft lighting effect without losing the sharpening effect from Adaptive Sharpen (as you may do with Gaussian Blur).
Description: This is a great setting for adding not only more light and contrast to your images but allows a subtle ‘bokeh’ type effect that I spent a very long time in the lens flare section looking for!
Magic Bloom
Description: Ideal if you want to add a slight bloom to your image without losing too much clarity. It is a wonderful effect, but sometimes this shader is bugged unless moved to the top of the use list in the preset .ini file. Please do not make modifications to these files if you are a novice user!
Tip: Depending on brightness of day use levels to realign the contrast and exposure.
Why am I not giving the preset away with this article? Simply put, it would defeat the object of me showing you how the filter is made and I'd like you to have a play with the settings! This way you may find something more suited to your tastes visually. If you do have a go please be sure to tag me @aeyvi on twitter to show me your screenshots (I really would love to see them)!
[caption id="attachment_265424" align="aligncenter" width="560"]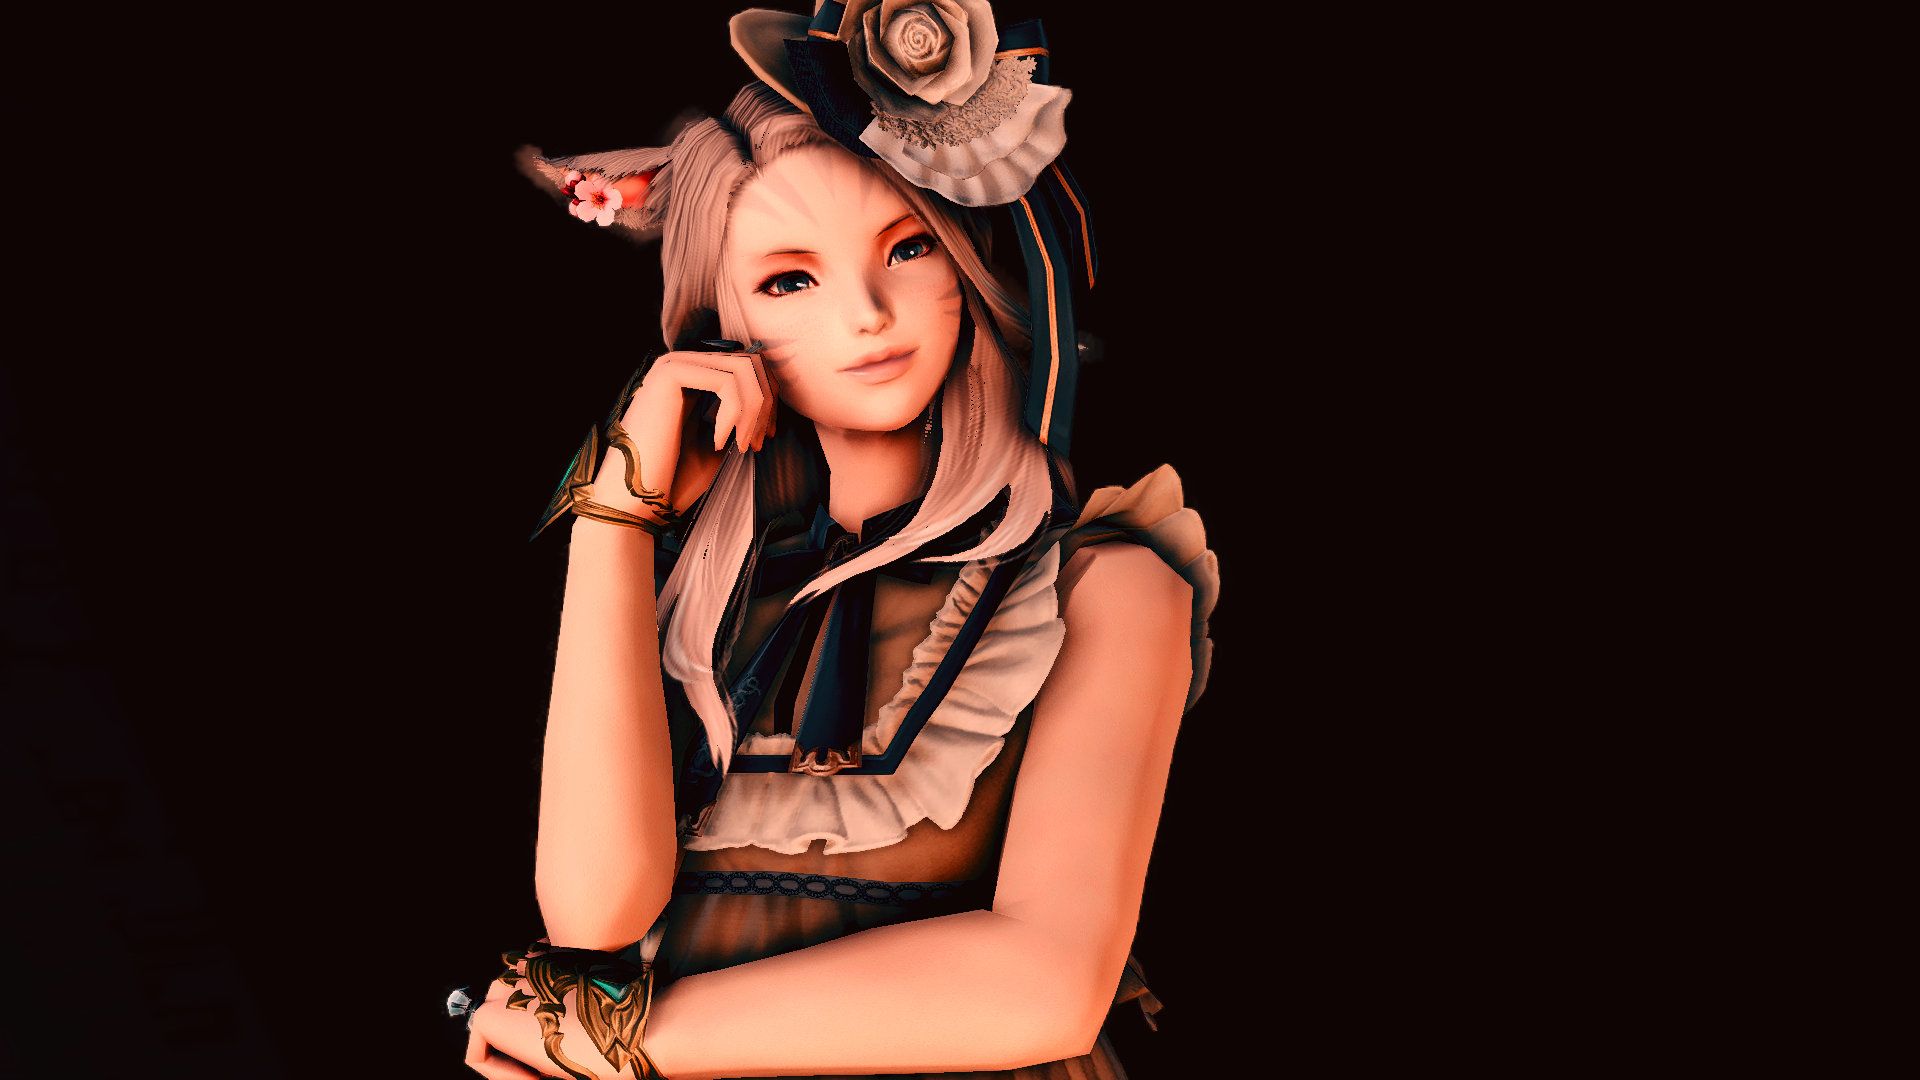 Portrait aspirations: Although the filter has very warm tones it still seems to work in a dark studio with one subtle GPose light source (level 1) positioned on Novi's right side.[/caption]
The ReShade Settings guide has a visual index of various other shader settings if you'd like some inspiration.
All the images in this article have been created using the same filter featured in the guide, as versatile as the filter has (luckily) proved to be, not all conditions worked well, as shown below.
[caption id="attachment_265425" align="aligncenter" width="560"]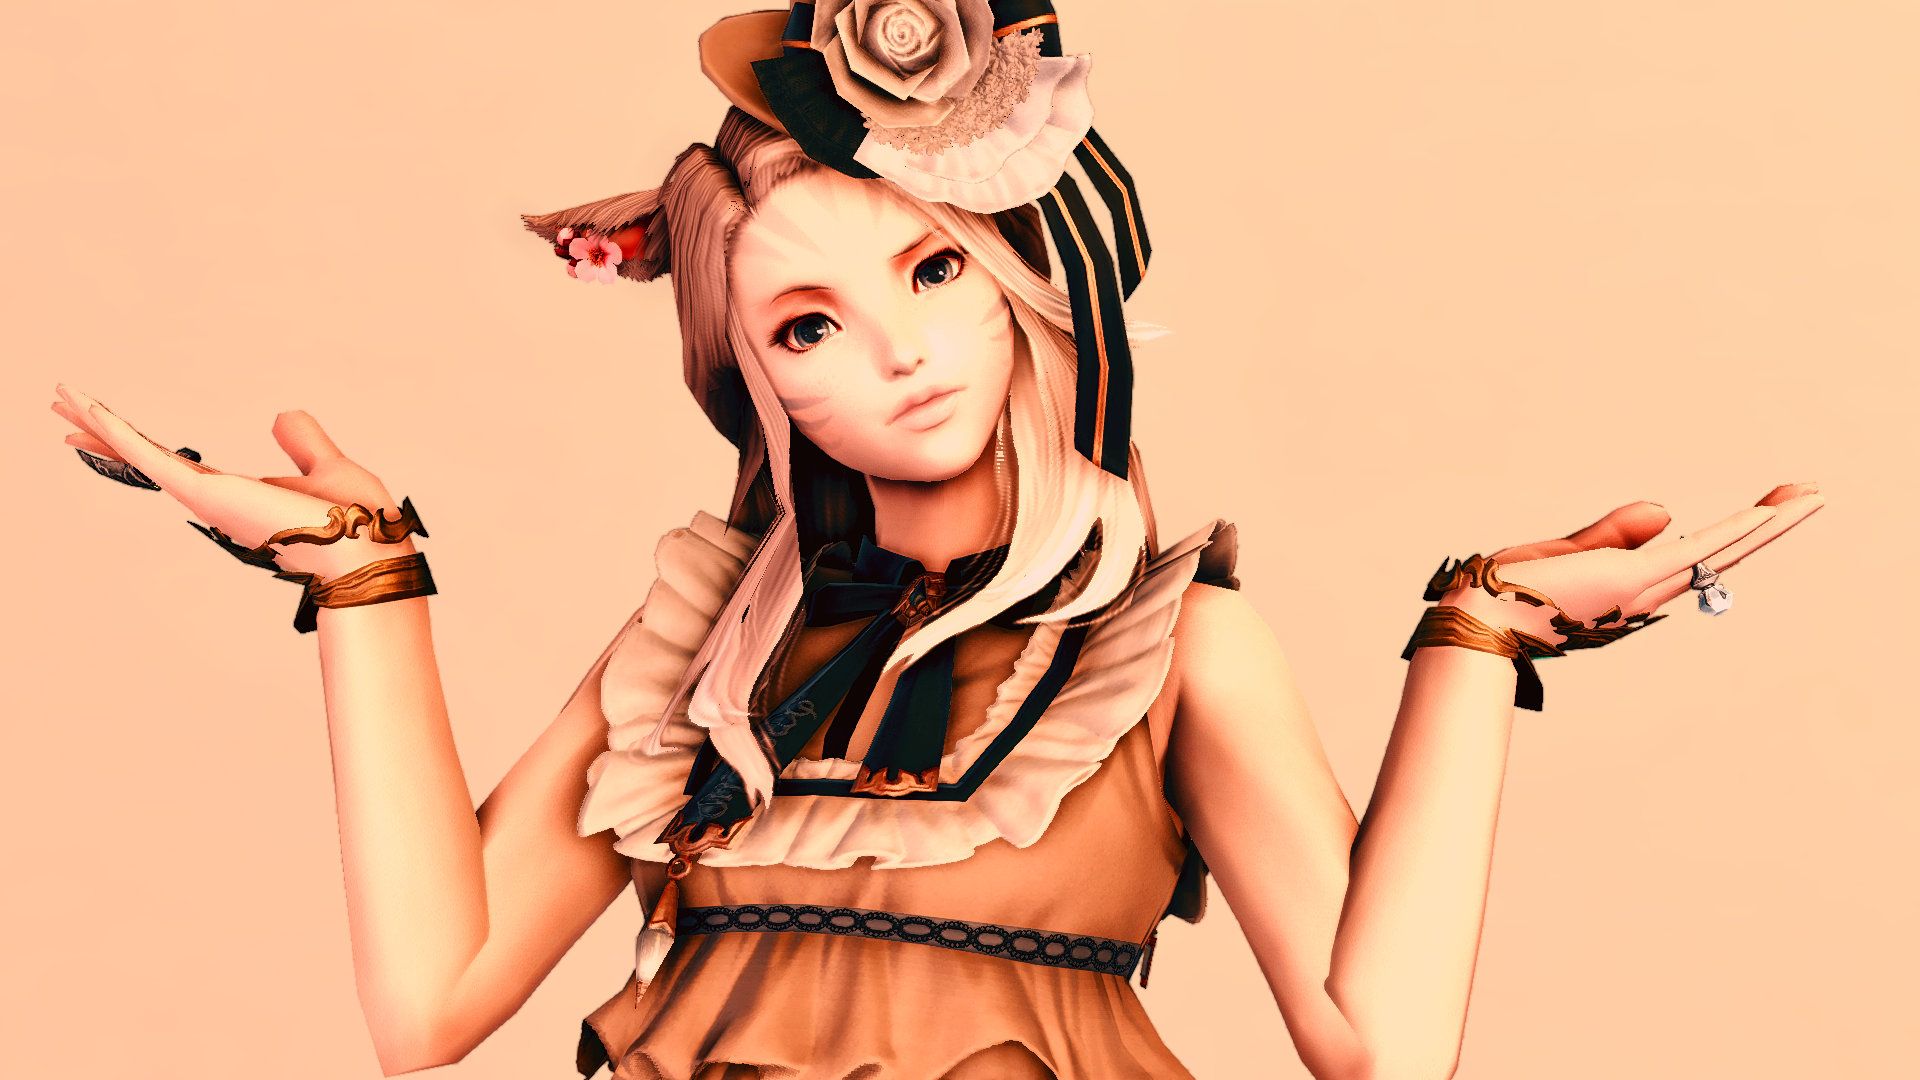 Not so versatile: Light studio environments do not wield the best results.[/caption]
Final Thoughts
If you got this far, thank you so much for taking a look at the article. I can't tell you how unbelievably grateful I am for the support that I've received from the community in regards to this column and my screenshot adventures. If it wasn't for you I wouldn't have the confidence to keep working on my screenshot portfolio or write these articles.
I hope above all that this guide has been helpful and informative. Enjoy your new preset!
If you have any questions, advice or comments please don’t hesitate to get in contact either through here, Screenographic or Twitter.
