
Welcome back once again to yet another screenshot oriented edition of Echoes of Eorzea, or should I say Art of Eorzea! Due to the nature of this series I have decided to re-brand this part of my FFXIV column to create a sister column. Firstly, because it seemed more fitting, and secondly because it will be neater and more recognizable for the creative intent. Today is the first in a series of screenshot photography and art columns that will introduce the technical aspects, color theory, and my own personal approach and experience in regards to photography and screenshot photography. This column will reference several previous articles which will be linked to in the article and below in the related section.
To begin with, why am I writing about this? To put it simply, because I have been asked to write more on screenshot art by numerous members of the FFXIV community and I dearly hope that it could be of use to someone. Yes, I’m sure there are various articles out there that cover similar things but in a series such as this, it seems sensible to start at the beginning. I do not consider myself an expert in the slightest but hope that in the coming months and years that I will learn and improve. If you are a veteran in the screenshot photography world, I am afraid that my words may not shed new light on matters, although you are still more than welcome to pull up a chair and share some tea.
For this guide, or rather explanation series, I will be referencing some aspects of the GPose tool and ReShade program so if you are unfamiliar with either, guides can be found here:
In-depth GPose see here.
In-depth ReSahde here.
(Update for ReShade 3.1 coming soon).
My Experience
My love for photography began the moment I held an SLR and came across the term ‘depth of field’, as those of you that have seen my images will know, this is often a great focus of mine. My very first digital camera was a 1.3 megapixel (oooh wow!) Olympus D-460 which at the time was like gold dust. I simply adored it, although it never quite captured the same beauty as proper black and white film in an SLR. My A-level photography education involved learning to process films in a dark room, various exposure techniques, learning about the technical aspects of SLRs, introductory digital work and of course, portfolio creation. I have a history of conference and AGM photography for a London organization.
In terms of gaming, I have always taken far too many screenshots for my own good, beginning with World of Warcraft. Mostly these were taken to document memorable times with friends or guild achievements. Final Fantasy XIV opened up a whole new world of screenshot photography. Perhaps it is the art style, the ever-changing landscape or the expressiveness of the characters but since my first day in Eorzea, I felt compelled to capture everything, and at this point GPose was a far away dream.
With the introduction and development of GPose, even more screenshot photography took place and I believe my addiction ran riot.
Over 30k screenshots and more than 4,000 individual edits later (I have no life!), I am here to write to you about both the base technical aspects of screenography and my own personal methods of achieving the images I create.
You do not have my eyes, and I do not have yours. I cannot tell you what is right or wrong but only try my best to explain how my brain translates what I see in the images you see.
None of the above, or below, holds any sway on whether or not you can take decent screenshots!
In terms of the comparative between instinctual photography or technical photography, a dear friend of mine provided me with this quote that couldn’t be more fitting.
“Of course there are [people that 'follow' strict rules on these things]. In the end, art or science or anything, the world needs both. One is perfect for what is, others try to find new for former to define and perfect.”
Personally, I take an instinctual approach (inclusive of technical knowledge of tools and programs, but not composure), many others I know take a technical approach. I cannot emphasize enough that neither is right or wrong. What is important is that the end result is something you are content with yet keeping an open mind to new techniques. My portfolio of gaming images can be found here.
Photography Principles
If we intend to cover the basics of in-game screenshot photography, we must first look at real-life photography principles. Now, just a heads up before I explain these: I do not and never have thought in terms of these principles for my images, nor have I knowingly used them during my 12 years of photography experience and 3 years of screenshot experience. Yes, perhaps I am an uneducated pleb, yet what drives my images is my love of the color, atmosphere, and emotion, I then combine this with the use of tools such as Reshade and Picasa. This article has involved learning for me as well, and I intend to summarize what I have learned along with the source and try my best to translate this into game screenography terms.
My only excuse for my work is that I try to make what my brain thinks is pretty. This does not mean others will like, value, or appreciate what I create and as a creative, I very much accept that. We all have different eyes, tastes, and different views. My best advice is to stay true to what you find beautiful and should you see a technique used by another, investigate it, learn what methods went into its creation and adapt that to your own style.
In my view, an image created with heart and spirit in it is far better and more meaningful than a technically ‘correct’ mechanical shot (following photography principles), even though technical knowledge of programs can very much help and editing can work to enhance your original shot.
Color Theory
Definition:
Colour theory is a body of practical guidance to color mixing and the visual effects of a specific color combination. There are also definitions (or categories) of colors based on the color wheel: primary color, secondary color, and tertiary color. (Source)
Color theory to some is considered incredibly important and can work to truly emphasize and enhance your images. My main educational source of color theory is this Color Theory video by Blender Guru (I couldn't recommend it more!) and the color chart now stuck to my wall as I try to etch it into my brain.
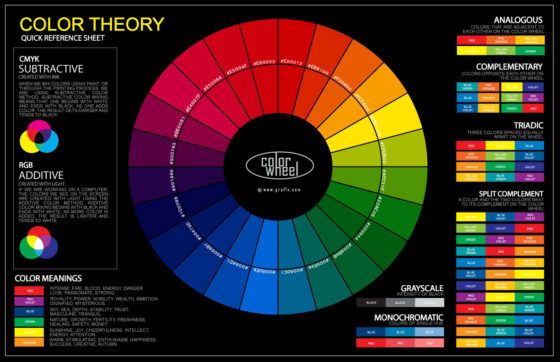
I could write up a huge long paragraph explaining each section and try to translate examples into the screenshot world, but I have so far found the video and image mentioned above to be most useful when trying to understand the principles. Although I haven't consciously applied structured color theory to my images, it's something I'd like to create a project on in the future, so hopefully, I can combine that into an article for this column. I've looked for a couple of images in my portfolio to represent some of these categories below.
In terms of color coordination for my own images, I first try to keep in mind my own characters colorings and tones, usually opting for colors that complement it in a subtle way or use a tone to complement the character, but also one that matches with something else in the image. If I am aiming for a more striking picture, I will use a much higher contrast color but still match it in with something in the image, such as a flower or object.
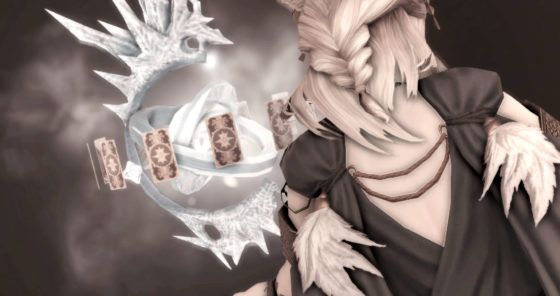
 An example image of Novi where I have tried to pair her hair and skin tones to the background of the image but complemented the yellow tones with the blue tones in her eyes and outfit.
[caption id="attachment_210166" align="aligncenter" width="560"]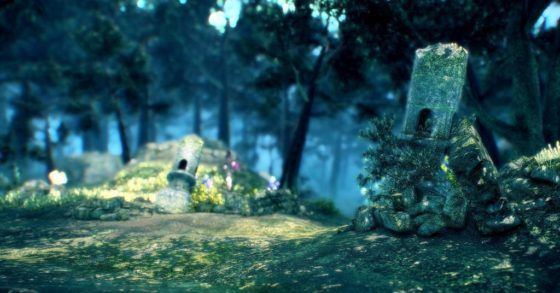 An example of Analogous featuring green, blue and violet hues.[/caption]
Depth of Field
Definition: The distance between the nearest and the furthest objects giving a focused image. (Source)
When we use the term in photography or screenography, depth of field is used to describe an image that has an area of sharp focus while the remainder of the image is out of focus. Both GPose and ReShade have the ability to create artificial DoF, though the GPose version is quite subtle and lacks proper control currently.
Using shallow (or 'strong' in relation to ReShade) depth of field is best used when you wish to draw the eye to one particular subject and hold a strong focus, with less need for detail on background areas.
[caption id="attachment_210172" align="aligncenter" width="560"]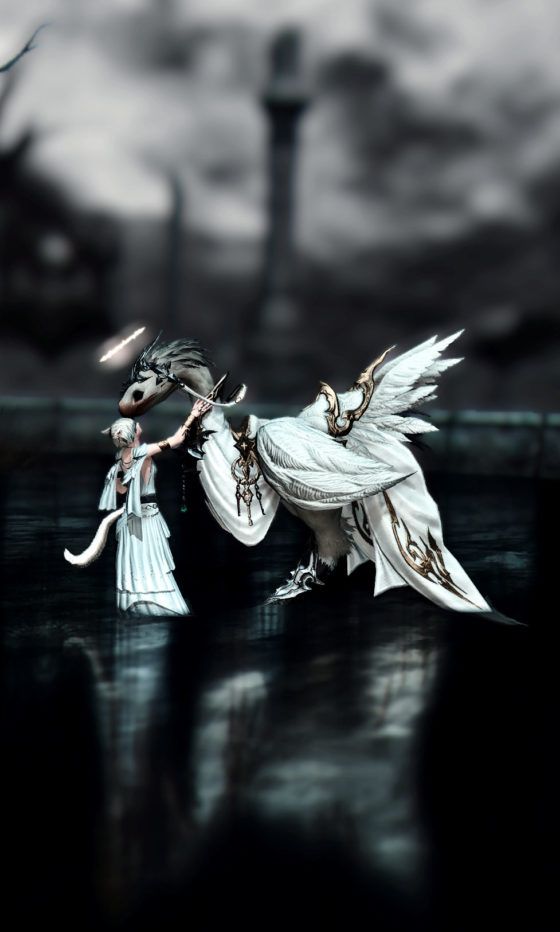 Strong use of DoF known as 'shallow' depth of field. [/caption]
Use of a deeper (further back) depth of field is ideal for landscape shots where you wish to capture a greater area of the shot in focus.
[caption id="attachment_210173" align="aligncenter" width="560"]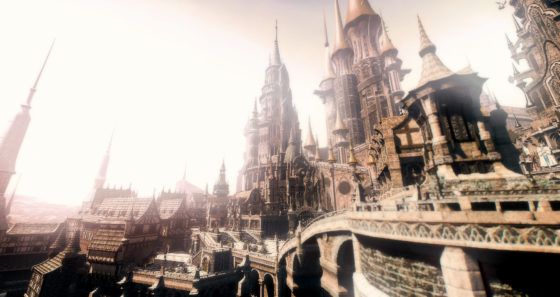 Deep, or distant depth of field used in this shot of Ishgard.[/caption]
I often find the depth of field to be the most powerful effect in photography and screenography because I find it the strongest element that allows the creator to speak to the viewer, you are effectively directing their eyes, and asking their mind to wander.
Framing
Framing is always something I struggle with and it leads to me taking around 5 to 10 images at various angles, sometimes just so I can have a comparative view. My main gripe is clipping an ear, tail or a hand, so I try my best to avoid this unless I have no choice and the composition of the image is lessened. Keep in mind just how much control you have of your image, that you can zoom in, out and tilt the camera. Rotation of the camera is 360° from your characters starting point, try to imagine a sphere around your character. Remember that walls can be used to 'push' the camera in closer. If you cannot get the frame you want from your own character's sphere, you can use a minion, NPC, or ask a friend to stand in a specific place to allow you to capture the spot (remember they don’t have to stay there once you are in GPose). For those of you that have seen my GPose stream, you will see how much I twist and turn my camera to achieve a shot. If I cannot line up the edges neatly in GPose, I will zoom out a fraction and then crop the image afterward in Picasa.
If the image has a central focus I will first try to keep the image straight, then examine the background. If there are say two doors in the image either side of the central object, I will try to include equal amounts of both so that the image retains some symmetry.
[caption id="attachment_210178" align="aligncenter" width="560"]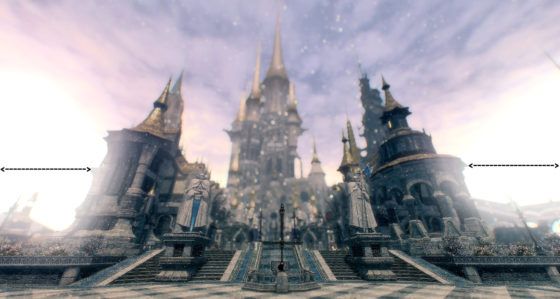 Here I have attempted to keep the shot central by cropping (by eye) equally either side of the image.[/caption]
The Rule of Thirds
Definition: The rule of thirds is applied by aligning a subject with the guidelines and their intersection points, placing the horizon on the top or bottom line, or allowing linear features in the image to flow from section to section. (Source)
I see this ‘rule’ pop up here and there and it’s one I have never consciously paid any attention to (perhaps to my detriment), but I’m going to put it in here anyway as for some it is an important factor of screenography capture.
[caption id="attachment_210200" align="aligncenter" width="560"]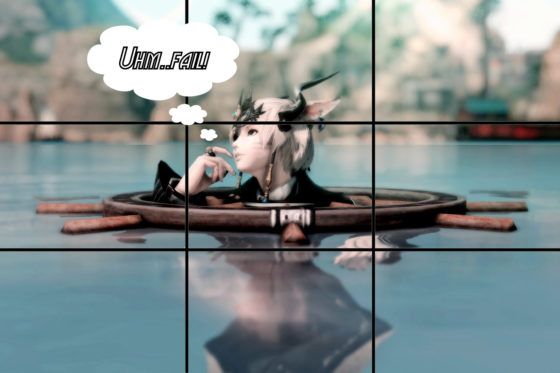 Needless to say, I am yet to master this principle.[/caption]
If using a grid theory system helps to line up your image, create better proportions or tell the story of your image, then it seems a worthwhile consideration when forming images. Personally, I feel it may lead to artificial structure, or perhaps it’s something I take into account subconsciously (or not, judging by the image above!), who knows. I’d rather be concentrating on capturing the mood or colors of an image rather than trying to see an imaginary grid across my screen. This is, again, the difference between instinctual and technical creativeness. In art terms, neither is wrong, it’s just not my preference for use in the images I capture.
Clipping
Sadly this happens a lot and can sometimes be unavoidable. Clipping has the ability to totally ruin an image once noticed. I recently took a dancing image of Novi for an EGI daily theme and I picked a dress specifically as I knew the emote would make it fan out and flow. Unfortunately, as she was mid-spin in the perfect pose, I noticed her tail clipping through the dress. This alone limited my screenshot angles by about 50% or more as it became apparent in so many frames. I worked around this and came up with something but ideally, I should have come out of GPose and picked a different outfit!
[caption id="attachment_210186" align="aligncenter" width="560"]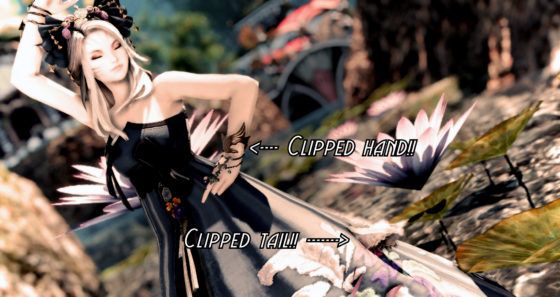 Argh! The clipping sadness![/caption]
You can also never really know which image will work ‘best’ for any given subject if you have a selection of a few. In the story of the clipped tail incident, those ‘disregarded’ images were seemingly liked a great deal more (says Twitter!) than the main image I spent 5 times more composing!
Patience
Do not rush your images. If you are using GPose effects like Sakura or Particle, they can look wonderful and create depth and beauty in the image. Yet, taken at the wrong time, you can end up with sparkles or leaves over parts of the body of your character which may mask specific features or details. A well-placed sakura petal can create beautiful depth within an image. Weather and lighting conditions can vastly influence the image as well so if you have a pose that is working, try hanging around in the same spot for a while to see if an atmospheric change could emphasize the image.

Taking too many shots is always better than taking too few if you’re aiming for that perfect shot. You can always delete the unused files later. Acceptance that some shots just don't work is also important. If you’re not getting a good feeling for a shot, change pose, outfit or location and try somewhere else.
Thank you for reading! Next in line is a much-needed update to the ReShade install guide but following on from this I’ll be expanding on topics mentioned in this article along with further basics, software guides, image organization, an updated GPose summary, ReShade DoF guide (it was too extensive to fit in the main guide) and more! If you would like me to write on a particular topic later down the line in relation to screenography just let me know in the comments below or via Twitter.
Until next time, happy prt sc’ing.
