
In this week’s article, I will be providing a guide on creating a screenshot gallery site from scratch, start to finish. Aside from editing and lighting inquiries, this is the second most frequent subject I’m asked about and so it seems only sensible to do a quick guide for those that may not have any experience creating something of this nature. Yes, there are vast communities of screenshot avid players on Instagram, Tumblr, and Twitter, but sometimes it’s just nice to have one place to organize and categorize your work, the way you would like it to be displayed.

I assure you, it’s easy!
For this guide, we are going to head on over to Wordpress.com to begin the process. For science, this guide was tried and tested by someone who has never used Wordpress. The site was up and functional within 15 minutes!
What is Wordpress?
Perhaps many of you will already know the answer to this, but here’s the definition of Wordpress CMS from Investopedia:
“Wordpress is a free publishing software and content management system (CMS) that is popular in America. The software is open-source allowing developers to create a wide array of plugins, themes, and widgets. Wordpress is widely considered easy to use and is the CMS of choice for almost 75 million websites.”
Before we get started:
Ensure your screenshots are sorted into their respective galleries on your computer. For example, Portraits, Locations, and Action.
To take, sort, edit and organize my images I use a program called Picasa. Here’s a quick video guide on how it works:
“Picasa is a discontinued image organizer and image viewer for organizing and editing digital photos, plus an integrated photo-sharing website, originally created by a company named Lifescape (which at that time may have resided at Idealab) in 2002.”
Creation
 Click to enlarge.
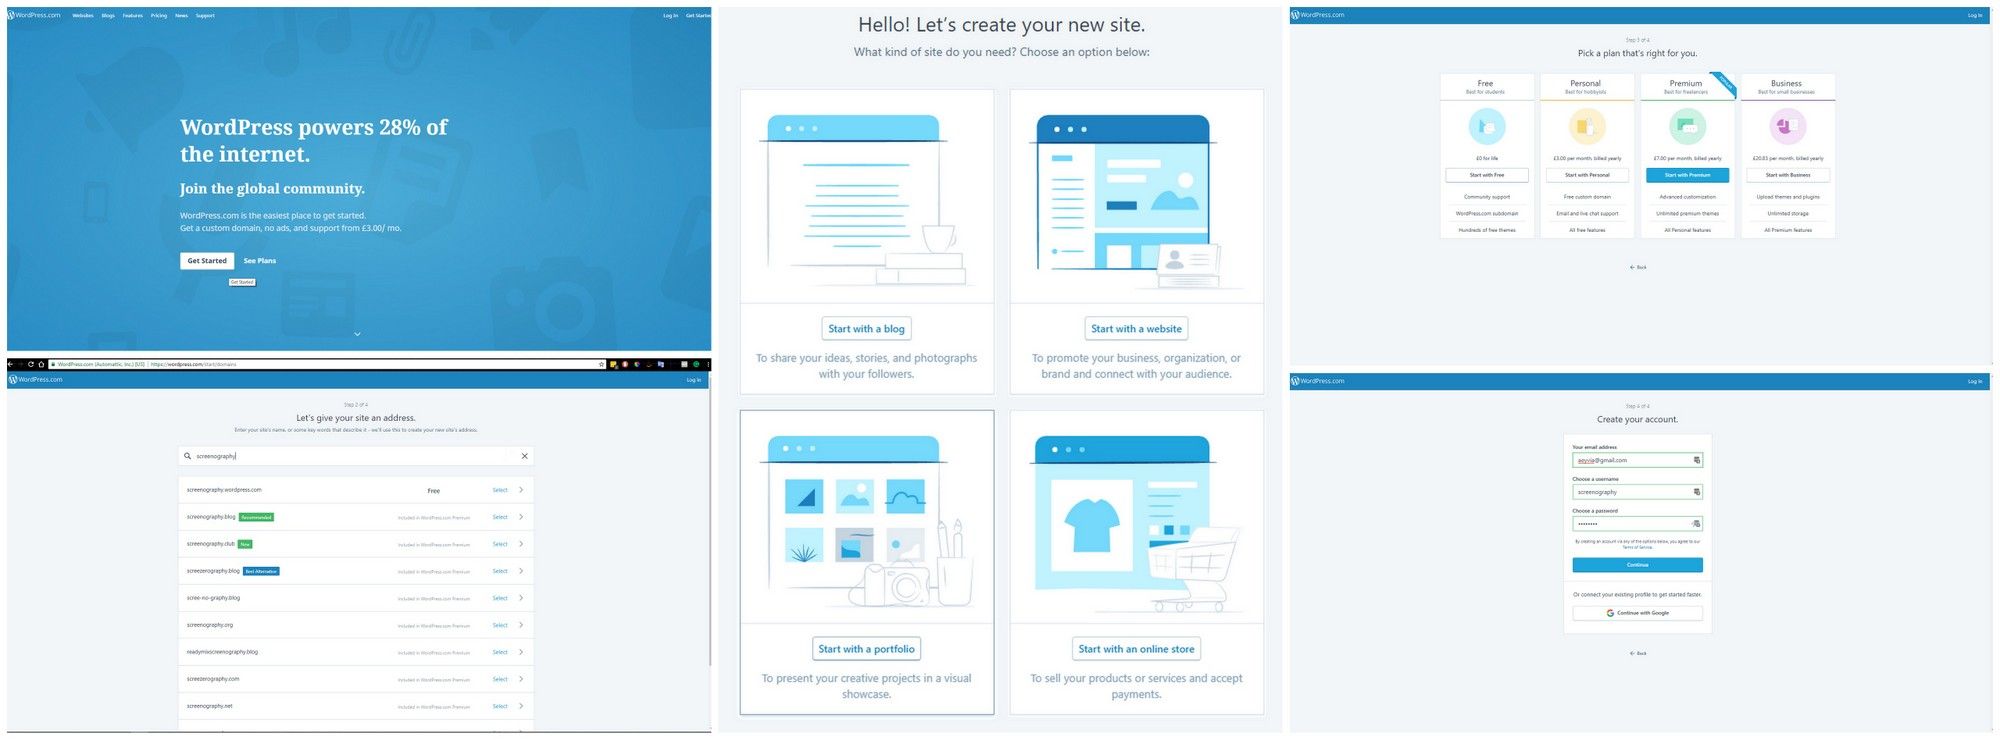
Navigate to Wordpress.
Click on Get Started and provide the requested details.
Select Start with a portfolio.
Enter your desired domain name.
Select the Free option.
Enter an email address, username and password.
Note: Validate your account using the confirmation email, you will need to do this otherwise you will be unable to publish.
Return to your Wordpress site. The first thing you will need to do before making any customization is to pick a Theme. Some themes work in slightly different ways when it comes to creating gallery/portfolio pages and so it’s good to start with a base theme and work up from there.
Click My Site in the top left corner, then select Themes from under the Personalize menu (don’t click on the Customize icon that comes up just yet, we’ll get to that in a little while).
Type in Portfolio or Gallery (the choice is yours) and select the Free toggle in the right-hand corner, unless you wish to browse the paid theme options.
For this example, I am going to be using the theme called Argent by Automattic.
[caption id="attachment_133270" align="aligncenter" width="560"]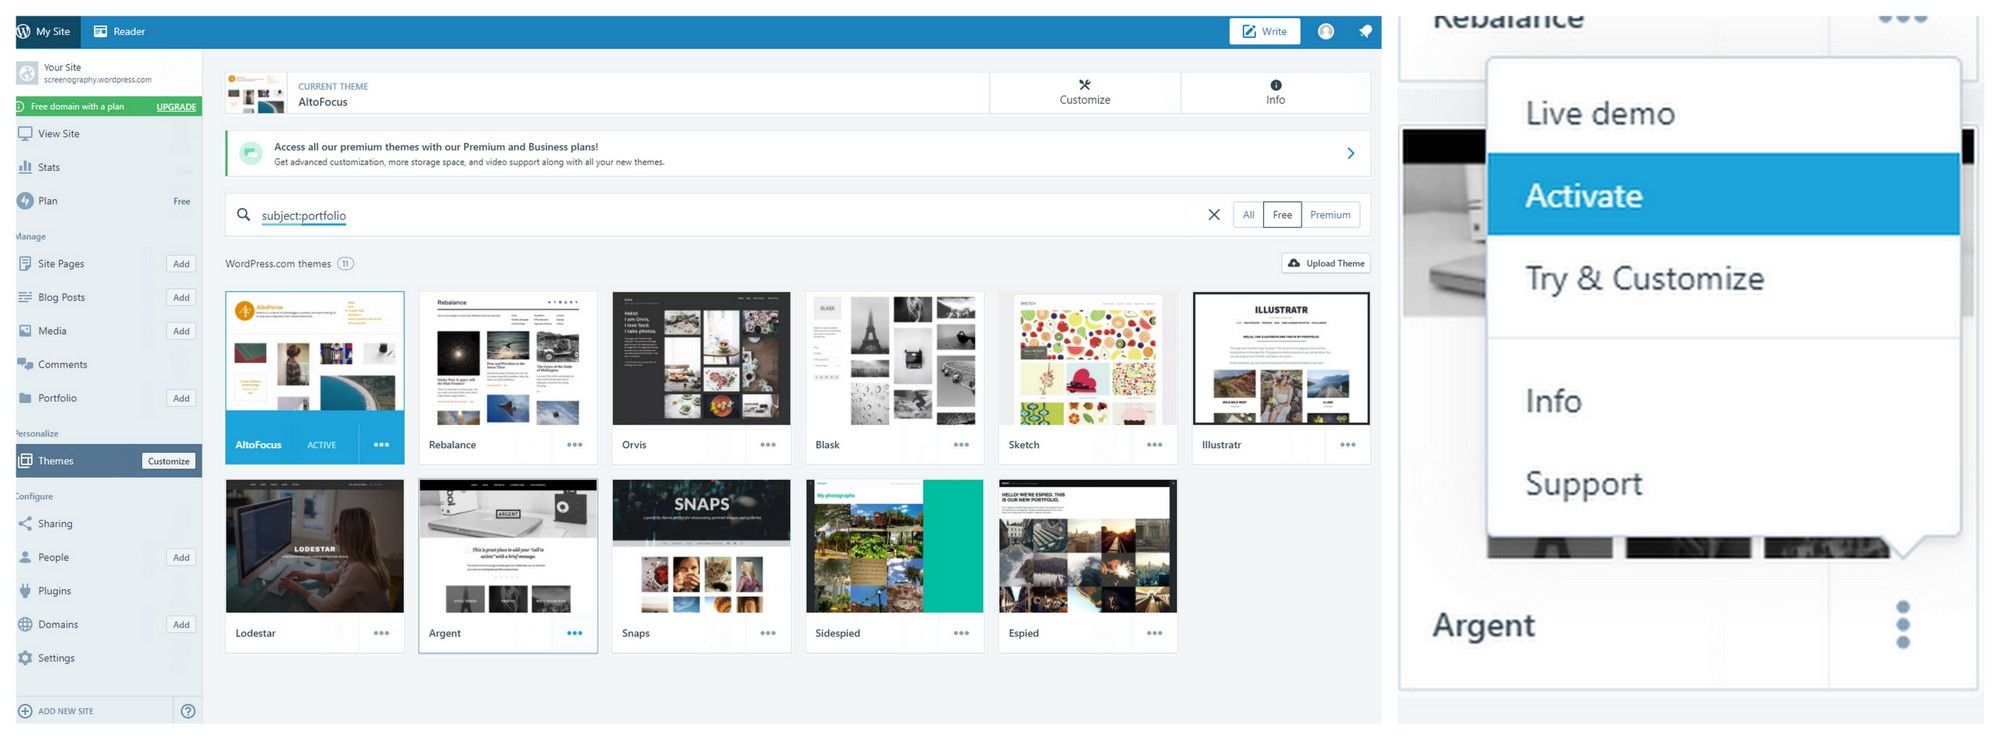 Click to enlarge.[/caption]
Click on the three dots to open the submenu and select Activate. Alternatively, you can click on the thumbnail of the theme itself, and select Activate from the menu at the top. You receive a dialog box prompt from which you select Back to Themes.
Return to the sidebar menu and click on the Add box within the Site Pages section.
Title the page Portfolio. Leave the contents of the page blank for now.
[caption id="attachment_133278" align="aligncenter" width="560"]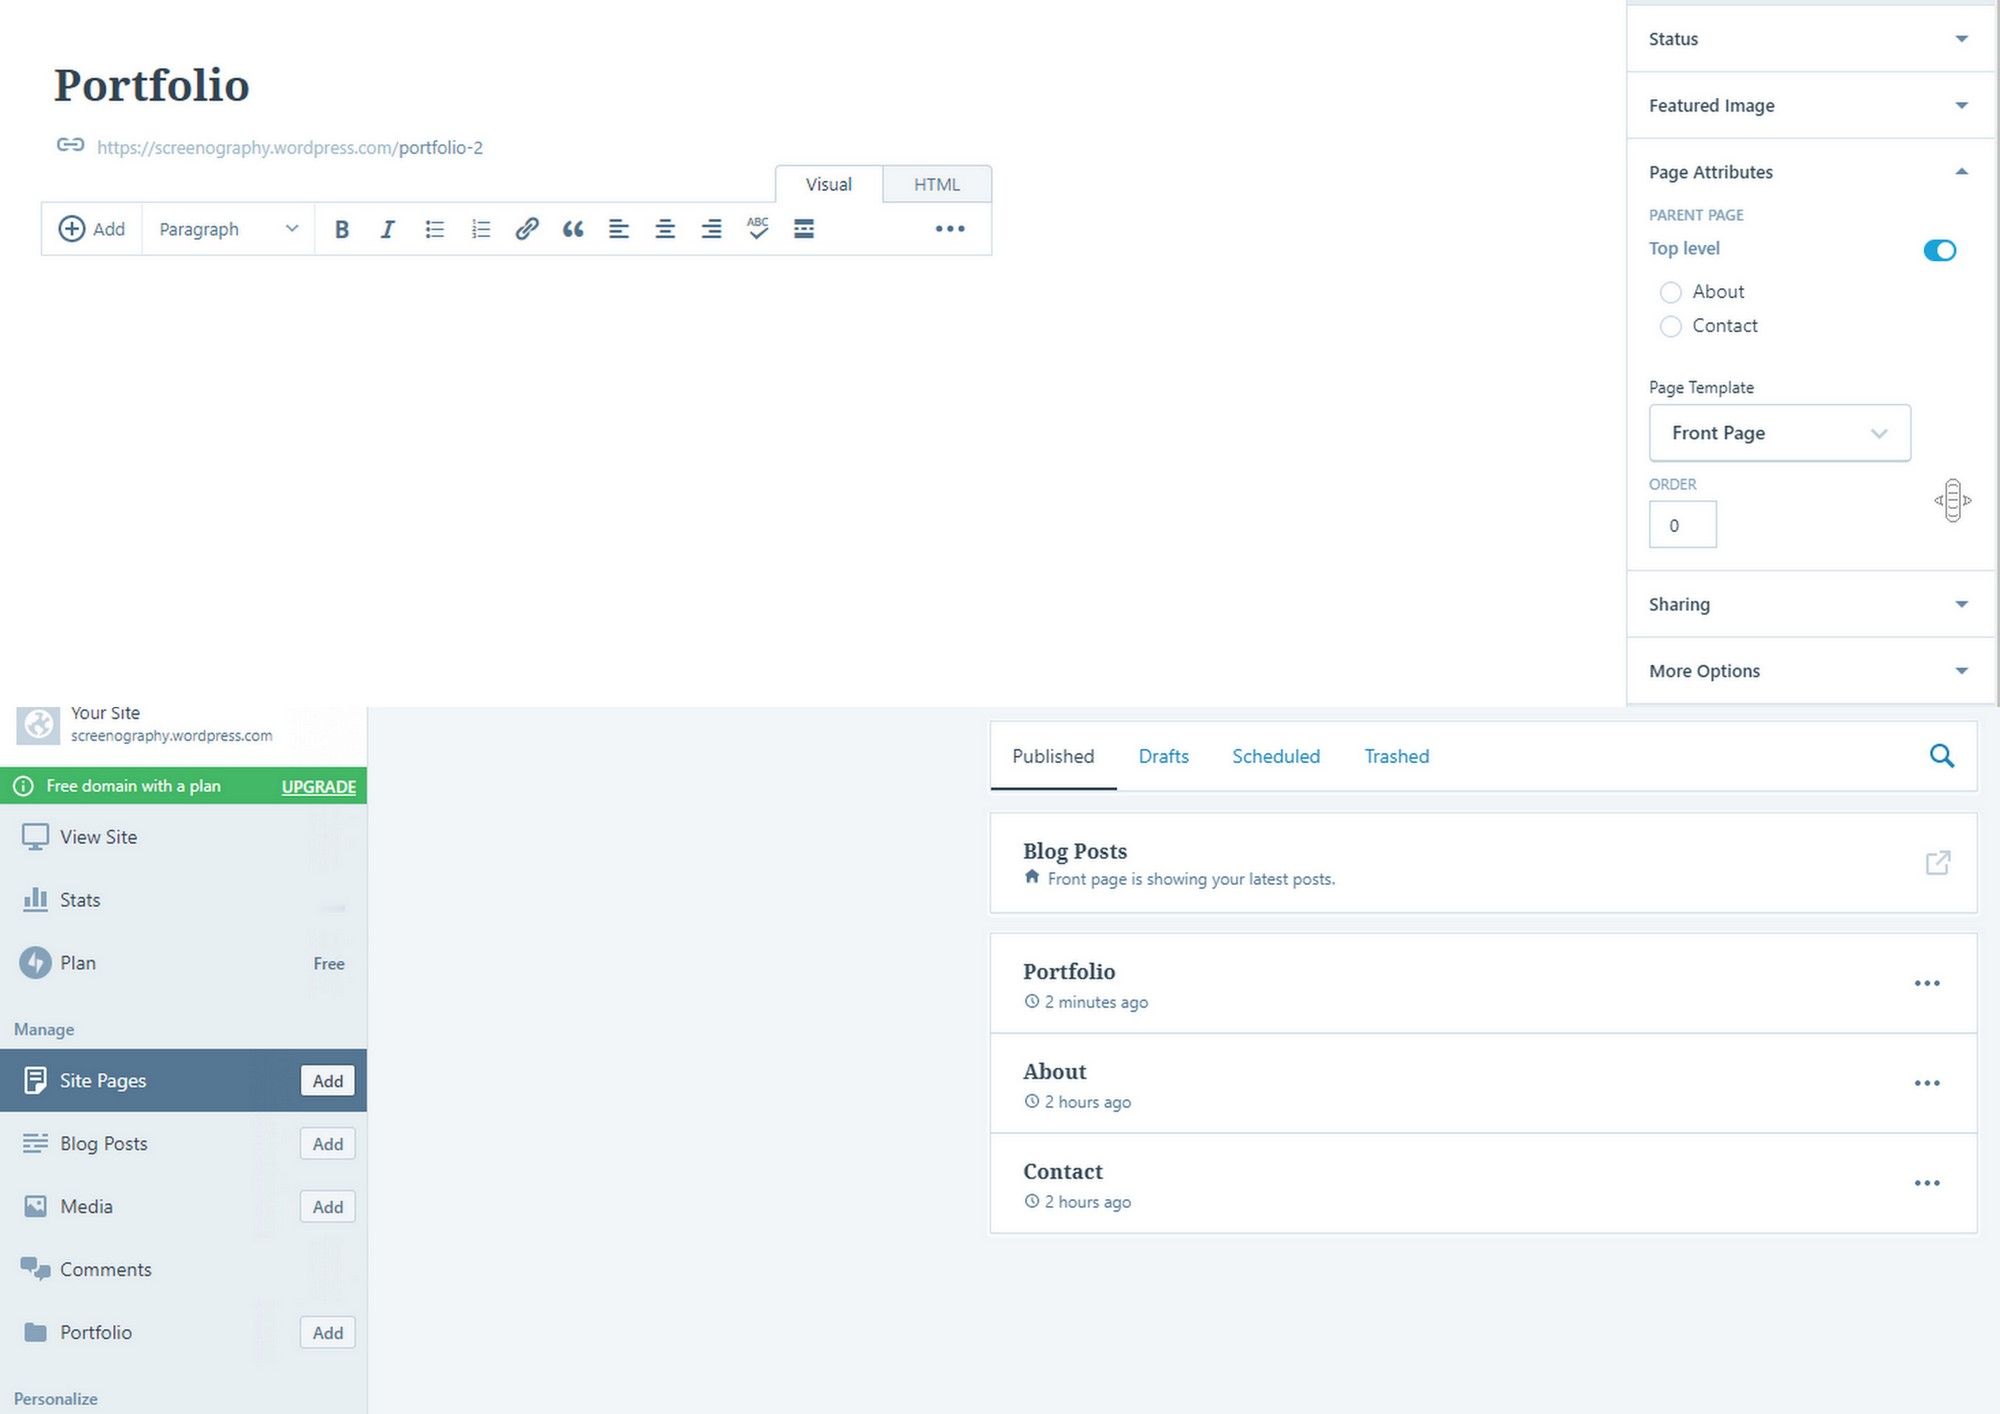 Click to enlarge.[/caption]
Click on Page attributes on the right sidebar menu. Under Page Template, you will see a drop-down box. Select Front Page.
Click Publish in the top right corner.
Here we are defining the shell for the front page portfolio layout.
Now when you click on Site Pages in the left-hand sidebar menu, you should see three pages: Portfolio, About and Contact (shown above).
Customization
Next, we will modify the look and feel of the site.
[caption id="attachment_133271" align="aligncenter" width="560"]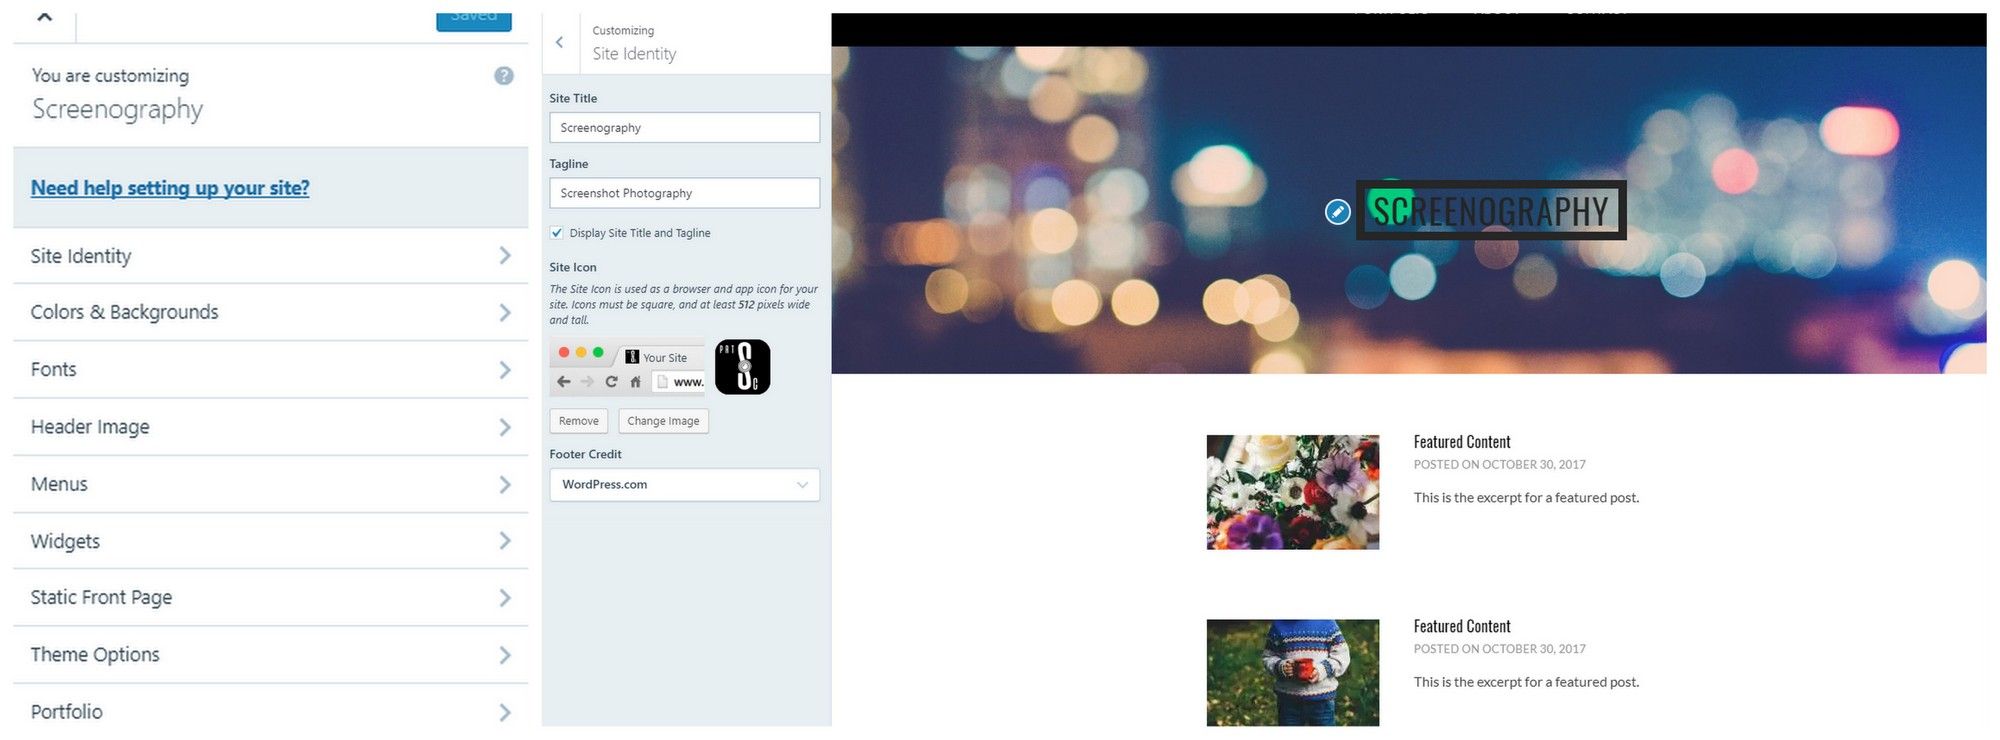 Click to enlarge.[/caption]
Click on the Customize box from within the Themes section on the left side menu. We will go through each section, one by one.
Site Identity: Rename your site to your desired name and add a Tagline if you wish to. Change the Footer Credit if you wish to. If you would like to have a custom Site Icon you may upload an image or icon now.
Note: I click Save & Publish between each section to save as I go (just to be safe!) but alternatively you can Save & Publish at the end once the modifications are complete.
Click the back arrow in the top left to return to the main Customize menu after each of the following points.
Colors & Backgrounds: If you would like to alter the color of the text on the middle banner or the background of the site, now’s the time to change this! You may wish to return to this section once the header and portfolio images are displaying to give you a better feel for the site.
Fonts: Here you can change the Header and Base fonts. I prefer to keep mine cleaner with sans serif fonts but there are quite a few to select from within this theme. Currently, I have chosen Oswald for the Header font and Lato for the Base font.
Header image: This image will be the first thing that visitors to your site will notice, so try to choose one of your best screenshots. Click Add New Image and upload your screenshot. You will be prompted to crop the image. Do this.
Note: If you upload multiple headers and select Randomize headers, try to keep your images on either a dark or light theme so that the Site Title does not get lost if the colors are too similar to it.
Menus: There are three submenus here.
Menu Locations: allows you to define which menu appears where. For this site, I have used the drop-down to select Social Media to appear on the top banner.
Primary: Allows you to edit and add to the Primary Menu. For this example, we will leave this as it is.
Social Media: Allows you to edit, add, remove and reorder your social media menu. Make sure all the links are correct!
Widgets: Here you can alter the contents of the footers on the website. You may wish to keep things simple and just stick with the text and the search bar for now, but you can come back to this later when you’re adding more to the site. You may wish to add your relevant copyright notices including the Square Enix one: Copyright (C) 2010 - 2017 SQUARE ENIX CO., LTD. All Rights Reserved.
Static Front Page: This is the most important section! Toggle the ‘A static page’ option then select Portfolio from the dropdown list and save (just to be safe again!).
Theme Option: Make sure the Show Portfolio Section is ticked. You may then choose whether to display 3, 6 or 9 portfolio sections on your front page. For this example, I am sticking with 3.
Portfolio: Not currently relevant, so you can ignore this for now!
Click the Save & Publish box in the left sidebar menu.
When the blue box has switched to saying Saved, you may click the X in the top left corner to return to the main site.
Galleries
Next, we need to create the pages containing the images that the portfolio page will be pulling in.
Click the Add box within the Portfolio menu on the left sidebar menu.
Title your page with the subject of that particular gallery. For this example, I will use the Portrait title.
To add media to the page click on the '+' sign, then the Media option. A new box will open. Click the Add New box from the top left. File Explorer will then be displayed. Navigate to the images you wish to add. You may select multiple images to upload at a time.
Tip: Make sure your file names are neat and relevant (unlike mine!).
Click Open, then your images will upload to Wordpress and remain selected as they do so.
Then click Continue in the bottom right. Your images will be added to the page.
Note: You may edit the order of the images by selecting the 'edit tab' however, the mosaic layout will become irrelevant as the theme puts the images into a carousel layout for the pages.
Important: Set a featured image by clicking on the Featured Image menu section on the right side menu. This will be the image that appears as a thumbnail on your front page.
[caption id="attachment_133273" align="aligncenter" width="560"]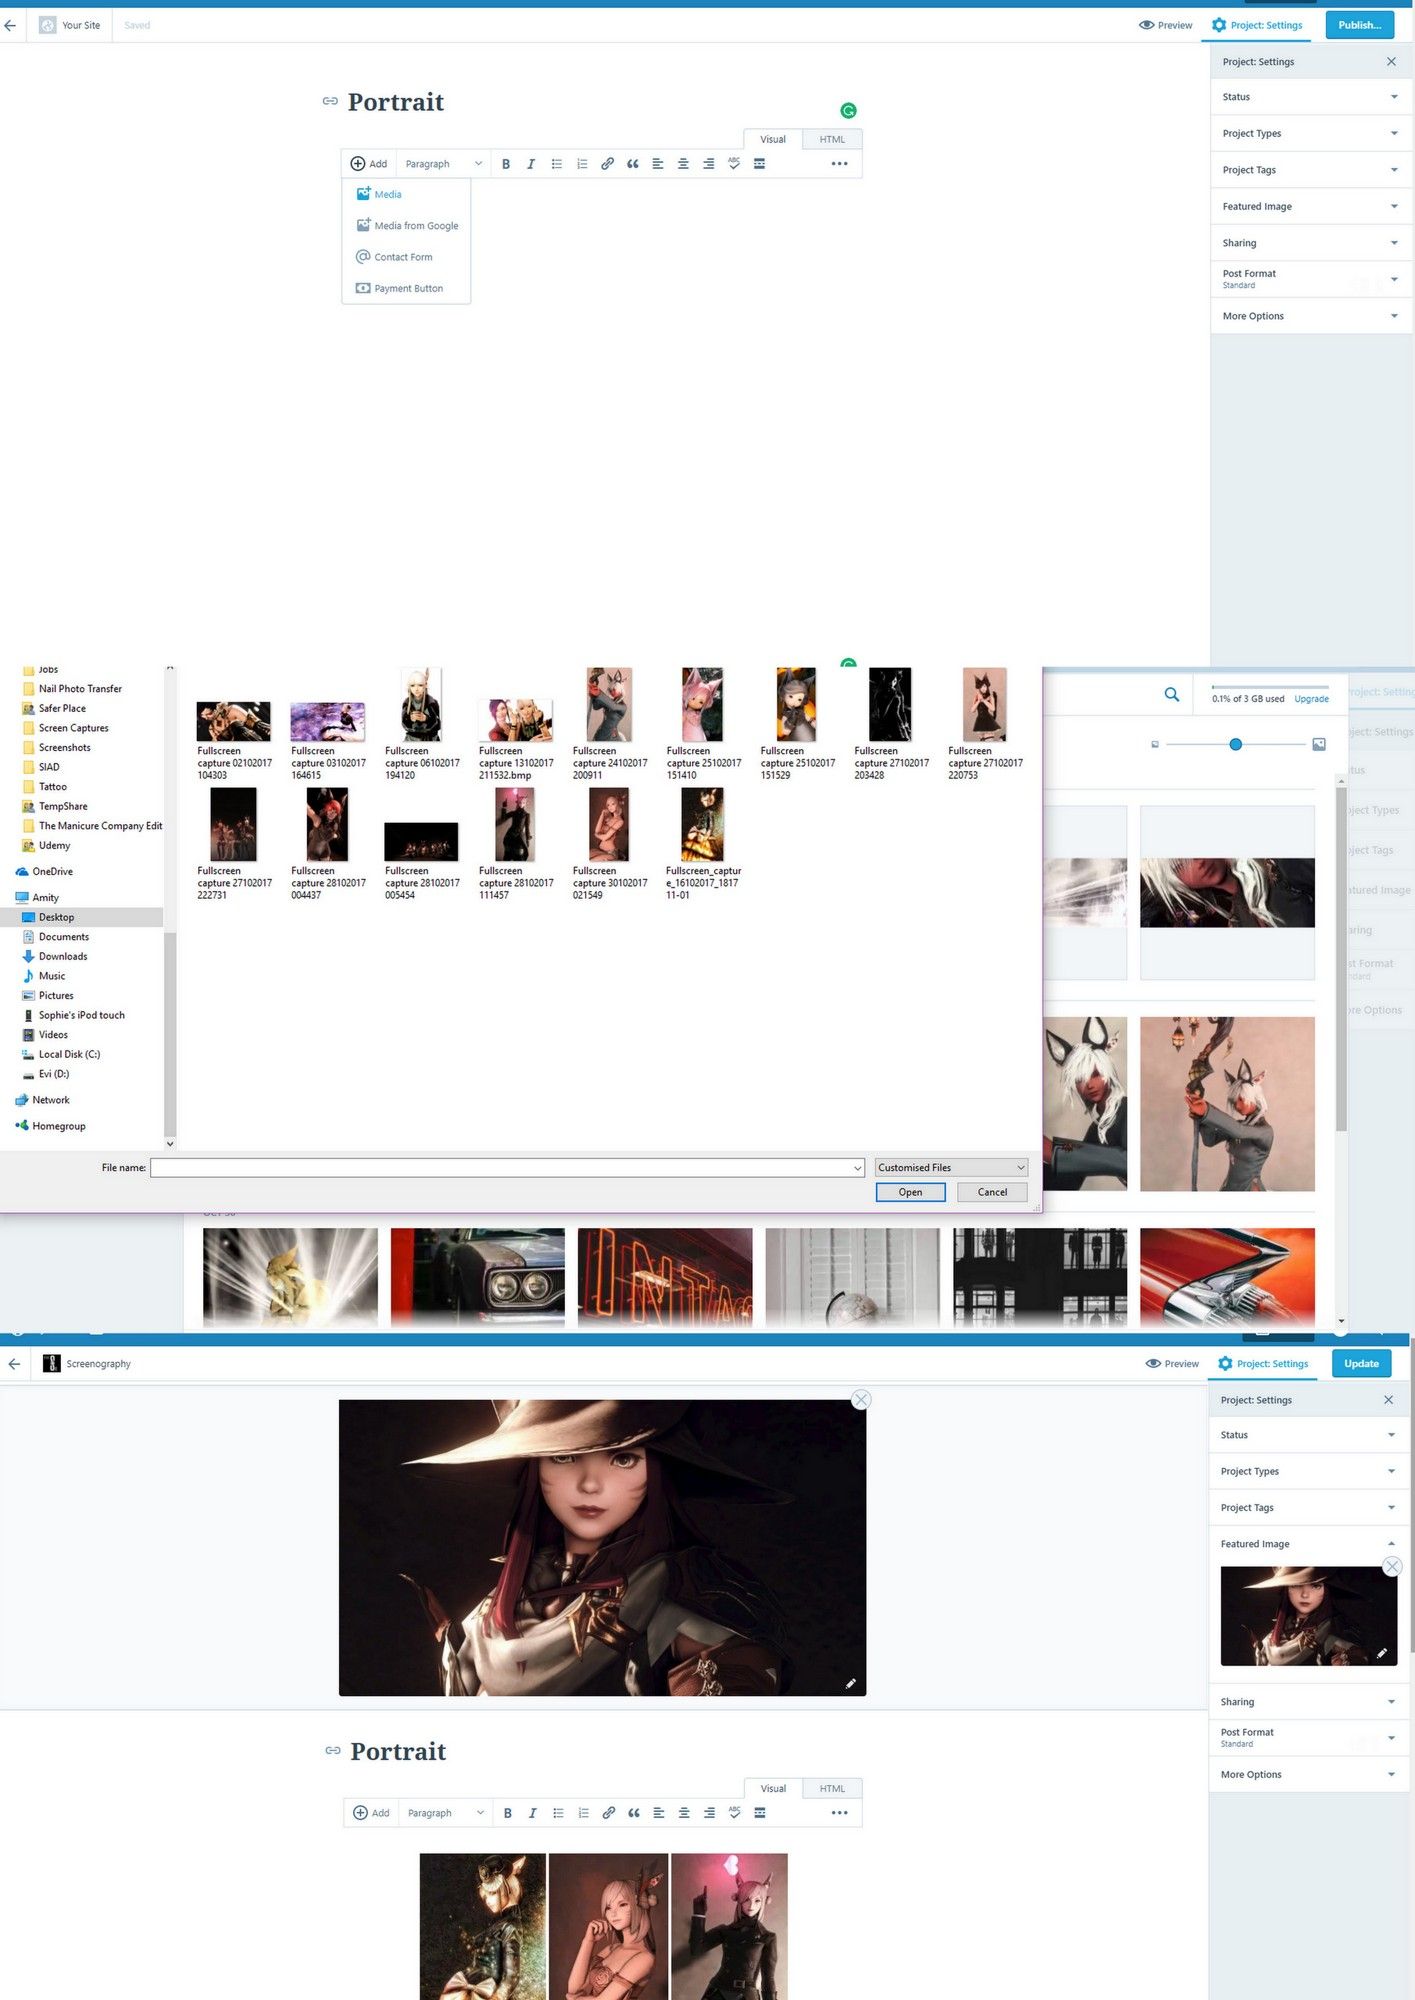 Click to enlarge.[/caption]
Click Save & Publish.
Add more galleries in the same way as above and then you are done!

There’s a lot more you can do with the site, but we’ll leave it there for now. If you wish to make more additions to the site in the future you might want to add more menus so you can include the About and Contact pages, add more galleries, integrate widgets and set up a blog page.
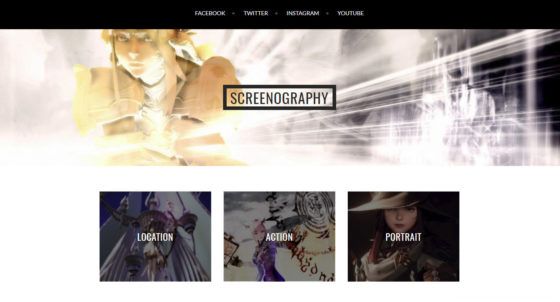
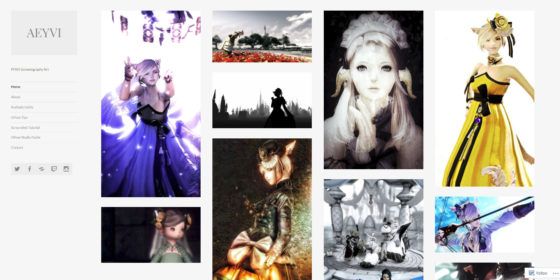
Remember, this is just a demonstration website put together for this article. If you’d like to see my actual site for screenshots please take a look at this link: aeyvi.wordpress.com.
Thank you for reading and I really hope you found this guide useful! If you have any questions or comments, please don’t hesitate to get in contact either through here or Twitter. I’m afraid I won’t be able to provide support for all the themes that if you did come across problems while creating your portfolio I’ll do my best to help!

For all related articles please see my author page where you can find guides on GPose and ReShade.
