This week in Echoes of Eorzea I have attempted to formulate a basic ReShade Settings Guide. For those who are perhaps new to ReShade, an earlier edition of Echoes of Eorzea covered a basic ReShade Installation Guide.
If there is anyone who wishes to ask some specific questions regarding the article please leave a message in the comments below or PM me on Twitter.
Introduction
The beauty of ReShade is that you can tailor your filter to your environment or requirements if you understand how the settings work. Creating a full preset is like trying to create a menu from a multitude of ingredients. Some work fine on their own but not when mixed with others, and some change and flourish when combined with others. Sometimes you will produce a tasty meal, other times, a pile of sludge.
If the list below looks a little overwhelming then you can search this page for your desired setting using the Ctrl+F shortcut.
This guide is aimed at covering the basic settings and will be going over the capabilities of most shaders, along with example images. The list is more of a companion, to be used as a reference as you learn more about ReShade. If you are an experienced ReShade user I doubt that, sadly, I will be able to offer any new pearls of wisdom!
Before I begin though, I want to emphasize that I am still learning and cannot claim to be a ReShade master (I know there are many out there), however, I’ve been asked to write this up time and time again after others have seen my presets and wanted to know how this can be achieved, and so getting to know the settings is a very important process.
As I also emphasize in any response regarding my own creations, each filter is usually created under specific conditions and therefore works best when those are replicated (and may look terrible or not function elsewhere). For example, my ‘night’ filters can work in some daylight conditions yet more often than not, they will look awful and the colors and contrast are hideous. My current work can be viewed at the Screenographic website.
If you wish to try out a variety of filters, you can find the FFXIV library here. Make sure the preset you download is listed for ReShade and not SweetFX, their configuration files are different.
However, if you are reading this guide then it would seem you are wishing to gain a more in-depth understanding of ReShade in order to create your own presets. There's no harm in viewing other configuration files to see how other creators have handled their settings.
Sometimes you will find a ‘standard’ filter that adds color, sharpening and shading as these are the fundamentals. However, if you want to delve deeper and create something more unique it’s ideal that you grasp the basic concepts first. I still find myself juggling presets, mixing and matching various settings in hope of achieving something nice (mostly blind luck to be honest). To make your images even more original you can begin to mix in the GPose standard filters and effects.
Even though I will list the settings here I would highly recommend the best way to get used to them is by playing around and seeing how it works. Not every variation will work, as some settings are location dependent and some may error, possibly because of graphics settings and/or the network activity. If your preset is created for a close-up studio shot, it may not work for a location shot (sharpening value changes) yet there is no harm testing each filter you create under different scenarios, the results may surprise you!
Please note: this guide is not intended for those using Stormshade even though some explanations of settings may still be relevant.
Important Notes
ALWAYS backup your presets. Dropbox is an excellent free tool for this.
If you are playing with the settings and you create a preset you really like but wish to build on it, go to the folder where your presets are stored (e.g- C:\Program Files (x86)\SquareEnix\FINAL FANTASY XIV – A Realm Reborn\game) then right click on the preset name, copy and paste it. Rename the pasted version. Go back in the game, create a new preset with the same name given to the pasted .ini. The settings will be ported in (or reload) and you can continue playing with the preset without risk to the first. You can always revert to your previous preset and repeat this process if you get in a tangle.Keep organized! Start by minimizing all settings and go through them one by one.There are a lot of settings in ReShade and some settings have a large list of variables. You don’t want to be accidentally shifting the wrong settings or clogging up the list while trying to learn.
Ensure your ReShade folder has read-write privileges. One of the most frequent things I hear regarding ReShade is that the file will not save the settings. The only answer I’ve come across for this is that the folder (C:\Program Files (x86)\SquareEnix\FINAL FANTASY XIV – A Realm Reborn\game) does not have Read/Write permissions. It must have these in order for the files to be written. If you still struggle with this, download a basic preset.ini from the FFXIV Library, drop that into your folder, duplicate and rename it. Then go back in the game and into the ReShade menu (shift+f2) and click the + icon. Name the preset to match and then the settings will port in. This will give you a preset to have a play with.
Things that may change how/if a setting will work:
Light day/night, thunder, snow, wind, PC graphics and network speed.
The order of presets in the top list of ReShade may not necessarily match the order of the lower list.
As there is such a vast array of settings so I will not be covering every single one, however, I will be going over the basics and explaining ones that I have found most useful while creating configuration files. Descriptions of lesser used settings will be kept to a minimum even though I will try to cover as much as possible. Settings I use frequently will be marked with a star (*). I will provide some reference images to more easily display the visual impact of the filter.
ReShade Settings
I have endeavored to keep the image the same for most filters but those that require close-ups have been created under uniform light conditions in the studio. The settings have been listed in the order they appear in the top menu of ReShade.
The location of the majority of these images have been taken in Upper LaNoscea (X29.7 Y: 24.7), so if you wish to test a 'faulty' setting it's best to go there and compare locations.
Adaptive Sharpen
Adaptive Sharpen is versatile and caters for close-up shots and I tend to use this option in its default form more than any other sharpening shader. You may increase the sharpening strength to suit your need although I would recommend having lower values for wider distance shots as it may have the side effect of making the image look very grainy and pixelated.

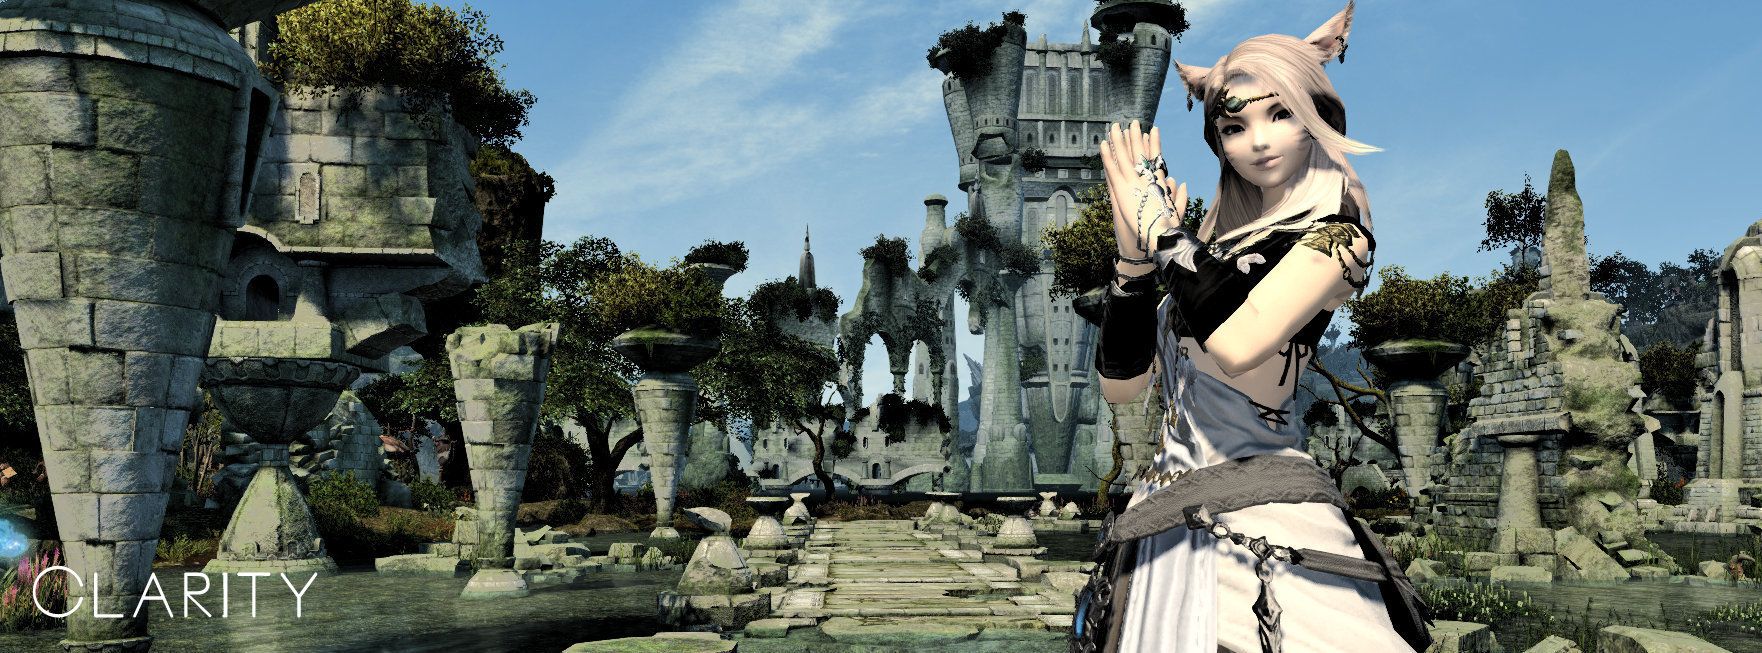
Clarity
Clarity essentially emphasizes the shadows in the image to provide more contrast. Increasing both the ClarityRadius(4), ClarityOffset (4000), ClarityBlendIfLight (170) values, lowering BlendIfDark (25), and selecting Linear Light in the ClarityBlendMode will provide the type of contrast and sharpness displayed in the image below. Thes shader is somewhat similar to the ‘strengthened effects’ GPose filter. There is a lot of flexibility in this preset and it’s well worth spending some time on as your image can get a great boost from it.
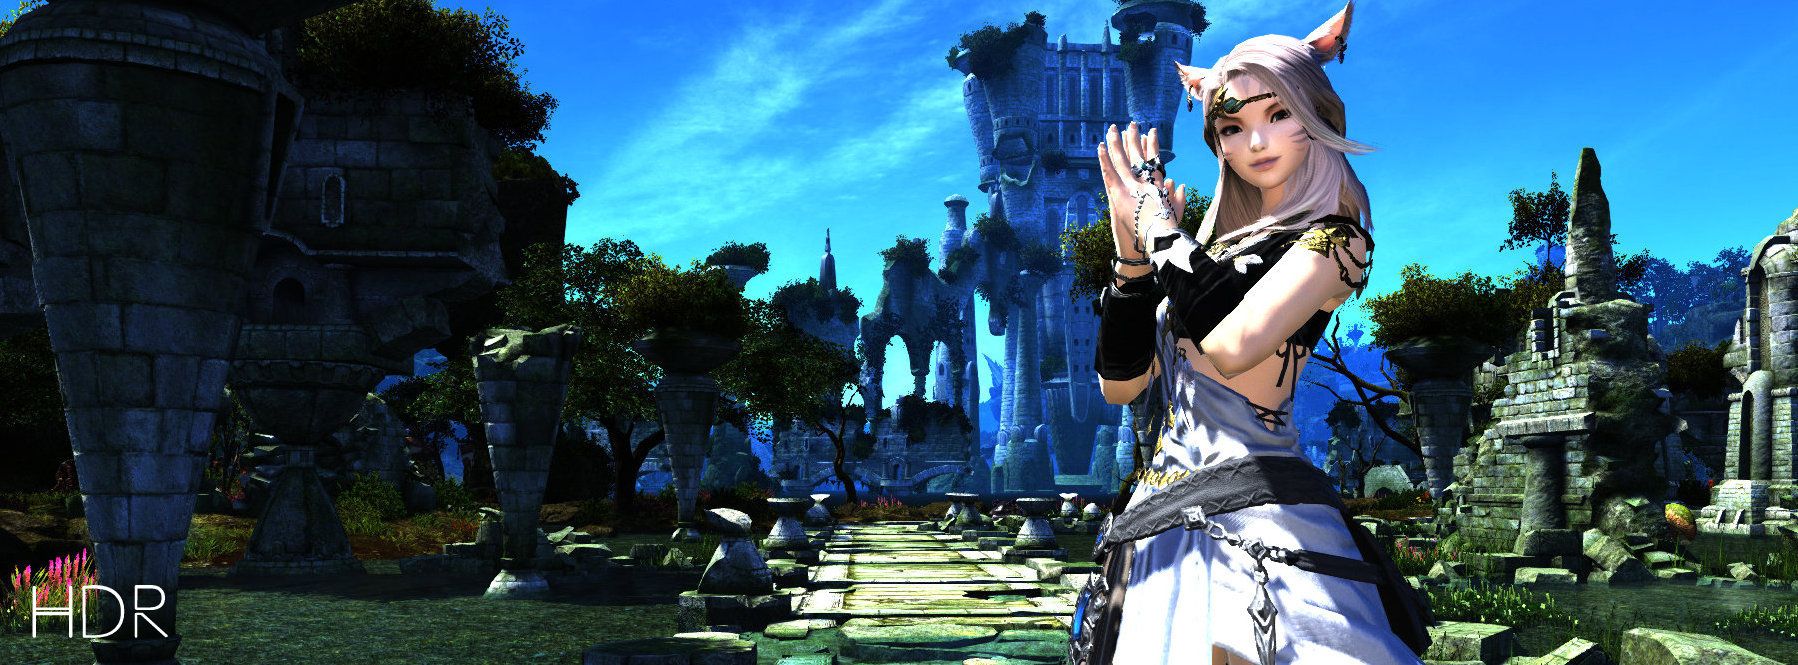
HDR
HDR stands for High Dynamic Range. Dynamic range signifies the ratio of light to dark and ideally, those can be balanced to provide a more equal distribution of detail in an image. This setting can be used to provide a boost in saturation and contrast to your image. Increasing the Power value will darken the image and increase the saturation and contrast. Radius 1 and 2 provide a slider ranging from a 'light>dark>light' exposure scale. HDR can look very effective if going for a Posterization effect or if you layer it with other effects while building your filters. [Images uses Power: 3.840, Radius1: 3.120, Radius2: 3.280].
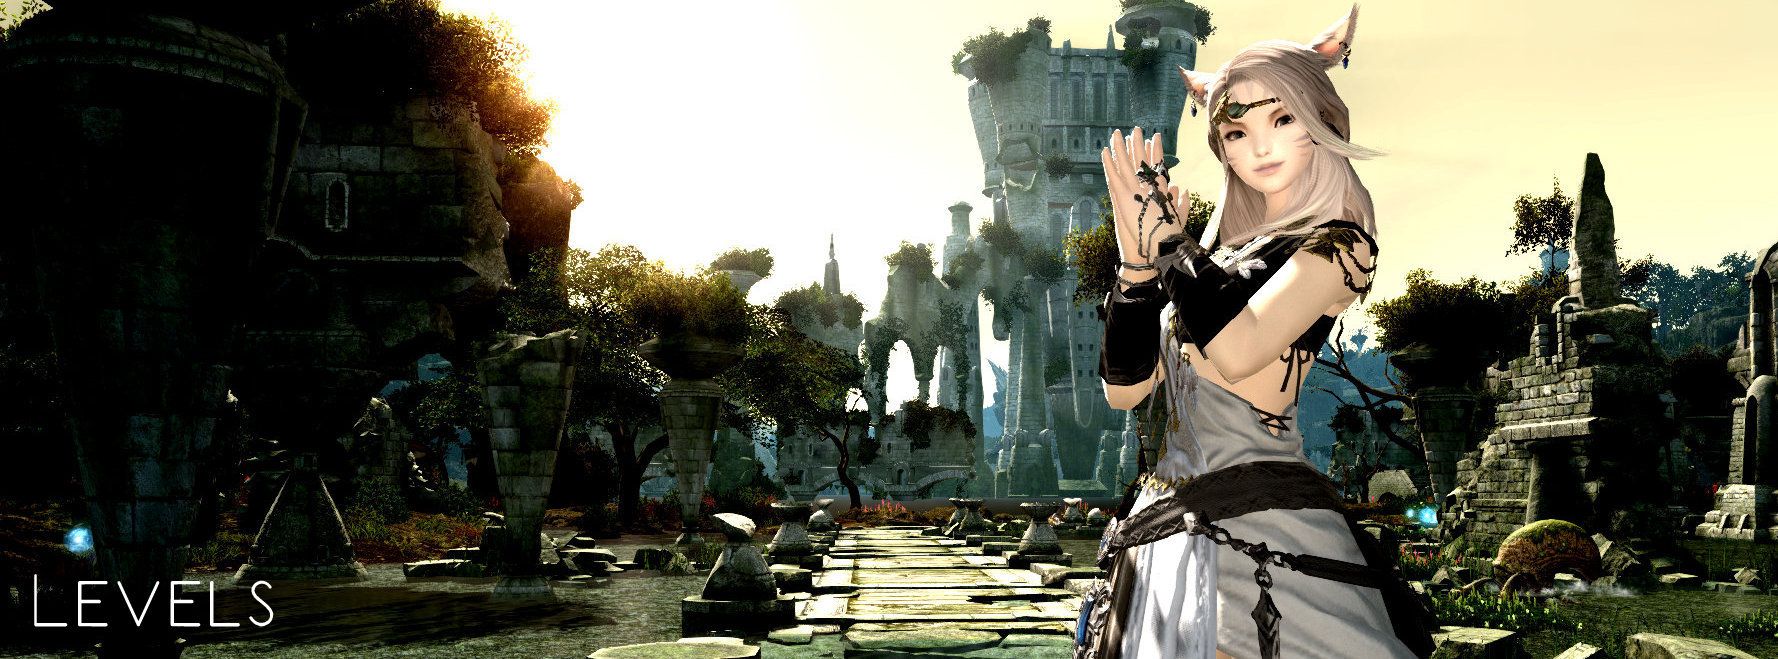
Levels
Levels only has two options to worry about, BlackPoint and WhitePoint. BlackPoint emphasizes the dark areas and WhitePoint, the lighter areas. This is a very simplistic way of adding contrast to the image.
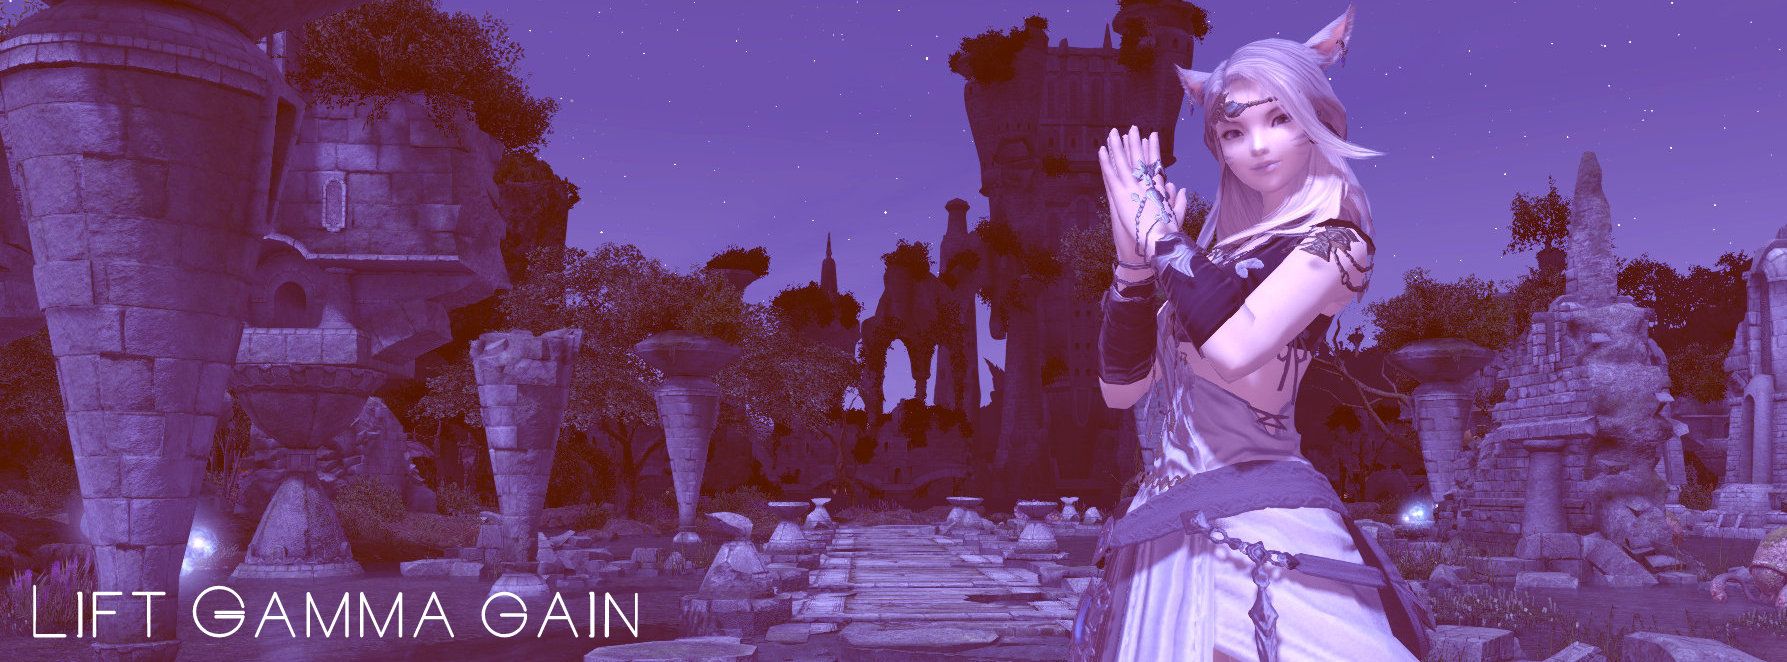
Lift Gamma Gain
Lift gamma gain is ideally used in conjunction with other settings in order to emphasize them. LiftGammaGain adjusts the highlights, mid-tones and shadows of red green and blue. You can also use this as a way to recolor your image.
SMAA
SMAA is a less resource demanding antialiasing mode. Anti-aliasing smoothes out jagged lines (usually seen around edges of objects).
CA
Adds colored lines around the image, similar to those when wearing 3D glasses. I have displayed the more extreme variables in the image below.

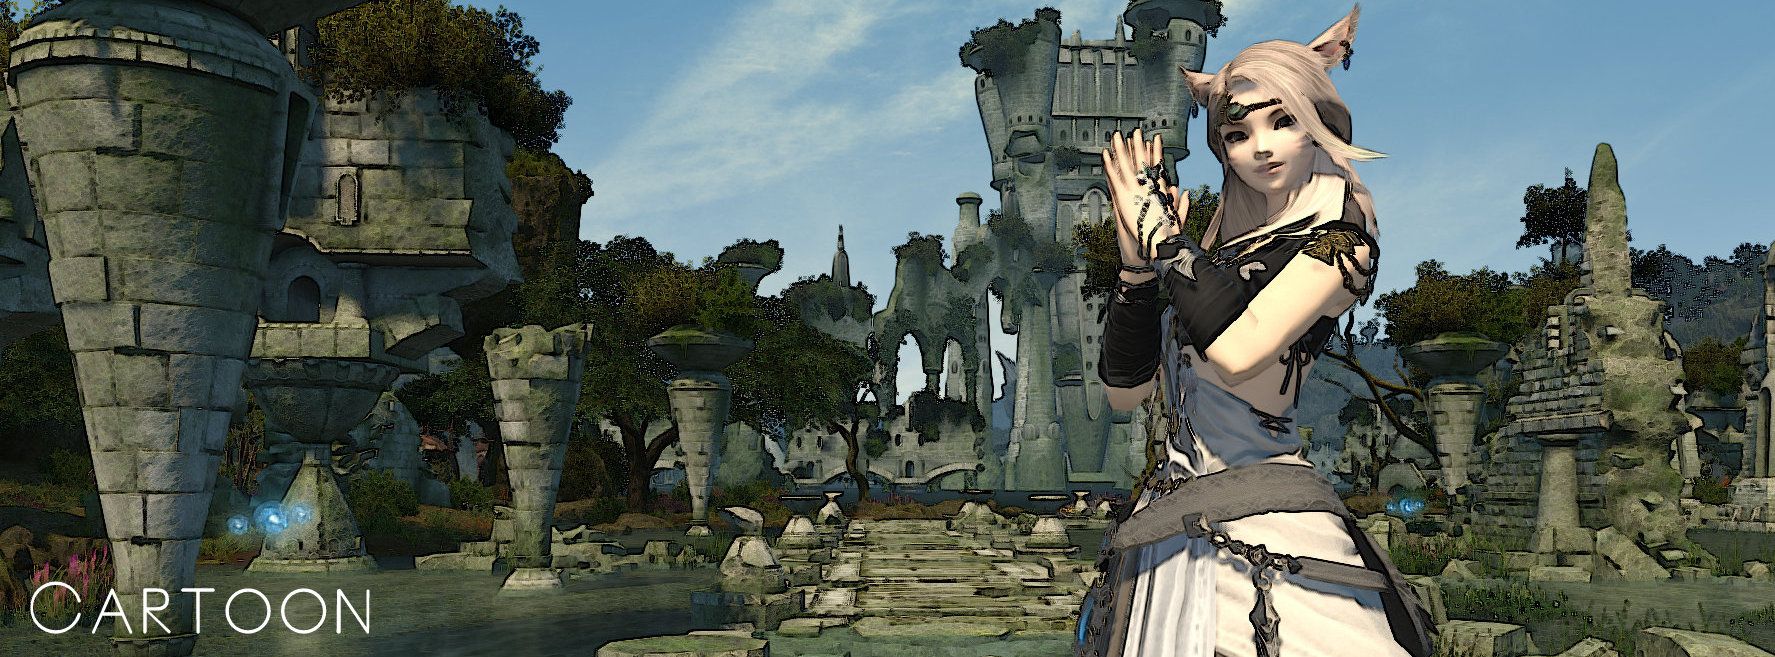
Cartoon
The cartoon shader adds a darkening effect to edges to create a comic style appearance. The two options here are based on intensity alone. For the image below I have used a relatively low Power value (2.337) and a lower Edge Slope (0.867) so that the effect did not become too overwhelming.
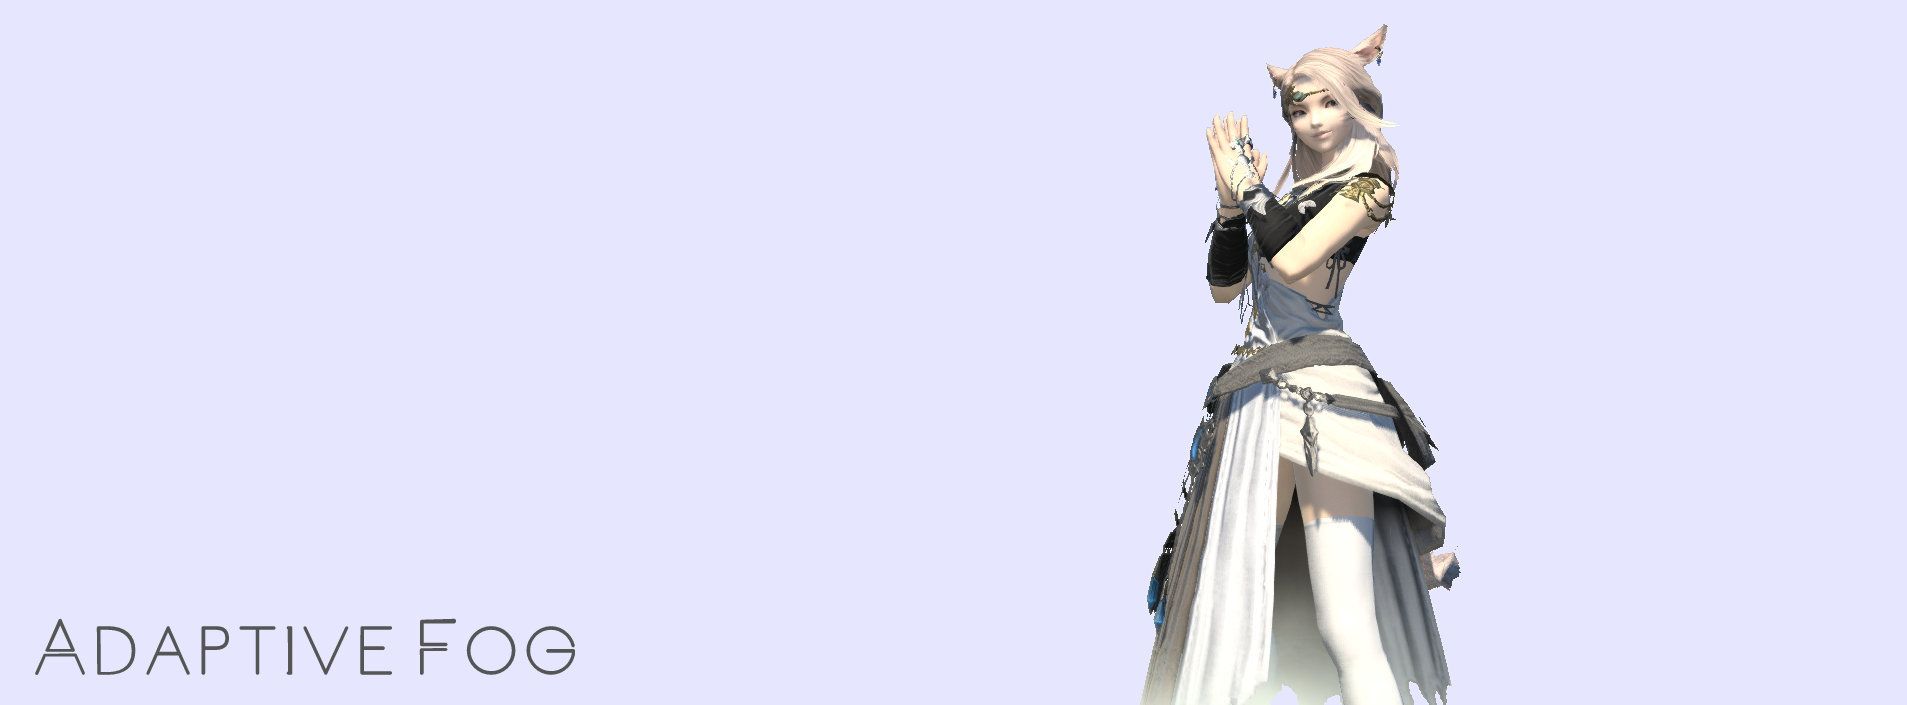
Adaptive Fog
Adaptive Fog is a bit glitchy and location depended (as it needs a lot of depth to determine where to place itself). Many people have problems with this preset so don’t worry if yours doesn’t work. My location is x29.7 y24.7 for this image so you can test whether yours works at this location as mine has. Even during writing this and taking the screenshot below, mine was flashing off and on.
MaxFogFactor - The higher the value, the denser the fog.
FogCurve - The higher the value, the closer the fog is to the location. The description in ReShade is “The curve determines how quickly items are fogged”.
FogStart - The ‘line’ at which the fog starts, the lower the value, the further away from you it begins. Some players use this setting to create a white background for their screenshots by having high values in MaxFogFactor and FogCurve while having a low value in FogStart.
Color Matrix
Adds a tint to the image.
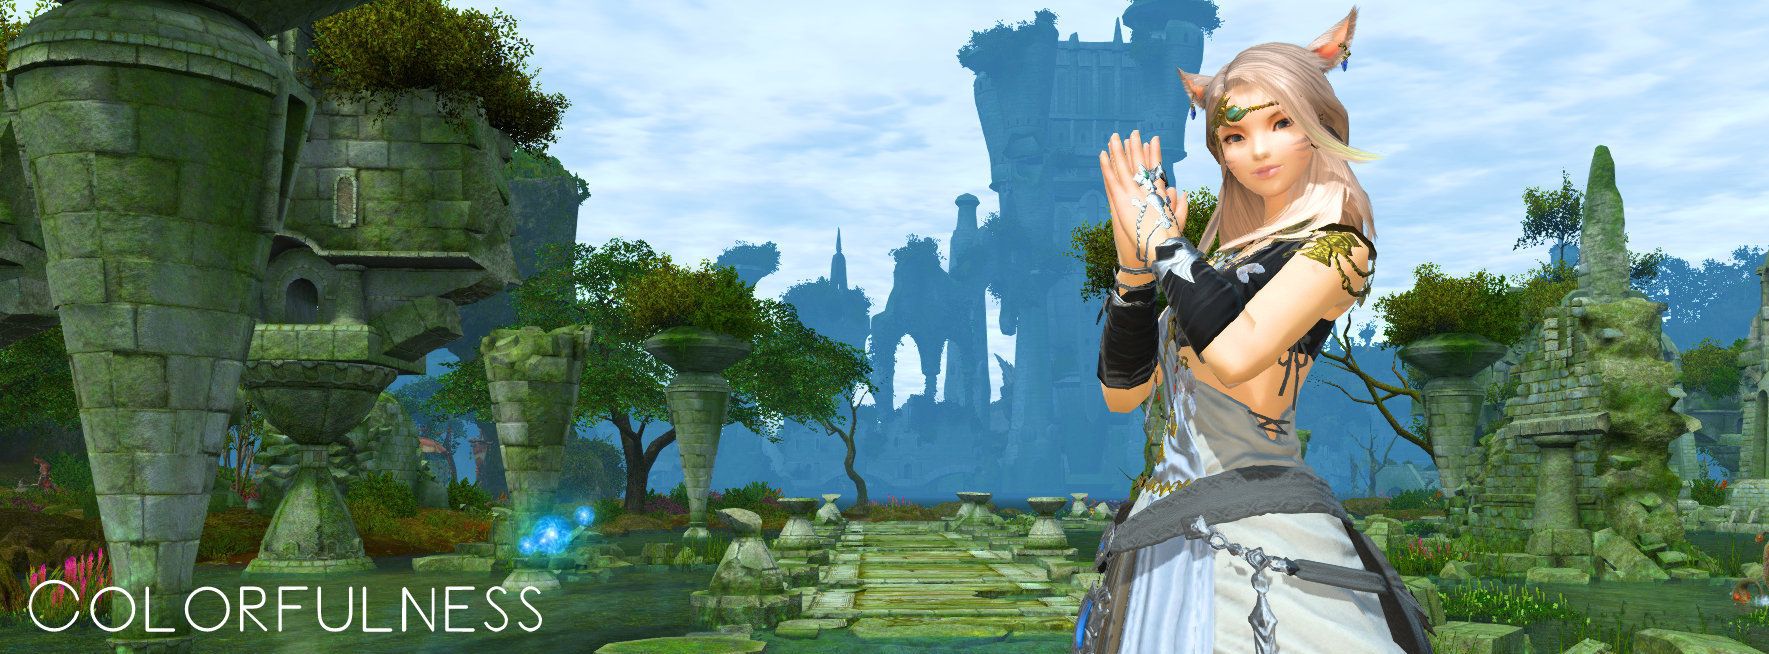
Colourfulness*
Adds saturation to your image.
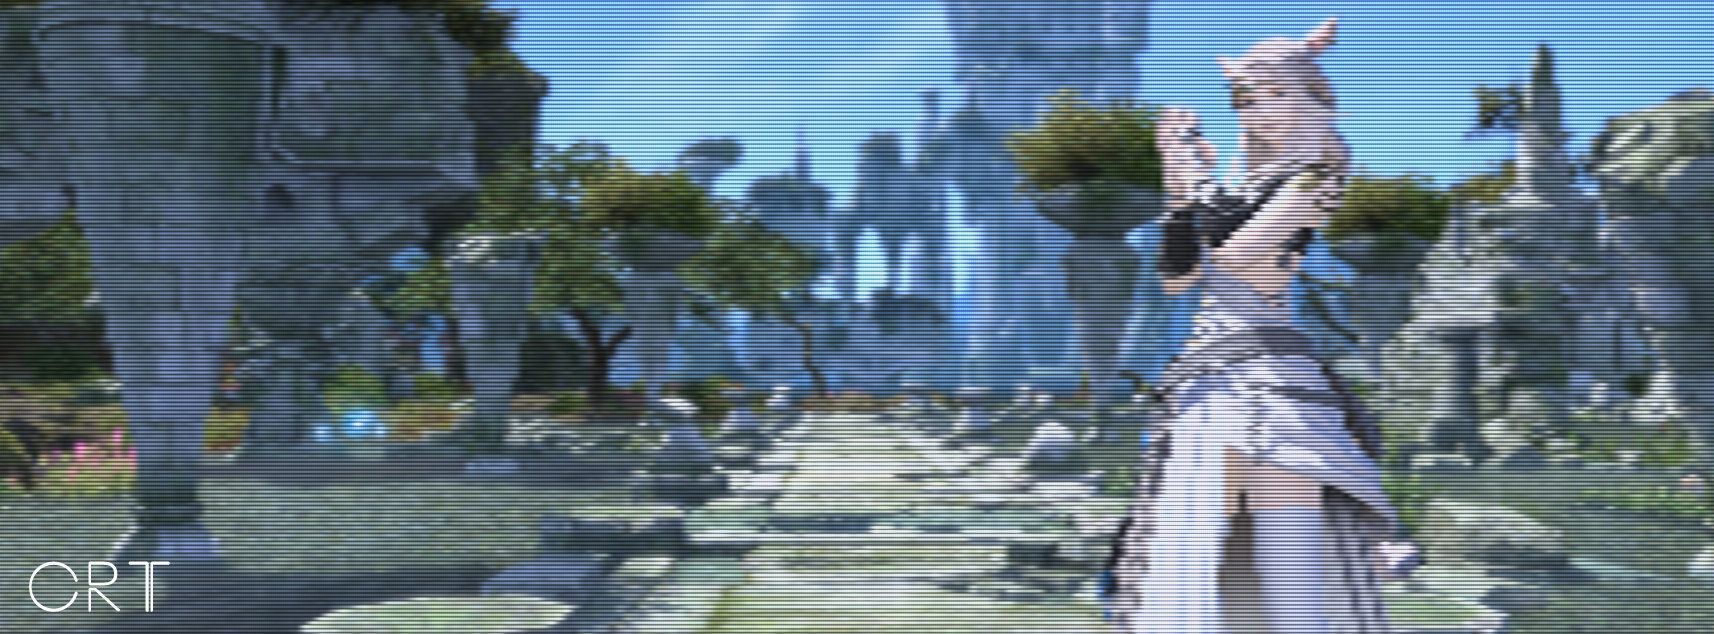
CRT
Recreates the effect of an old CRT screen. The sliders increase the density of the CRT squares or lines. You may also adjust the border and corner shaping.
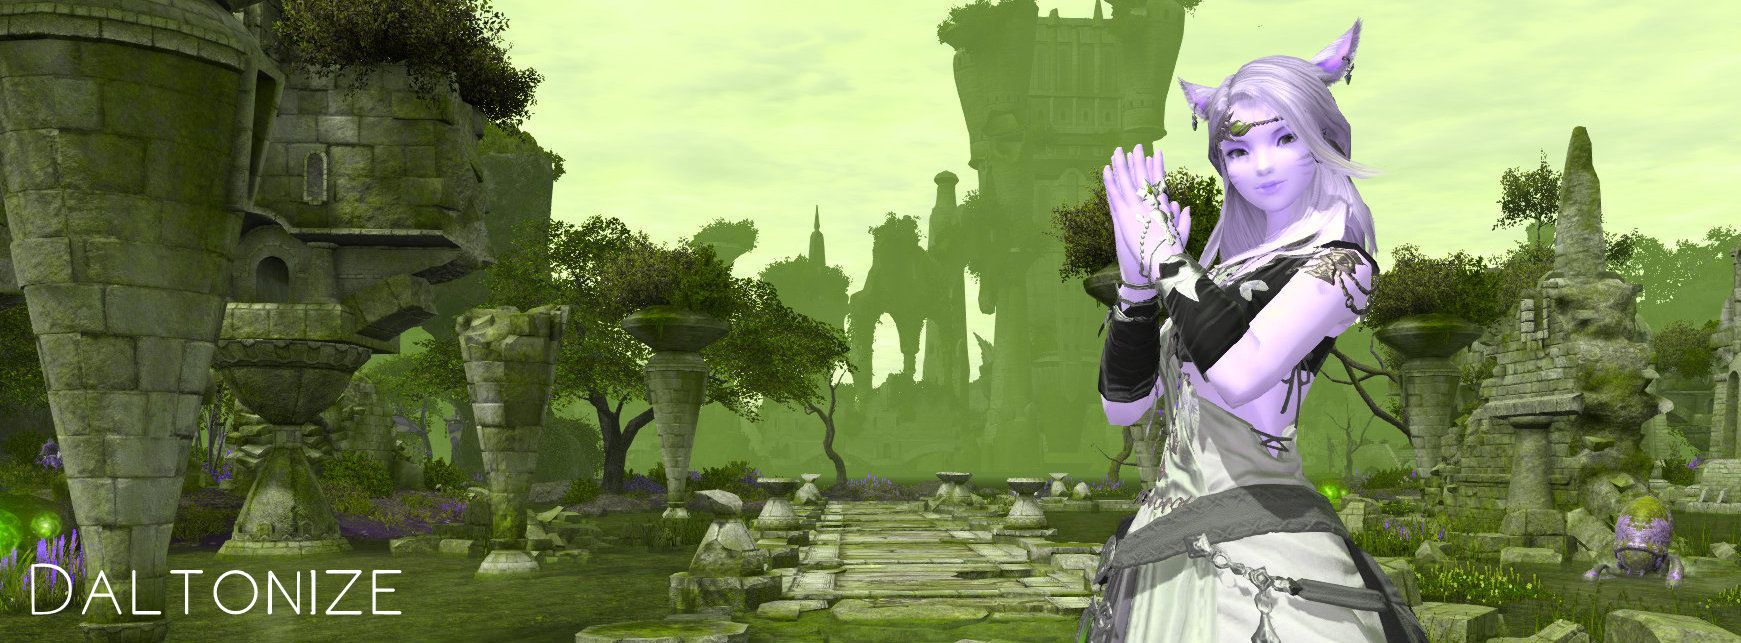
Daltonize
Daltonize adds a color-blind effect to the image. There are three variables to choose from, Tritanopia (pictured below), Deuteranopia and Protanopia.
 Deband
Deband will produce a noise-like effect over the image similar to the effect of the FilmGrain setting mentioned below.
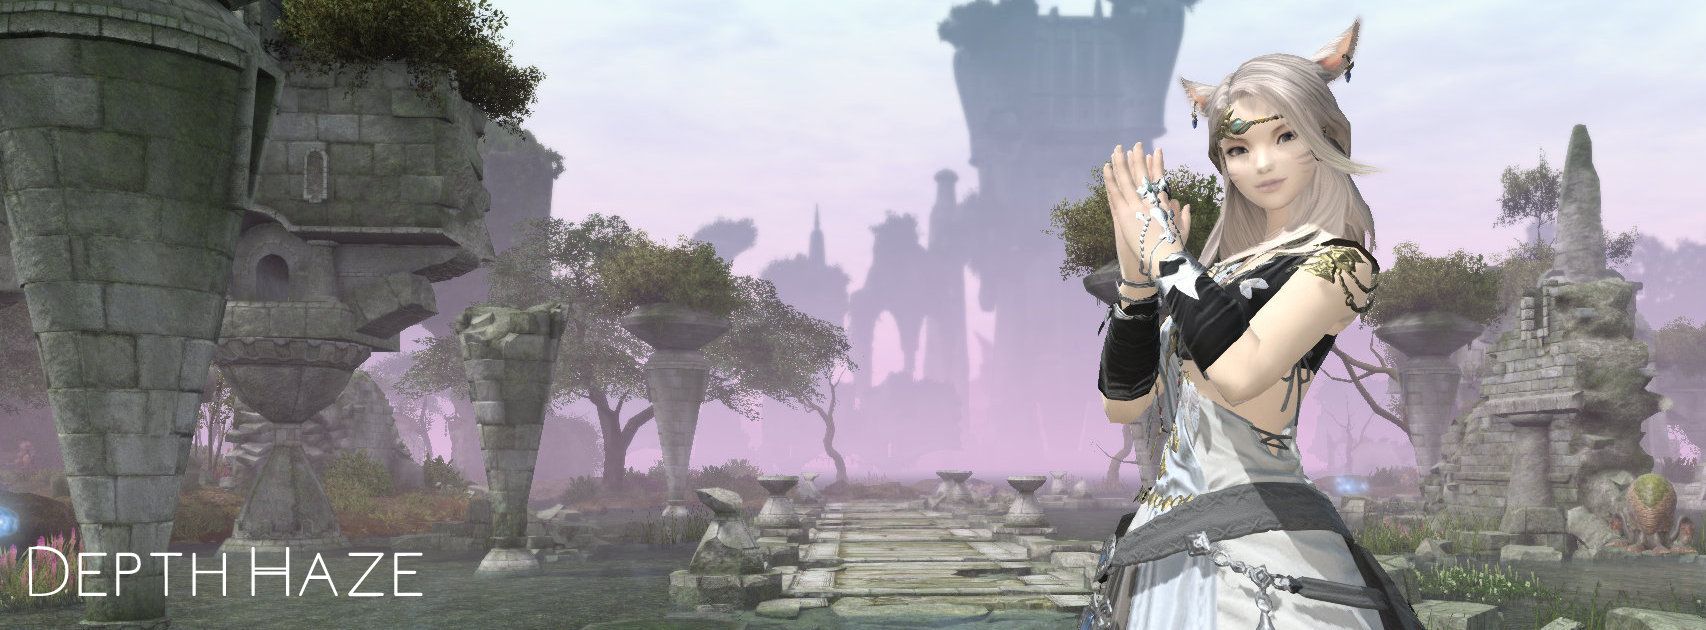
DepthHaze
Depth Haze is similar to Adaptive Fog as it places a fog effect in the far distance. In the image, I have put the EffectStrength slider at full (1.000) and selected pink for the FogColor (why not!), with the FogStart at it’s the lowest value (0.000) so it will be furthest away.
This preset is also wonderful for creating silhouette images for the background with the right configuration, currently, it works quite well in the background during a thunderstorm (with the correct location depth). Current location is listed above if you wanted to take a look.
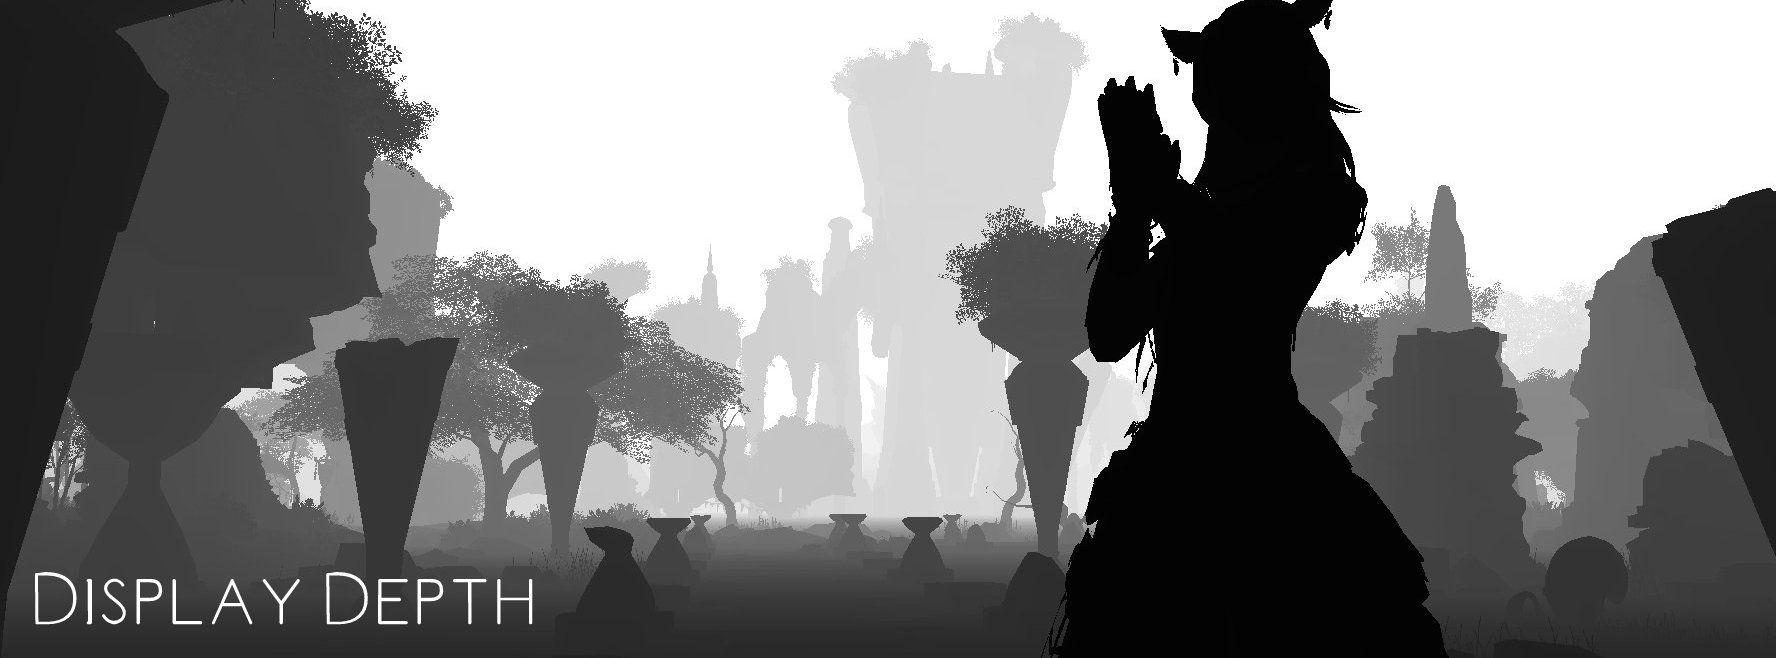
Display Depth*
This preset is location dependent and need lots of environmental depth/levels in order to work. If the conditions are not suitable the screen will go black. As mentioned above, try this at my location coordinates (or Limsa Lominsa for example) to determine whether this is a location problem or a graphics bug.
Display Depth works by graduating objects from the foreground to the background. Black is at the front and pale grey towards the back. I adore this preset for more abstract pieces.
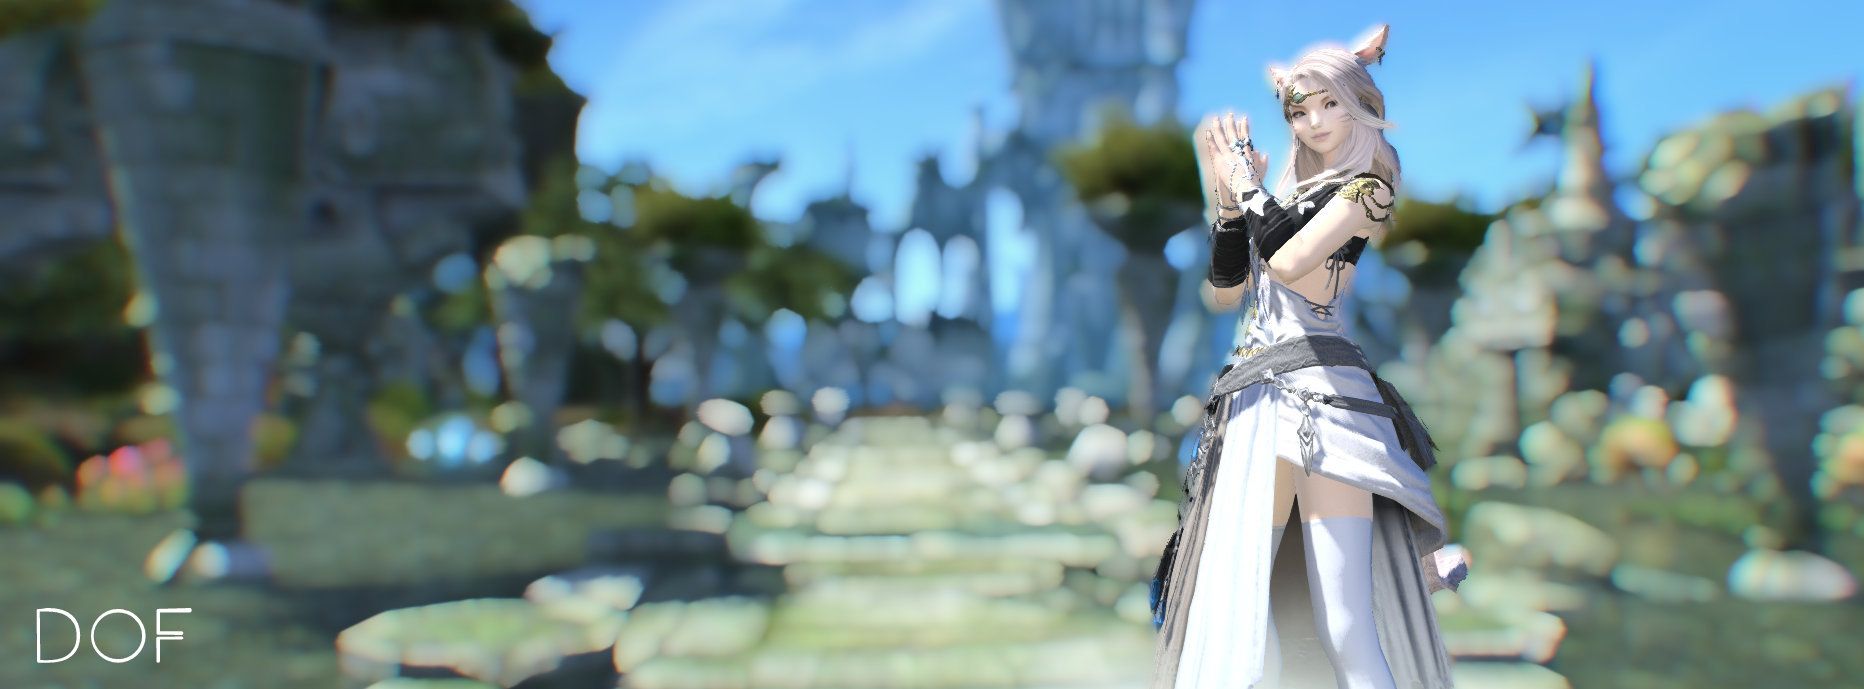
DoF*
As a photographer I enjoy creating depth of field in my images above any other style or aspect, the same goes for my Final Fantasy XIV images. The depth of field variables within the ReShade presets are possibly some of the more complex options in the lineup and can very easily break, so pay attention to what you are changing and note the value before changing it. If you make your color alterations before adding DoF, back up or duplicate your filter (in the copy and paste method mentioned in the introduction above). For this example, I have used the MatsoDOF setting. For a standard preset with simple DoF, I will turn on the DOF_AUTOFOCUS and DOF_MOUSEDRIVEN_AF in the general DoF settings. Mouse driven AF simply means the mouse will determine where the focal level lays. If I am creating a wedding filter or something that needs a constant background DoF I will turn off both the aforementioned settings and manually edit the DOF_FocalPoint (X/Y coordinates to focus to remain in a given area), the DOF_FocusRadius(200) and the DOF_NearBlurCurve (medium to high value). A more important thing to do is to keep the DOF_ManualFocusDepth low, and the DOF_InfiniateFocus high. I would love to go into these settings in greater detail but perhaps that will warrant its own article at a later date.
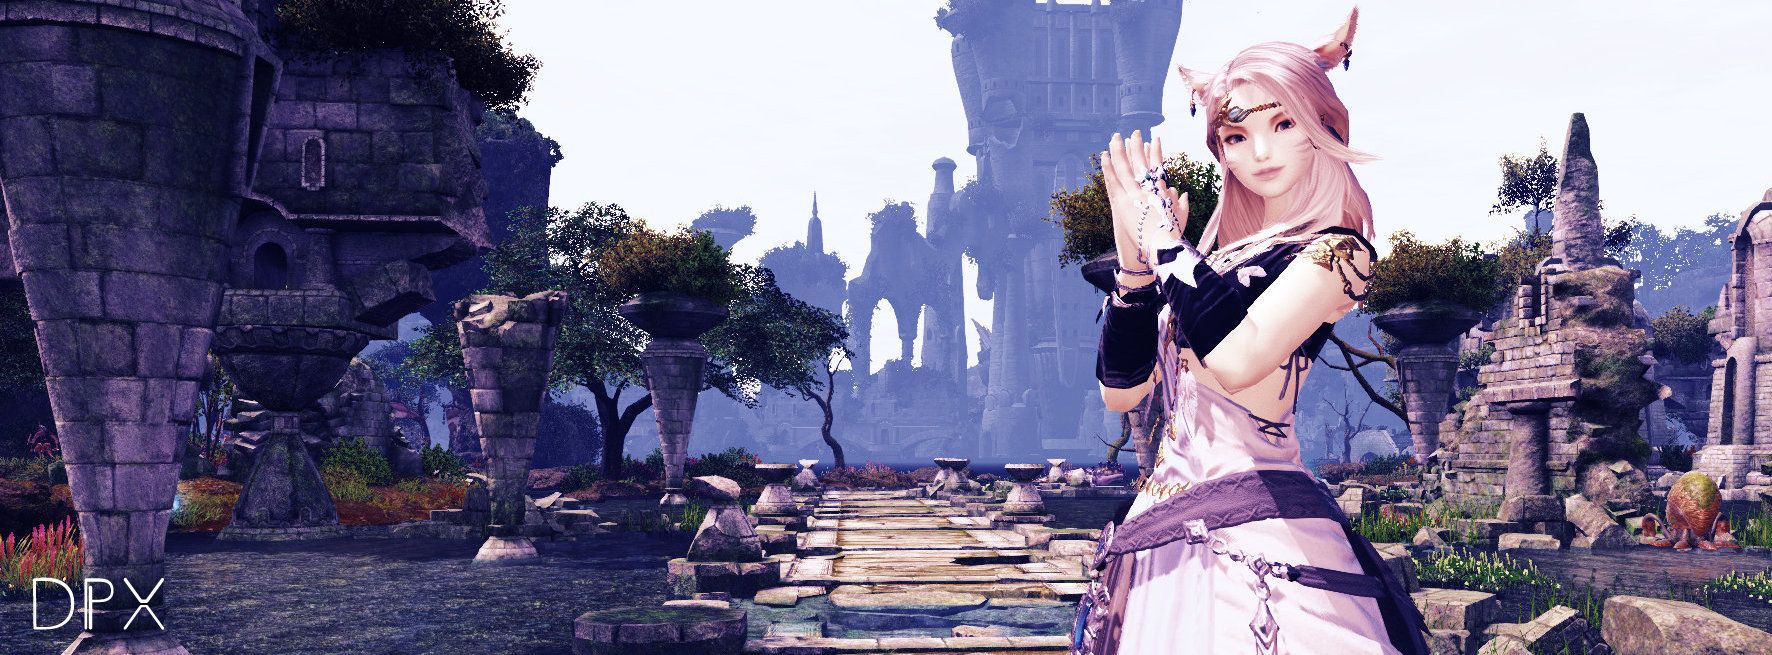
DPX*
DPX is a powerful preset in terms of the color manipulation of your image. You have control over Contrast, Saturation, Colorfulness, Strength, RBG Curve and RBGc.These settings are relatively safe to play about with to see the color alterations that can be achieved. I will also include my settings list used in the image below so that you are able to see exactly what I have used to achieve this look. Having a play works best for a preset such as this.
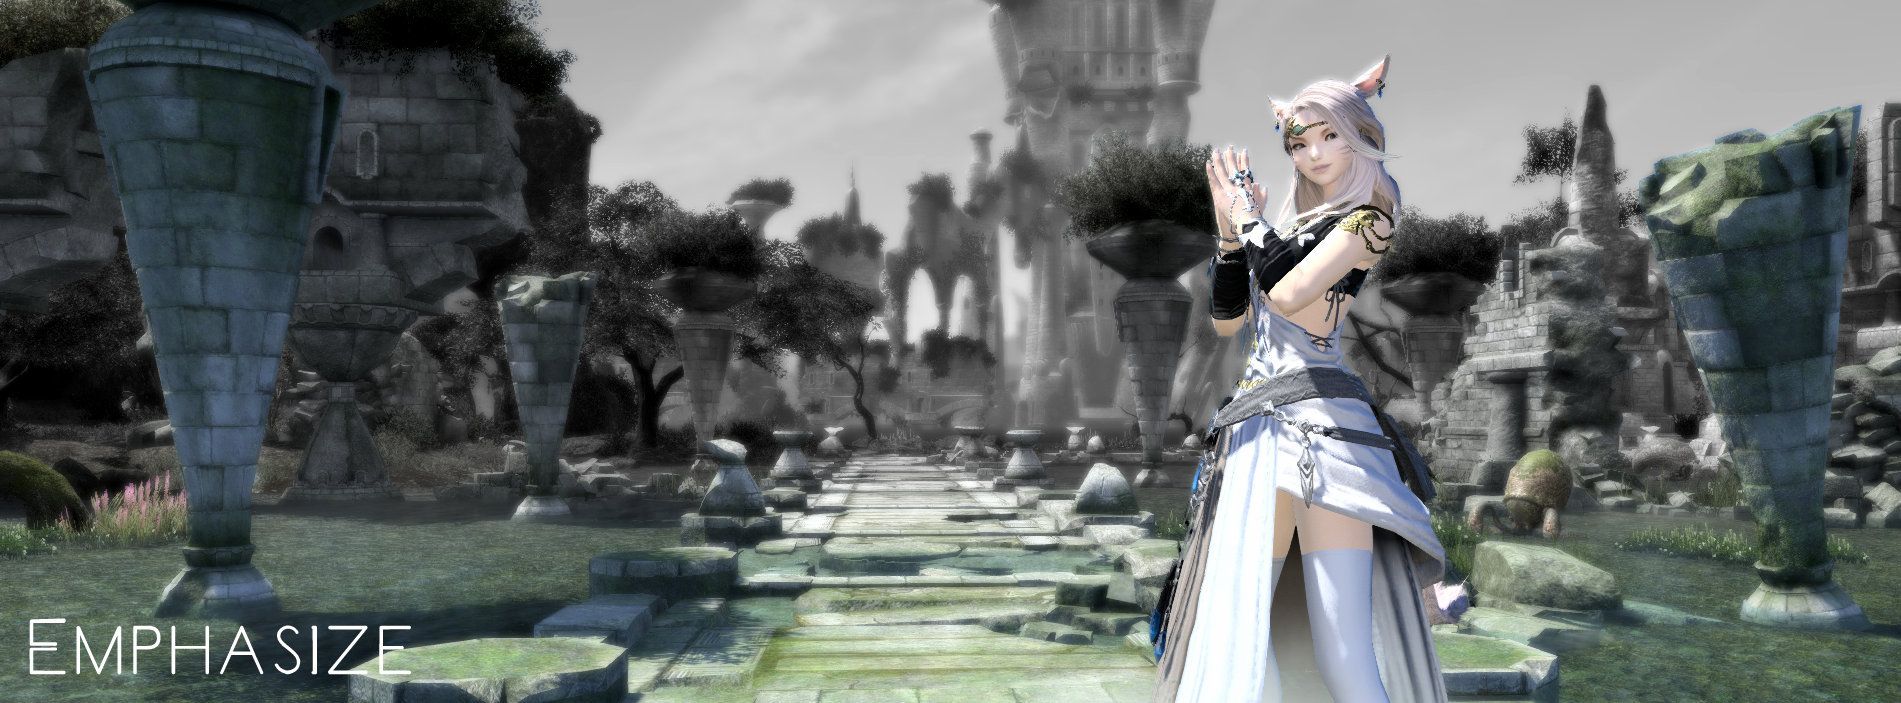
Emphasize*
Emphasize gives you color in the foreground of the image, with it fading out to grayscale in the background. You can manually alter where the color focus by using the FocusRangeDepth and the ManualFocusDepth.
FilmGrain 1 & 2
The Film Grain setting is designed to reproduce images in the style of the photographic techniques where a high ISO is used. I don’t often find much use for this setting (unless perhaps you are looking to create old-fashioned sepia Wild West imagery)! FilmGrain2 makes my head spin, and I don’t recommend looking at that at all (perhaps a bug!).
FineSharp Mode 1-3
Fine Sharp offers a more user-friendly sharpening alternative to Adaptive Sharp and has a minimal list of setting which will allow you to determine how strong or subtle the sharpening of the image is. Just beware, emphasizing too much detail is not always a good thing. Try different sharp modes at different distances and see which suits you the most for the preset you are trying to create.

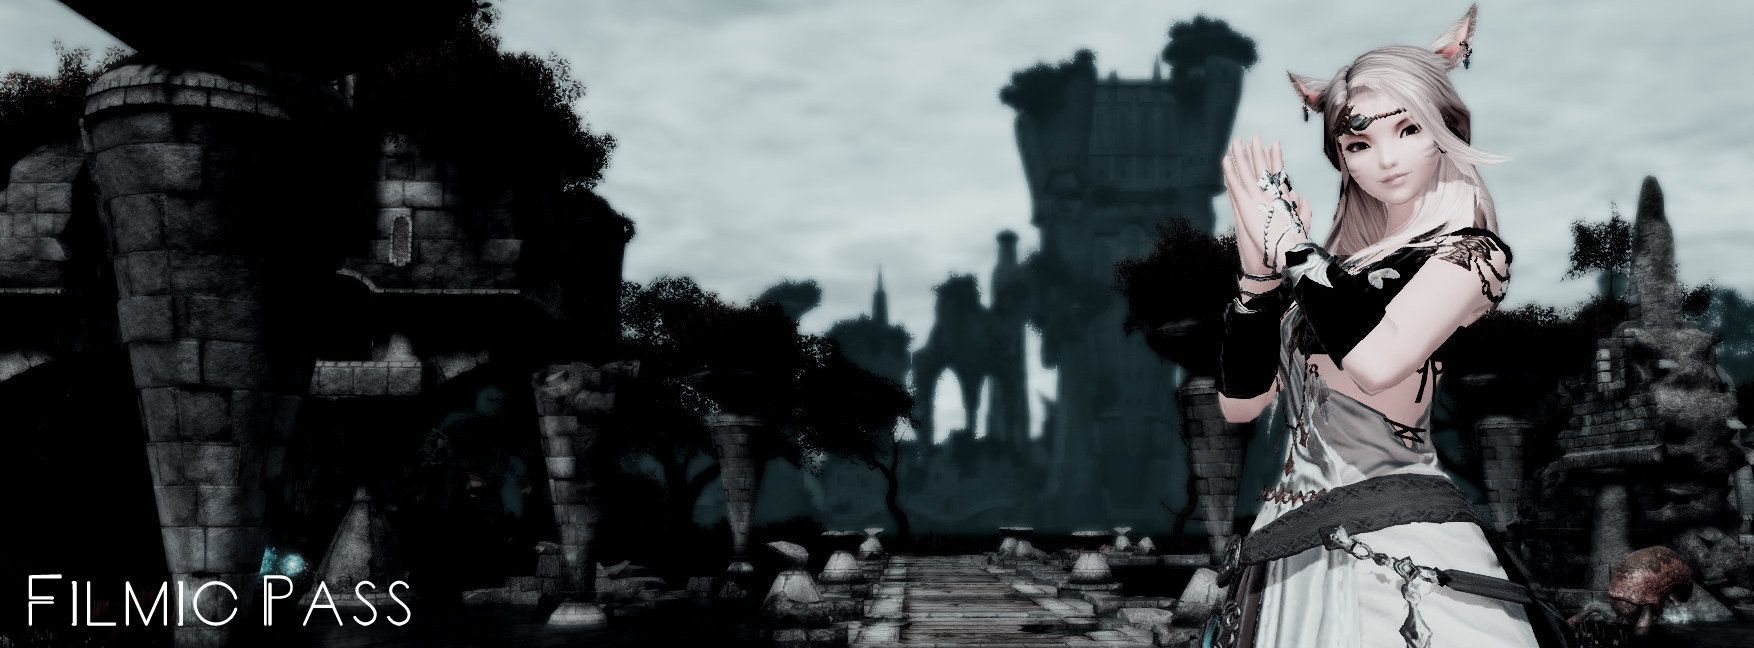
FilmicPass*
FilmingPass is a wonderful filter which can work well on its own and with others! It provides both contrast and background darkening. As there are so many settings to go for, I have included my preset values for the image below, so that you are able to recreate the image and have a play. The most important values to keep an eye on are Strength, Fade, Contrast, Linearization, Bleach, EffectGamma and Saturation. The values required for a daytime shot will be quite different as these values will over explode your character quite badly as they are designed to compensate for low light (the main culprit is the contrast slider, try changing that before any other setting if switching from dark to light).
FXAA
FXAA stands for Fast Approximate Anti-Aliasing originally created by a chap that works under NVIDIA. The job of this filter is, in short, is to smooths jagged areas. I haven't yet worked out a way to get this setting to work for me!
GaussianBlur
Adds a faint blurring over your image. Great for dreamy images, not so great if you are valuing the clarity and sharpness of an image.
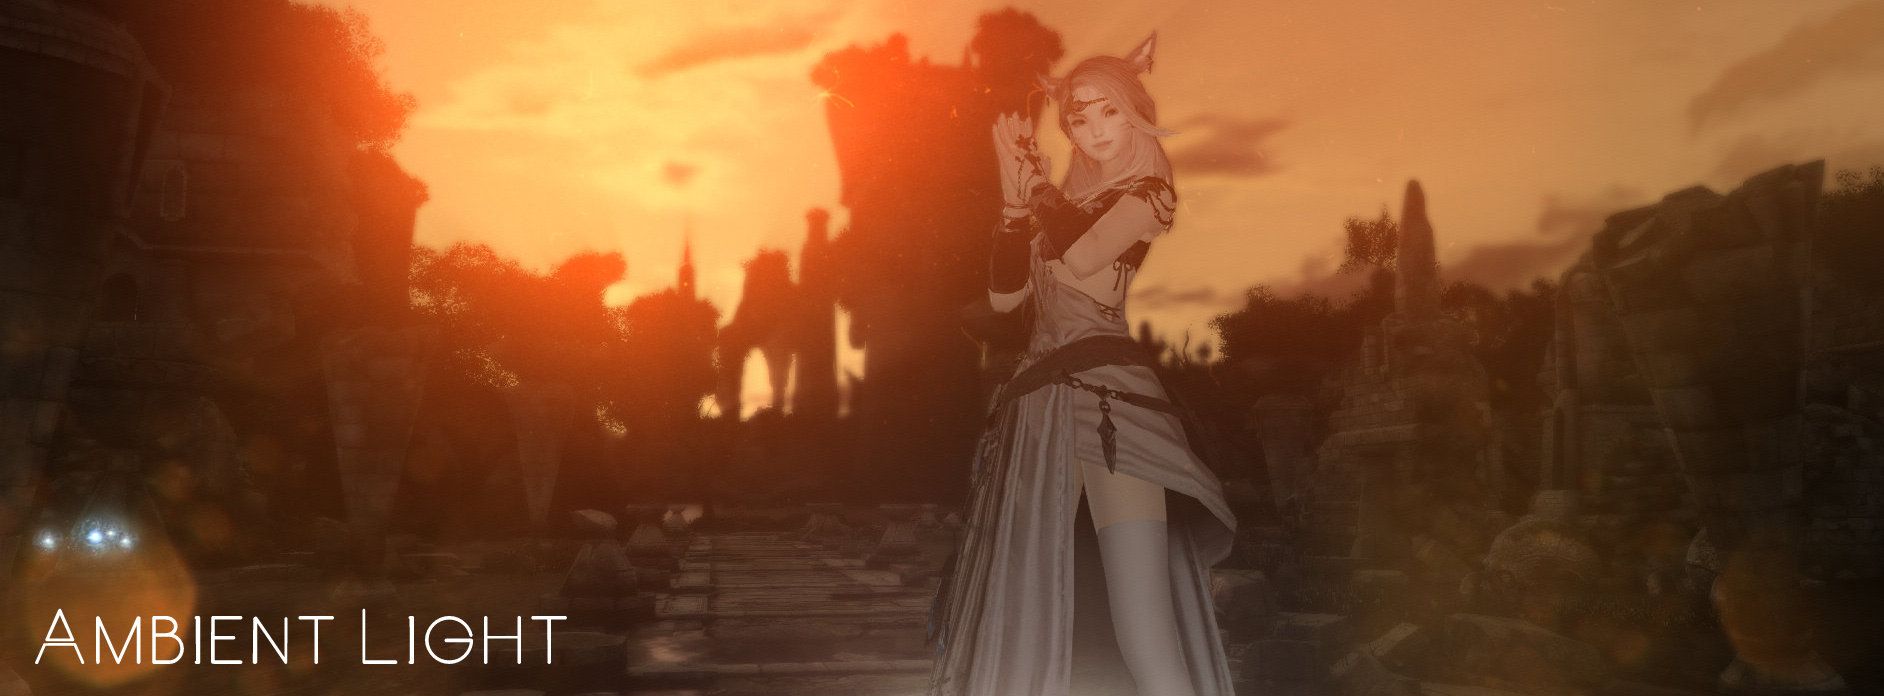
AmbientLight
This is a great setting for adding not only more light and contrast to your images but allows a subtle ‘bokeh’ type effect that I spent a very long time in the lens flare section looking for!
alDebug: Don’t worry about this, leave it off.
alInt: The base intensity of the Ambient Light. I set this on a high value at first so I can see what I’m able to play with. Having it on a high value allows you to see more clearly what the other variables do.
alThreshold: This doesn’t seem to work for me, it either makes no change or floods the screen with bright color. You can lessen the alInt to get more from this variable.
The AL_Adaptive dropdown also allows you to select whether you would like the light to be cool or warm.
HQ4X
HQ4X stands for High Quality, and then the value the image values are increased by, in this case, x4. In short, it makes things smooth, or in my case, very blurry! This setting is on me 'to investigate' pile.
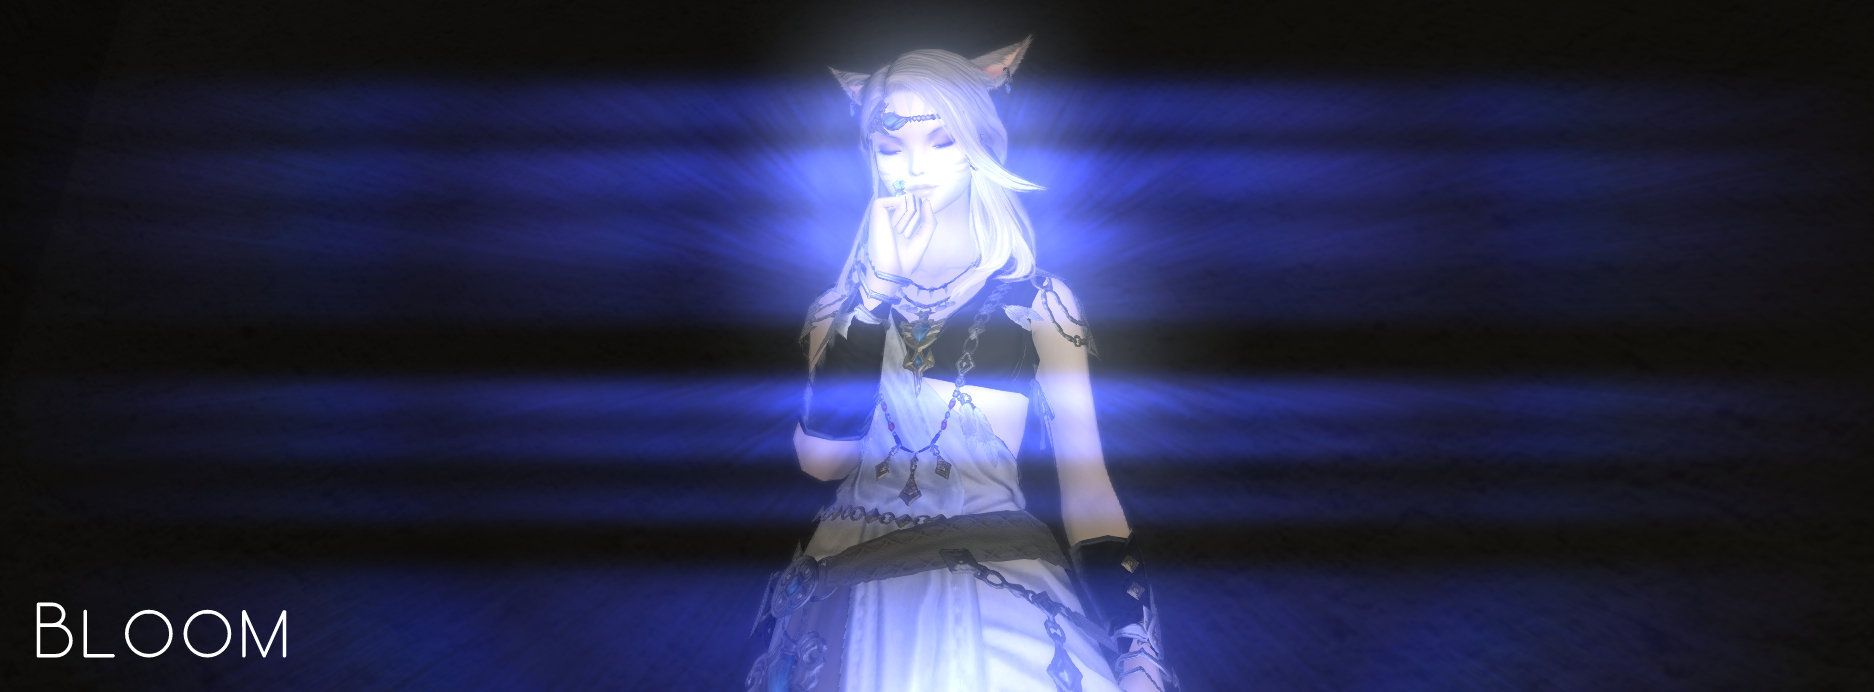
Bloom* (Bloom & Lensflare).
You will need to be near place a light source in GPose to get the most out of testing this shader. The list of settings is extensive so I will provide the setting list below the image. If you wish, you can then replicate the variables and hopefully, you will be get an idea of how the shader could work. The image below has Novi positioned against a dark background with one light source (at level 1 intensity) positioned a few feet in front of her. As with the DoF settings, I may elaborate on this shader in a future article to show some more variations and capabilities of the shader.
LumaSharpen
Yet another sharpening option, however, the difference with Luma is that the sharpening is a little softer, there is a list of presets, and you can even set it to show you the sharpened areas (show_sharpen) so that you gain more control over the sharpening process.
MagicBloom
This shader is ideal if you want to add a slight bloom to your image without losing too much clarity. It is a wonderful effect, but often bugged regardless of which game you use it in. As soon as you exit the ReShade menu it turns the filter off. Not so magic after all. It’s great when it’s working though!
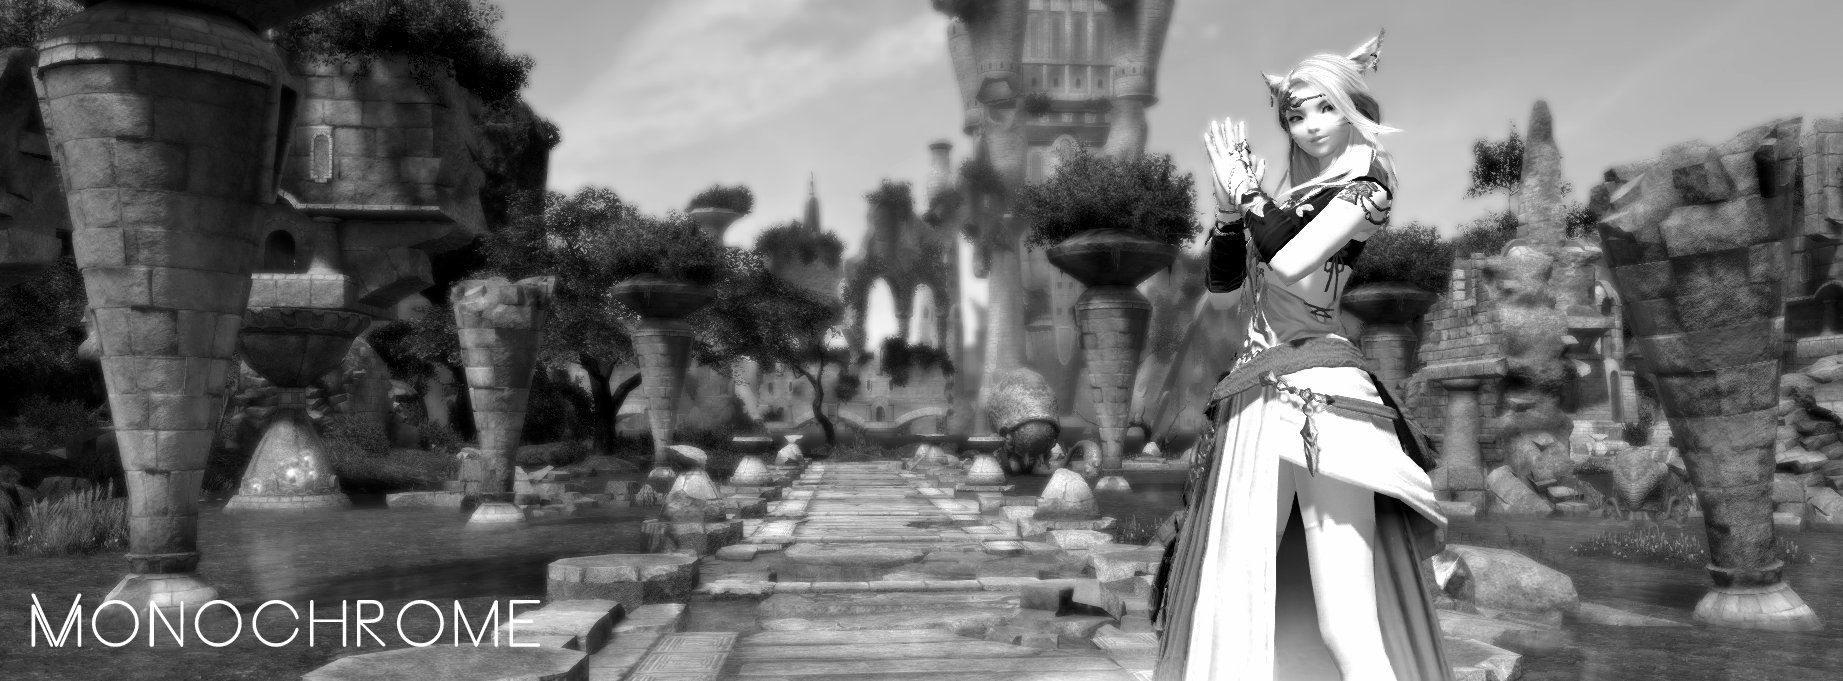
Monochrome
The black and white setting, quite basic. RBG sliders will determine how the monochrome filter will tackle corresponding colors.
MXAO*
"MXAO can both apply little shading almost for free or heavy shading for screenshots to completely change the look of the scenery.” Source.
In Final Fantasy XIV ReShade, MXAO creates a very noticeable difference between images, creating depth and shade. It's very rare that I don’t use this within one of my presets. Keep in mind that this is an environmentally dependent preset, so one set of values may work for certain hairstyles, yet for others, you might have to pull the slider to the opposite side and lessen the intensity to create a more subtle effect or compensate for certain shapes. The most important slider here is Sample Radius (determines where the shadow will sit), so set that first before altering the others.


Sepia*
Sepia is a handy setting to use if you wish to subtly tint one of your presets. Just modify the RGB value (or enter your desired hex code) and adjust the strength. After using Sepia I would usually go back to other color/tone management settings to adjust the contrast appropriately.
SurfaceBlur
Adds a blanket blur to the image and the settings determine the depth. To increase the intensity of the blur, increase the values of the BlurRadius, BlurOffset, and BlurStrength. I’ve not yet found a use for this one!
Technicolor 1 & 2
The technicolor setting aims to recreate the Technicolour three-strip process. Technicolor 2 has slightly more versatility and may play a useful part in slight alterations of color in conjunction with other settings. However, I feel that other color altering options work well and have a wider array of variables such as DPX.
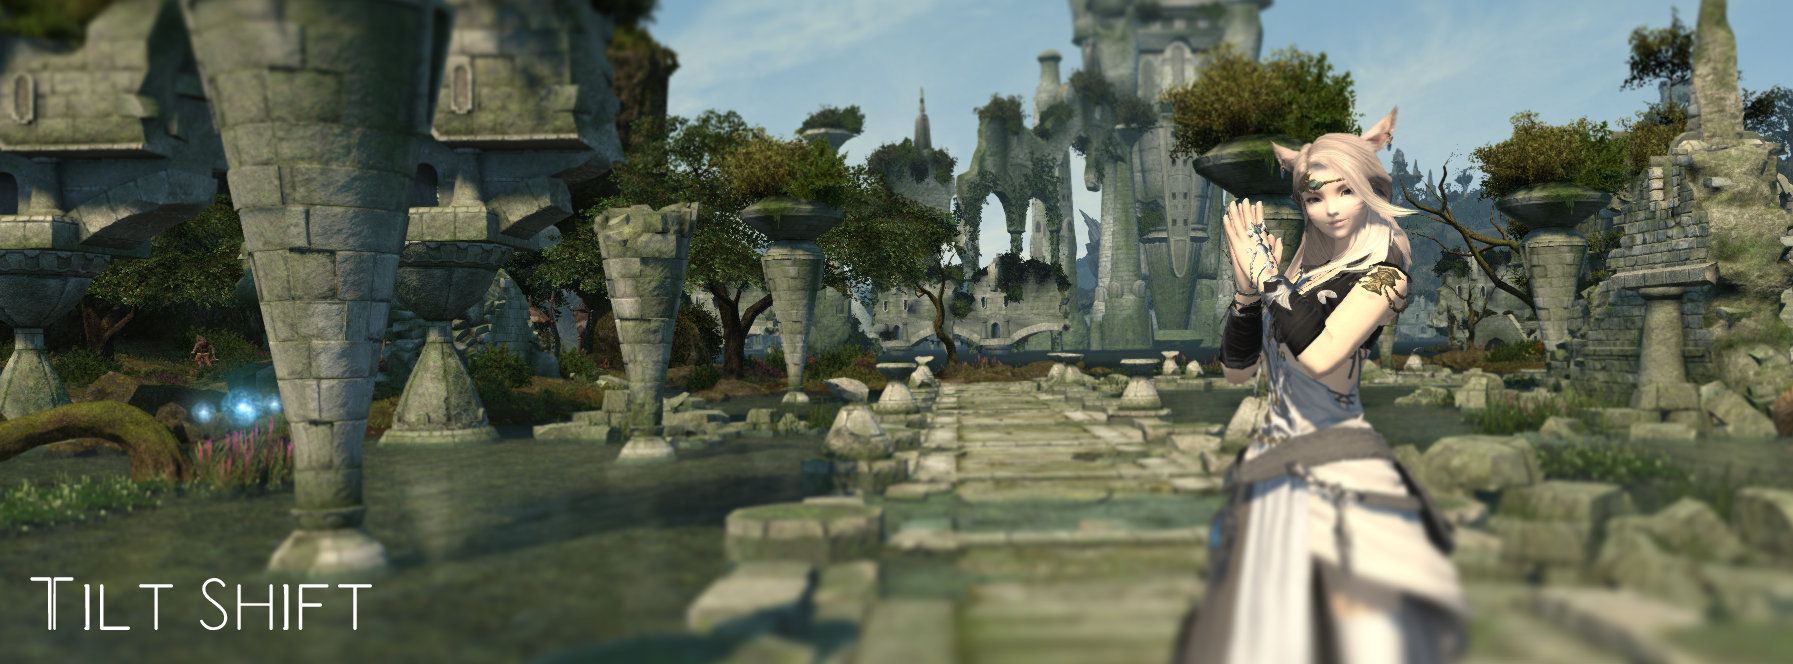
TiltShift
Tilt-shift is a wonderful technique in both photography and in-game and can be used in images to enhance the area of focus by blurring certain other areas, most commonly in a band. In Reshade it’s a good idea to start by having the Show Center Line on, as this will help you to place your central focus point. Use the offset to determine where the line places on the horizontal axis first which will be your central point of focus. Then use the Axis value if you wish to tilt that line. The Blur Curve will determine the width of the central area of focus and the Blur Multiplier will increase or decrease the amount of blur in the lower and upper sections. Remember to turn off the Show Center Line once you have placed the tilt-shift at the desired location.
Tonemap*
Tonemap is another color manipulation setting incorporating Gamma, Exposure, Saturation, and Bleach. However, the most important feature of Tonemap is the Defog setting. The color you choose in the bottom right is the color it will remove from the image. Playing with the RGB sliders will give you an idea of how this works in practice (I've removed orange tones in the image below).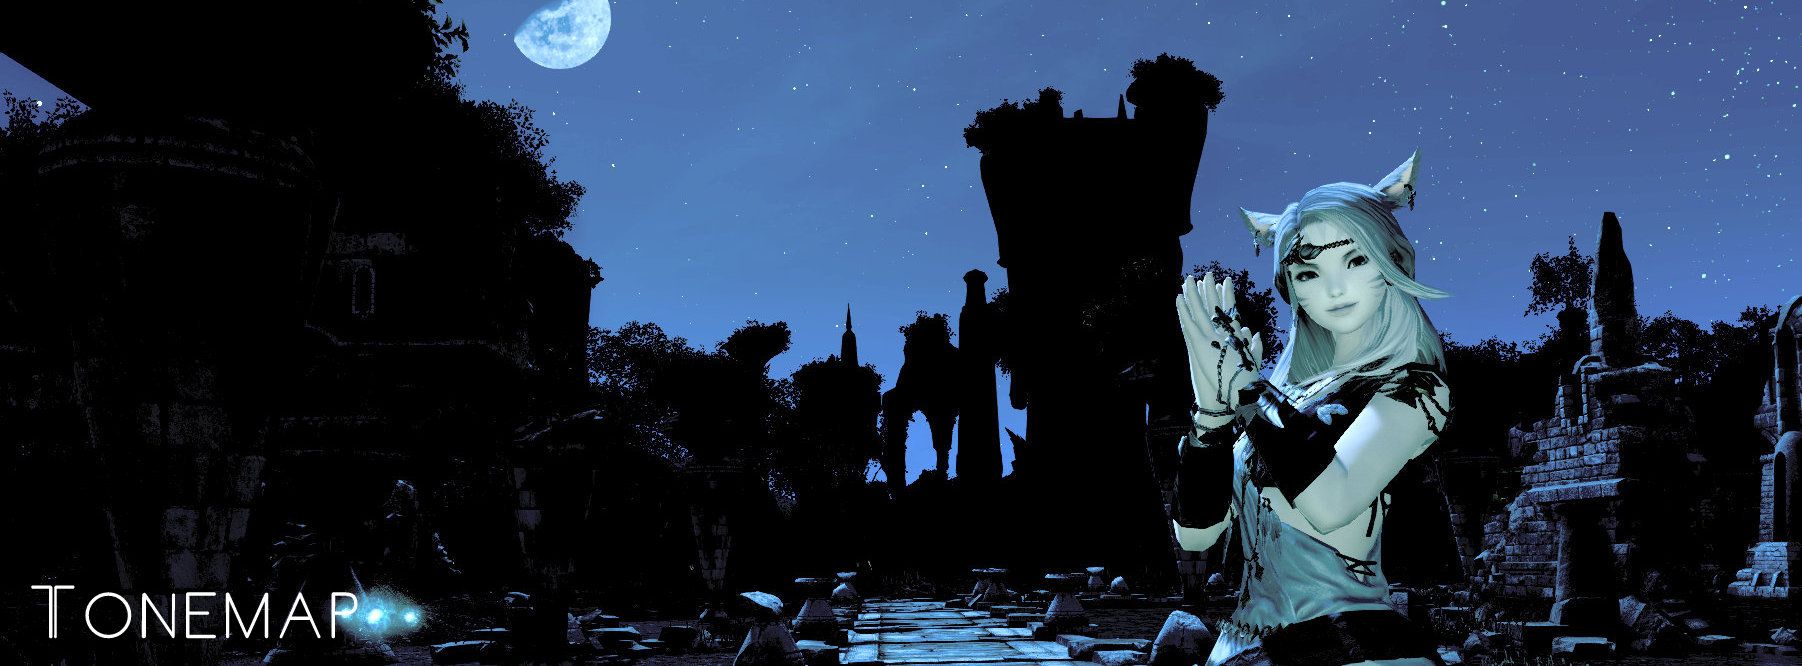
UIMask Imports an image from the ReShade-shaders directory and displays it over your screenshot.
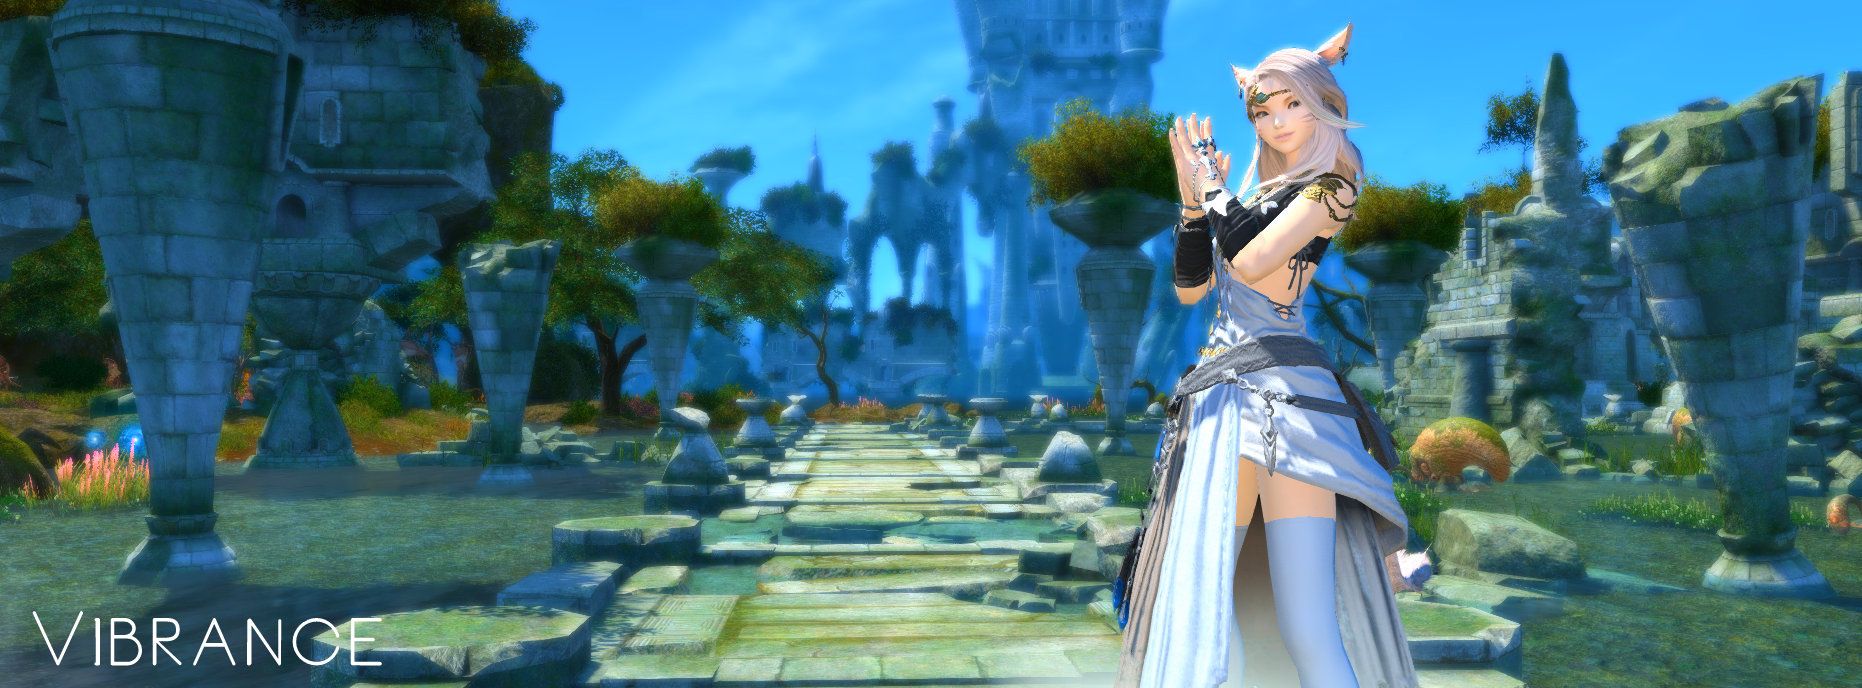
Vibrance*
Vibrance allows more control over the saturation of specific RGB values. If you wish to highlight a certain set of colors this setting might be useful.
Vignette
Adds darkness to the corners, recreating the somewhat overused ye’olde Instagram filter or the more standard definition of the reduction of an image's brightness or saturation towards the outer corners.
Final Thoughts
To round things up, here is a list of presets that I frequently use when creating a new filter and which I think may deserve a more attention compared to other minor settings: Clarity, AdaptiveSharpen, Colorfulness, DisplayDepth, DoF, DPX, Emphasize, FilmicPass, Bloom, MXAO, Sepia, and Tonemap.
I apologize if there are any mistakes in here (and that I could not go over every single setting!), I am still learning myself but I wished to share what I have gathered so far. If you have any questions or comments please drop me a message here, on Twitter or the through the Screenographic website which houses my portfolio.
Related Articles:
Thank you for reading and I really do hope something in here will help someone! Now it’s your turn, go play and combine all the things! Let me know how you get on.